In this article I’ll give short instructions on how to install LAMP stack on Linux (in this case Linux Mint version 19.2). With a short explanation of what LAMP stack is. Separate post explains how to create a database using PhpMyAdmin and add user privileges. For Windows see the post: How to install WAMP.
Table Of Contents (T.O.C.):
- What is LAMP?
- How to install LAMP to a Linux computer
2.1. Linux update
2.2. Installing LAMP server
2.3. Setting up MySQL root password
2.4. Installing phpMyAdmin - Installing PHP extensions
- (File) Paths explained
- Other options (Flywheel, Softaculous)
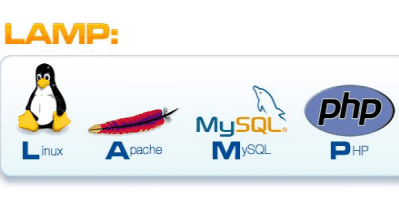
1. What is LAMP?
LAMP is, to oversimplify it, an acronym for Linux Apache MySQL PHP. It is an environment for developing and deploying web applications and websites. Each component is Free Open Source Software (FOSS).
- Linux is the operating system on which it all runs.
- Apache is the web server (though NginX can also be used instead).
- MySQL (or MariaDB) is the relational database management system.
- PHP (or Python, Perl) is the language for running scripts.
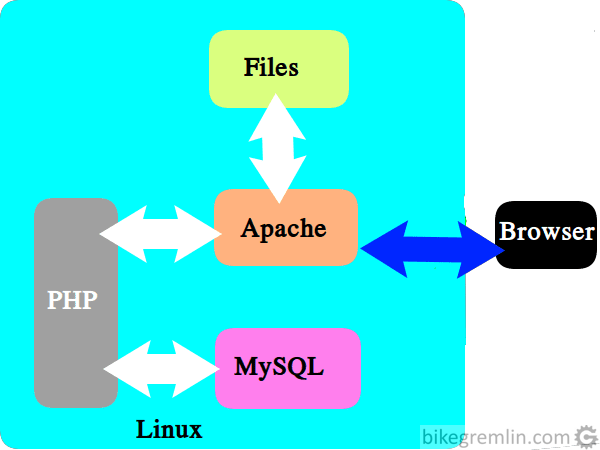
Picture 1
This is the basic principle on which all the websites work. Understanding this environment and the relations within it helps solving any potential problems. However, in this post I won’t be going into details on LAMP itself, but focus on showing how to install it on a Linux computer.
2. How to install LAMP to a Linux computer
Simple, step by step, with minimum explanations:
2.1. Linux update
Open the terminal (CTRL + ALT + T) and first update Linux:
sudo apt-get update
sudo apt-get upgrade
Code can be copied (line by line) and pasted into the terminal (CTRL + ALT + V for paste).
2.2. Installing LAMP server
Next step is installing LAMP server:
sudo apt-get install lamp-server^” ^ ” at the end is not a typing error, it should be included.
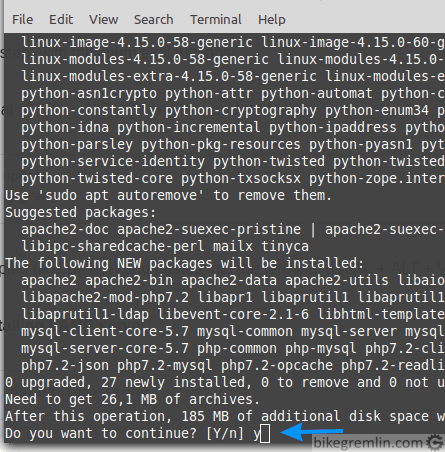
Picture 2
Check if Apache is working, by typing “localhost” to in your browser:
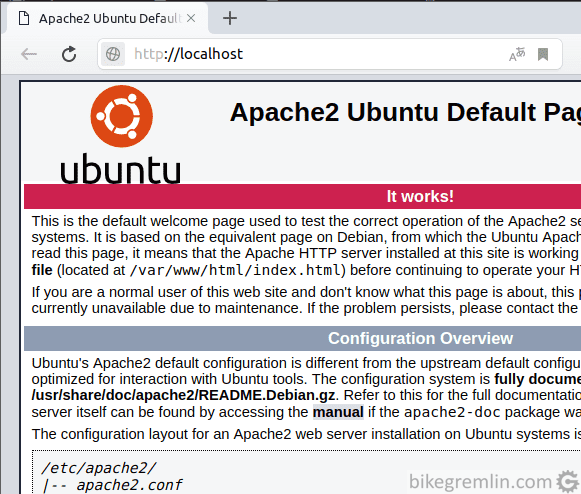
Picture 3
2.3. Setting up MySQL root password
In terminal type:
sudo mysql -u rootAfter this command, you’ll be in the mysql> prompt, where you should enter the following:
ALTER USER 'root'@'localhost' IDENTIFIED WITH mysql_native_password BY 'new-password';Replace “new-password” with a strong password you will memorize. If all went well, you’ll see:
“Query OK, 0 rows affected (0.00 sec)”.
Then exit mysql prompt by typing:
quitNow restart mysql using the command:
sudo service mysql restart
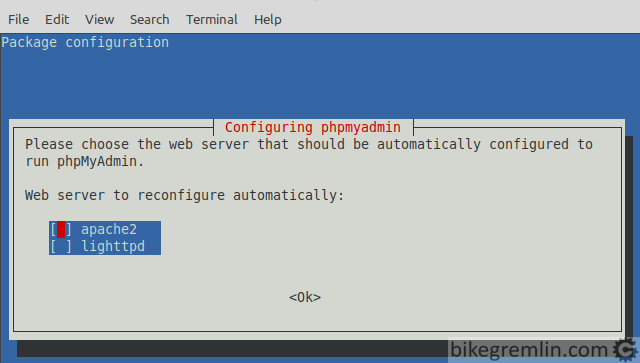
2.4. Installing phpMyAdmin
Terminal again:
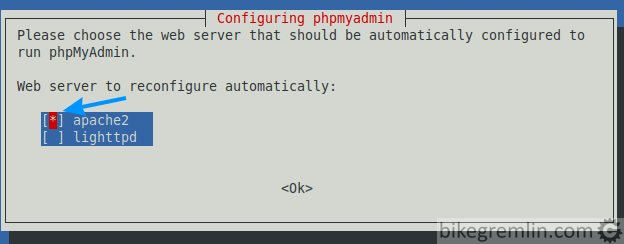
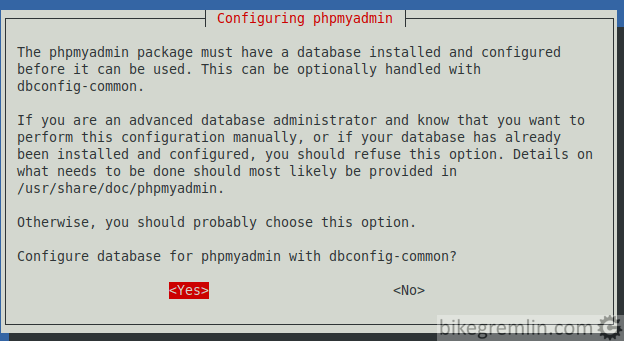
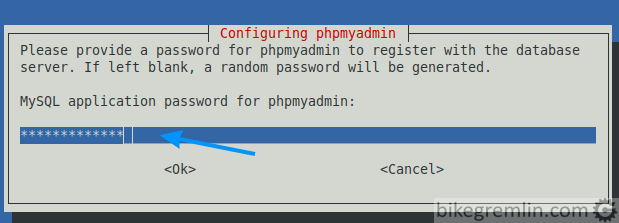
sudo apt-get install phpmyadminLook at the pictures 4 and 5 – that is how phpMyAdmin is set up to work with Apache2 server.
Picture 4
Picture 5
Picture 6
Picture 7
Check if it works, typing this in your browser:
http://localhost/phpmyadmin/You should get something like this (logging in with “phpmyadmin” username and the password set in picture 7):
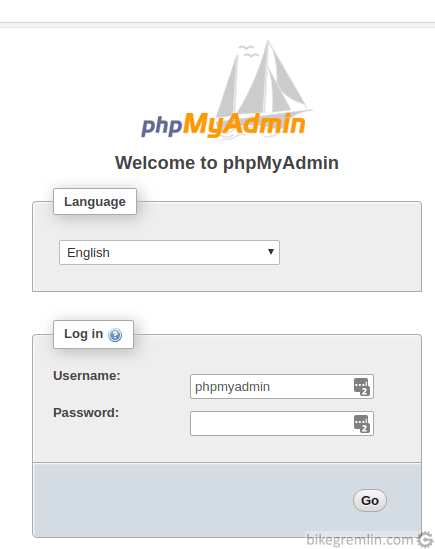
Picture 8
In case it doesn’t work (404 error), try the following commands in terminal:
sudo ln -s /etc/phpmyadmin/apache.conf /etc/apache2/conf-available/phpmyadmin.conf
sudo a2enconf phpmyadmin.conf
sudo systemctl restart apache2
3. Installing PHP extensions
PHP extensions are compiled libraries that allow various functionalities. To see the version, setup and the installed extensions of the PHP, do the following:
Open a text editor, copy paste the following code and save it as “phpinfo.php”:
<?php phpinfo(); ?>Now that file needs to be copied to directory:
/var/www/html/
You can’t copy to this directory without root access. So open terminal and type:
sudo nemoThis will start the Nemo file manager with root privileges. Allowing you to copy/paste the file. After copying, type in your browser:
http://localhost/phpinfo.phpLooking at the extensions list, I noticed that imagick I use is missing. It is installed with the following command in terminal:
apt install php-imagick -yNow just restart the Apache2 server:
sudo service apache2 restartWhat’s left now is to create a database in PhpMyAdmin and start making websites.
And that’s it. Faster than you could say “Supercalifragilisticexpialidocious!” 🙂
4. (File) Paths explained
Thanks to this question/feedback, I’m adding the info to this article – in case it helps anyone else.
When you try to open http://localhost/, your MAMP server will look for an “index.htm“, “index.html”, or “index.php” files on this path:
/var/www/html/
If you wish to run some other, particular file, say “phpinfo.php”, stored as /var/www/html/phpinfo.php, your browser address should be:
http://loalchost/phpinfo.php
Same goes for files, or website installations placed in a subdirectory. Say we install WordPress in a subdirectory named “wordpress-test01”, its path being: /var/www/html/wordpress-test01/. Running the installation (or the website itself, after having run the famous “5-minute installation”) would be done by visiting the following address from our browser:
http://localhost/wordpress-test01/
5. Other options (Flywheel, Softaculous)
Sometimes, for whatever reason, installing MAMP is not the most practical solution. Other, rather practical (and free) alternatives are the following:
- Local by Flywheel – run on your computer
- Softaculous – run on a (shared) hosting server
There are countless other options as well, but these are the one’s I’ve “played with” the most and the ones I find the most practical. I wrote about these in separate articles:
- How to install and configure Local by Flywheel.
- Softaculous – what it is and how to create a staging WordPress website using this tool.
For any comments or questions regarding this article, please use this BikeGremlin Forum thread:
https://www.bikegremlin.net/threads/lamp-stack-install-on-linux-mint-19-article-comments.99/
The starting level was slightly above nothing at all, but I want to try and persevere. The course so far has been very good, the guy hosting it is nearer my own age and has a reassuring style and also says the same as you’ve just said-that it’s so broad and deep no-one can know it all.
I know the course will give me a good overview of things with a possible entry point into several different directions, and I like that idea of not feeling a stranger whichever path I choose even if I’m no expert. It’s offers the confidence to know you can learn more.
I’m going to read a little bit more about Local by Flywheel to see what it is-I googled it just now to get a basic definition. I think the HTML/CSS/JS might have given me a false sense of security and now with PHP it gets serious. However it goes I’ll let you know when I’m on the other side, thanks again 🙂
Thank You Very Much! I Love This Tutorial.
I’ve looked at a number of LAMP install on Linux pages and, IMHO, this is far and away the best. Thanks very much.
The only (slight, rather insignificant) variation I made was to call “sudo nano” in the terminal, paste in “” and then save the file to “/var/www/html/phpinfo.php”.
I’m now off to follow the link “create database in PhpMyAdmin”
best regards 🙂
sorry for the typo in the above post, should be paste in “”
Excelente explicación muchas gracias