Update:
This article still nicely explains email client configuration (step-by-step with images), even though Google is removing the here-described reliable POP3 email integration option from the start of 2026:
https://support.google.com/mail/answer/16604719?hl=en
My current email setup is explained here (keeping that up-to-date)
E-mails stored on a website hosting server take up space and the limited number of files (iNodes). Likewise, storing emails on your hosting server complicates website migration. In this article, I’ll explain:
- How to store your domain’s e-mails on your Gmail account.
- How to send e-mails as [email protected], instead of [email protected], from your Gmail account.
- How to receive mails sent to [email protected] to your Gmail account.
1. Introduction
Since e-mails are important for business correspondence, I prefer storing them “in the cloud”. Also, such a setup makes website migration easier and faster.
Integration with e-mail clients other than Gmail (like Mozilla Thunderbird, for example) is done using a similar principle. Also, mail clients can be configured to leave e-mail copies on the server, either permanently or for a limited time (30 days or so).
In order to easily understand the instructions given here, you should understand and gather the needed information as explained in the post: E-mail setup in cPanel and DNS. Picture 1 below shows a brief reminder:
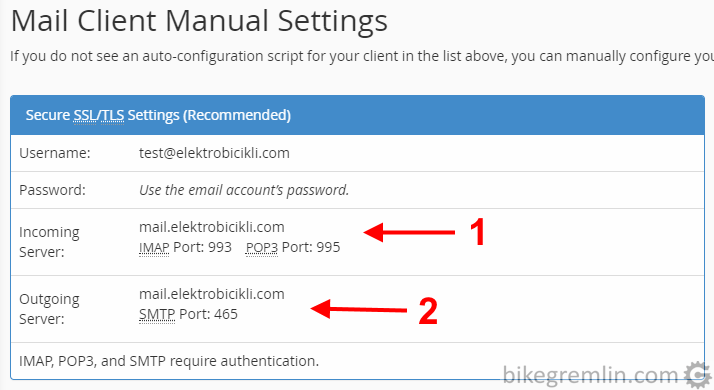
Incoming server name and ports (1)
Outgoing server name and ports (2)
Picture 1
Take the time, do as explained in the noted article, write down the needed information, and then continue reading here. If you are using another (hosted) email solution, the procedure is very similar, as explained in the post about the MXroute email setup.
It is also understood you have a Gmail account, of course.
2. Setting up sending with SMTP from Gmail
First, we will set up e-mail sending using SMTP. Open your Gmail account, then click on the small sprocket (“Settings”).
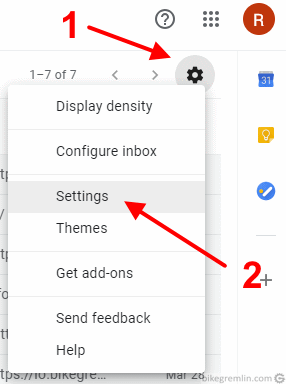
Picture 2
Then click on “Accounts and Import” -> “Add another email address”.
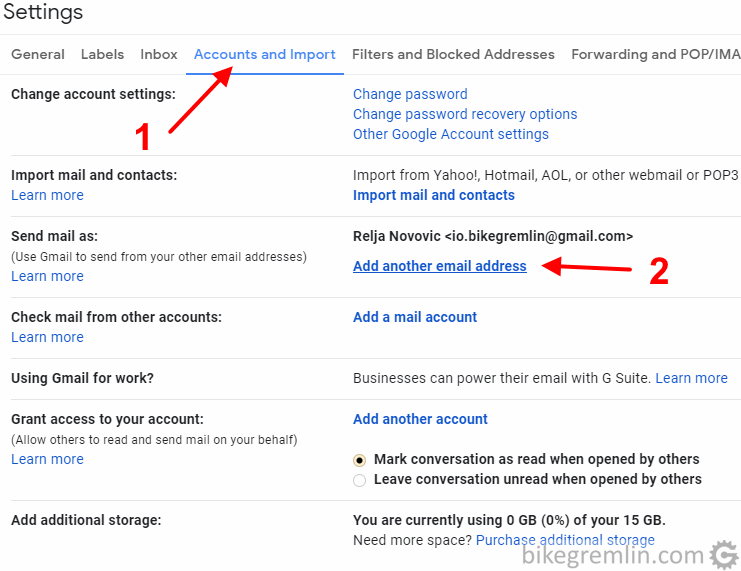
Picture 3
After clicking the option (2) in picture 3, you’ll get a pop-up window to set up the account.
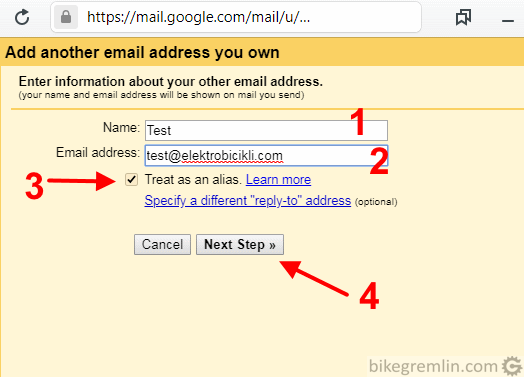
Enter the e-mail address you’ll be using (2)
Check “Treat as an alias” (3)
Click “Next Step” (4)
Picture 4
After clicking on “Next Step”, you get the following screen:
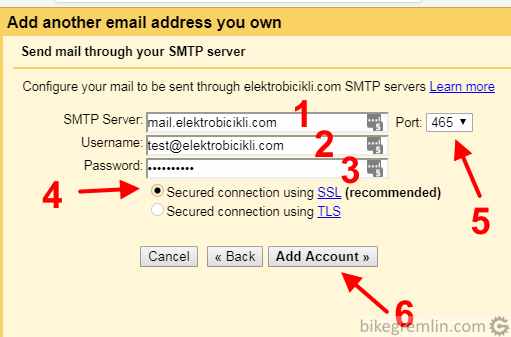
Choose the option as shown in picture (4)
Choose the port your SMTP server uses (5)
Then click “Add Account” (6)
Picture 5
Don’t let point (4) in the picture above confuse you – that is the safer option, and TLS encryption will be used (if the certificate and the hosting server allow it, as they should).
Now you should receive an e-mail with a control code that should be entered, as shown in picture 7. E-mail can be checked from cPanel’s webmail.
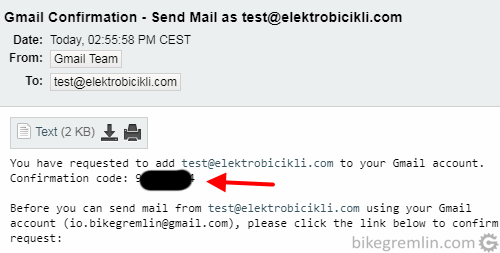
Picture 6
The verification code should be copied to Google’s window:
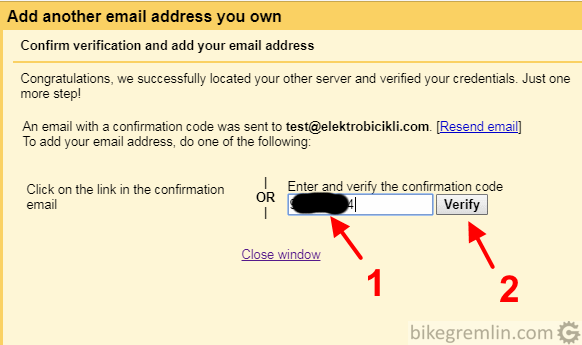
Picture 7
Now you can choose the default sending address for the Gmail account:
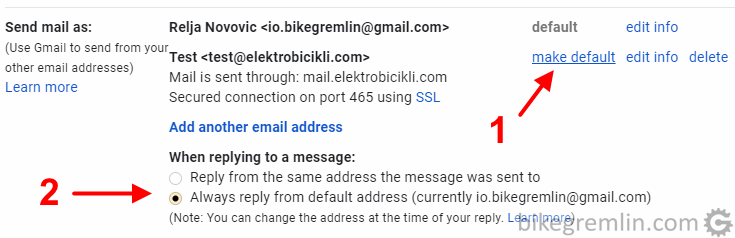
Clicking (1) will change the default address shown next to (2)
Picture 8
This concludes the Gmail setup for sending e-mails using the website’s SMTP. Testing is explained in chapter 4.
3. Setup receiving POP3 email to Gmail
How to set up e-mails sent to the website’s address to be received to Gmail, and deleted off the hosting server, so they don’t fill up the inbox there.
Go to Gmail account settings, as shown in picture 2. Only this time choose “Add a mail account”.
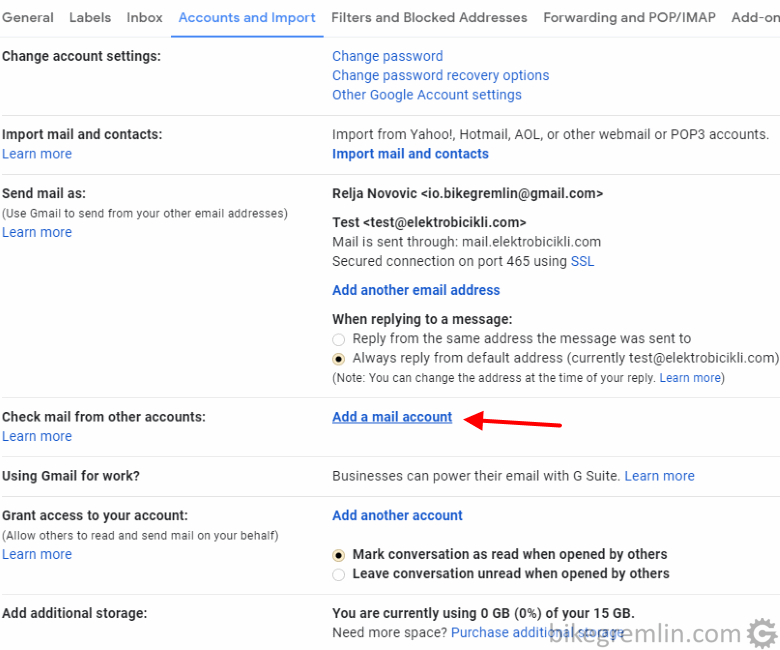
Picture 9
After this, you’ll get a pop-up screen to enter the e-mail address:
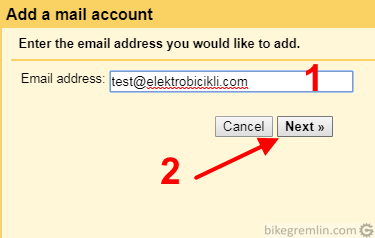
Picture 10
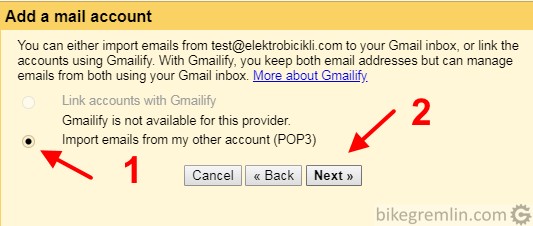
Picture 11
Now you will need the info shown in picture 1 and explained in chapter 1 (you might want to re-read it if picture 12 is not clear enough). In this case, the POP3 port for TLS connection is 995, so we’ll use that:
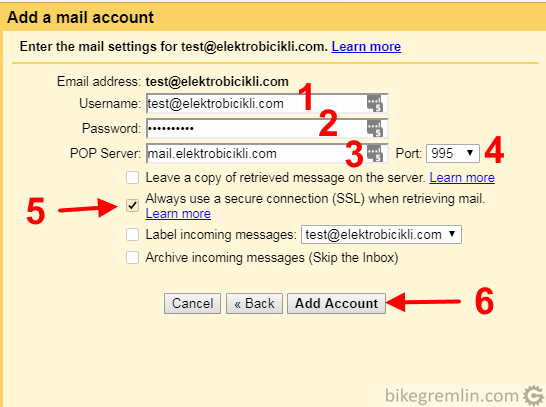
Choose other options as shown in picture (5)
Click “Add Account” (6)
Picture 12
You could also choose not to delete the retrieved e-mails off the server (“Leave a copy of retrieved message on the server”). Note that in time the left emails will pile up, taking a lot of storage space and making website migration and website backup creation more difficult.
And that’s it. Now it’s time to test whether it all works properly.
4. Testing
The quickest way to test both sending and receiving is to send an e-mail from your address, to your address. But also try sending to at least one Gmail and one “non-Gmail” address – just in case. See if those e-mails arrive correctly. Also, send an e-mail to your address from one Gmail and one “non-Gmail” address to confirm you can receive them.
After this, if it’s all OK, the last check is done using a mail testing tool. Go to mail-tester.com. Then follow the instructions I wrote in the article about SMTP mail sending with WordPress. Just send the e-mails using the Gmail account, not WordPress.
Testing is very important, don’t skip this part – if anything is malfunctioning with your website’s e-mail delivery, you should be the first to know.
5. Important note – a catch (pros and cons)
Google gives you a lot of storage space for free (15 GB per a Gmail account) and has excellent antivirus and antispam filters. Unfortunately, it isn’t perfect, as I’ll explain below.
At the moment of writing, there is no way to configure Gmail to check your domain’s e-mail inbox every say two minutes (or one minute). No. Gmail uses an arbitrary schedule for checking your domain’s email. That can be as infrequent as only once per hour!
If your domain inbox gets a lot of emails every day, Gmail figures that out and checks for the new e-mails more frequently.
However, if you want to be sure you haven’t missed any new emails, you must “manually” “order” Gmail to check your domain’s inbox. Here’s how to do that (on desktop only):
- Click on the small sprocket icon in the top-right corner.
- Click on the “See all settings” option.
- Then go to the “Accounts and Import” tab.
- Scroll to the “Check mail from other accounts:” section and click on the “Check mail now” option, next to the account you wish to check e-mail for.
A screenshot might help:
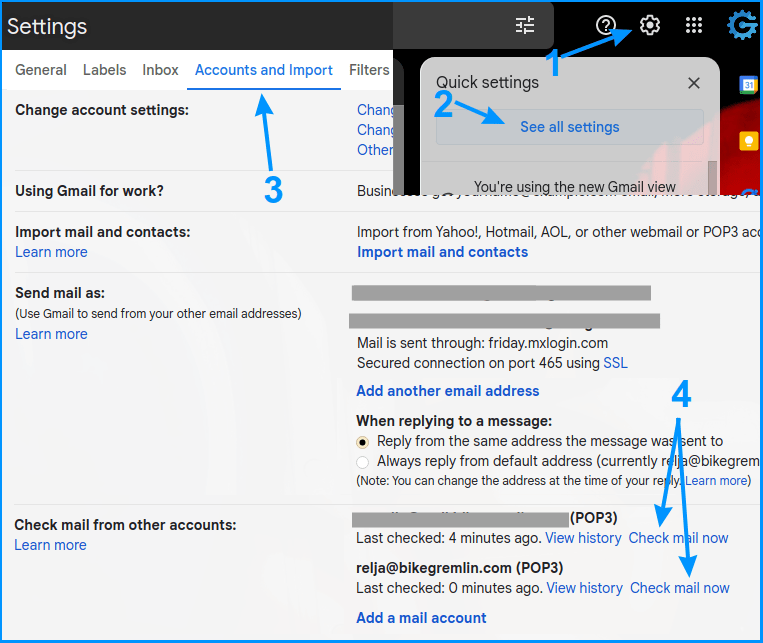
Picture 13
Note:
Gmail doesn’t use the industry standard SPF (Sender Policy Framework) record check. So, some of your emails fetched using the POP3, might be flagged as “spam” even though they are legit and properly authenticated.
Solution: check your spambox, or create a Gmail inbox rule to handle your emails accordingly (i.e. “not mark as spam” for a given filter, or move to a certain “Label”).
6. Why is forwarding emails dangerous?
The procedure explained in this article is a safe and proper way to use all the Gmail’s advantages (lots of free storage, easy backups, excellent anti-virus, anti-phishing, and anti-spam protection), without any problems for your domain’s email.
However, many people just set their domain’s email forwarding to their Gmail. That is dangerous. Why?
It can ruin your domain’s email-sending reputation. How?
- Someone sends spam (or an e-mail with a virus) to your domain’s email . It happens. It’s inevitable.
- If you use e-mail forwarding, your domain will forward the spam e-mail to your Gmail.
- As far as Gmail (and Google) is concerned, your domain had sent that spam!
The greatest irony is when you, yourself, mark such a forwarded email as spam – you are in fact then reporting your own domain’s email as spam (if you are using e-mail forwarding)!
That’s just how mail protocol works. Would it make more sense if Google could figure out the email is forwarded? No. Email protocol offers no way to confirm the email was actually forwarded.
For the same reasons, Cloudflare’s free “Email Routing” service is also a bad idea. Long discussion about that (with my explanations why) is on the LowEndSpirit forum.
Then what makes the method I described in this article better and safer? This is what it boils down to:
- You configure Gmail to directly pull emails from your domain’s mail server (chapter 3). There’s no e-mail forwarding.
- You configure Gmail to send emails using your domain’s SMTP server (chapter 2). You aren’t sending e-mails over Gmail’s infrastructure. You are just using Gmail as a simple mail client (similar to Thunderbird and the likes).
That’s why the here-described procedure is good and I’ve been using it for years without any problems.
Last updated:
Originally published: