In this article, I’ll provide step-by-step instructions for placing Google AdSense ads on a WordPress website – without using any additional plugins.
If you are using an Ad-Blocker, this article’s images containing the word “AdSense” in their name may not display at all. 🙂
Table Of Contents (T.O.C.):
- What is Google AdSense?
- Activating Google AdSense for your website
- Google AdSense Auto ads
- Privacy policy (GDPR and CCPA)
- Manual AdSense ad placement
5.1. Configuring and adding Display ads
5.2. Configuring and adding Matched content - Google AMP adverts
- Conclusion
1. What is Google AdSense?
Briefly: Google places ads on your website – automatically, or in places you determine – and you get some money.
That is one of the ways of monetizing your website.
In the article about my Google AdSense experiment, I briefly explained how to apply for Google Adsense. Here, I’ll explain the technical part – how to get the Google ads up and running on your website.
It is understood you already have an AdSense account (see the link above for more details).
2. Activating Google AdSense for your website
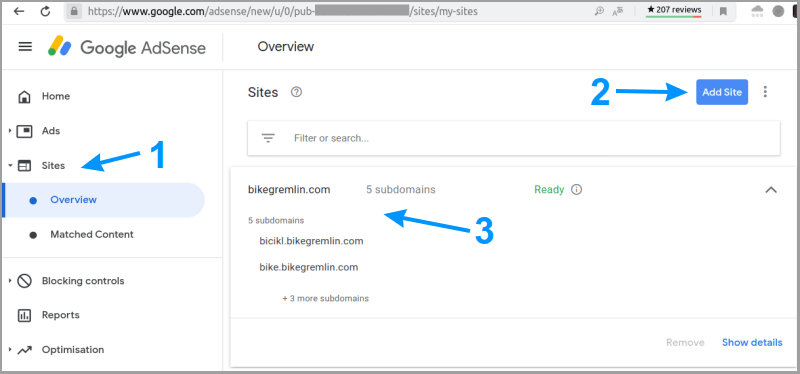
After Google accepts your AdSense application, the website you applied with should already be active. Just in case, the picture below also shows how to add a website (by adding a domain, or a subdomain):
Picture 1
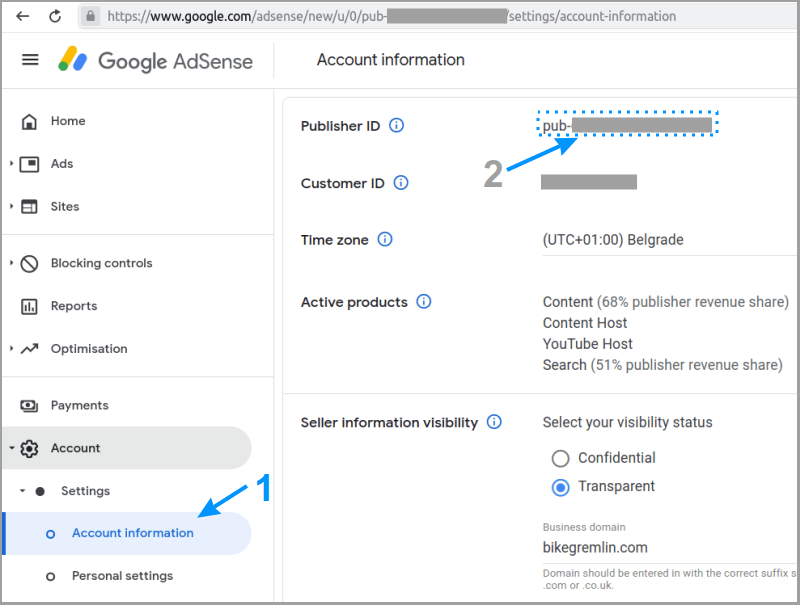
While you’re in this menu, go to the “Account -> Account information, and write down your “Publisher ID” – you’ll need it for the next step.
Picture 2
Now add the following code to your child theme’s functions.php file (how to make a WordPress child theme?):
// BEGIN Google Auto Ads
function ns_google_autoads() { ?>
<script async src="https://pagead2.googlesyndication.com/pagead/js/adsbygoogle.js?client=ca-pub-XXXXXXXXXXXXXXXX"
     crossorigin="anonymous"></script>
<?php
}

add_action( 'wp_head', 'ns_google_autoads', 10 );
// END Google Auto Ads
Replace the “pub-XXXXXXXXXXXXXXXX” with your Publisher ID.
Now your AdSense code is put into your website’s head element.
This solution is faster and more stable than using a plugin to add Google AdSense. Don’t use plugins for things that can be done using just a little simple code.
Congratulations – your website is now set for showing AdSense ads! 🙂
In the next chapter, I’ll explain how to add them to your website.
3. Google AdSense Auto ads
Google can automatically put ads on your site where it considers is best. On my websites, this resulted in 30 % more revenue, compared to placing the ads myself where I want them. I didn’t like having so many adverts on my sites (even between article paragraphs), so I disabled it, but here I’ll give the instructions for those who want to use it (manual ad placement is explained in chapter 4).
For more details on this, see my Google AdSense experiment.
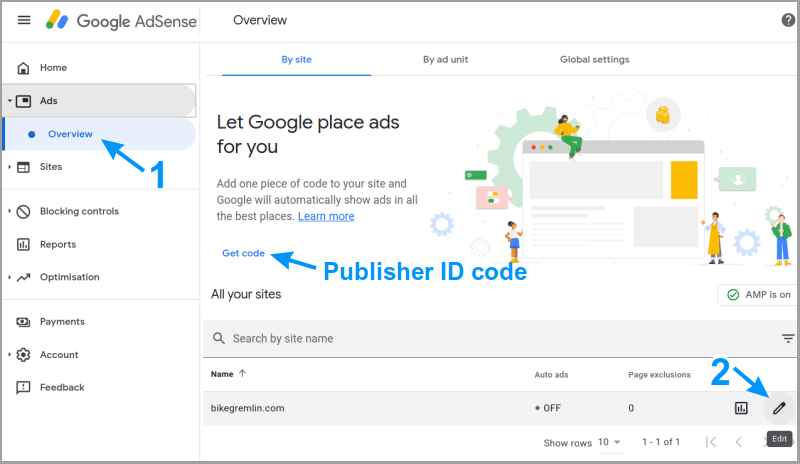
The picture below shows how to get to the Auto ads activation & configuration menu:
Picture 3
From here you can activate Auto ads:
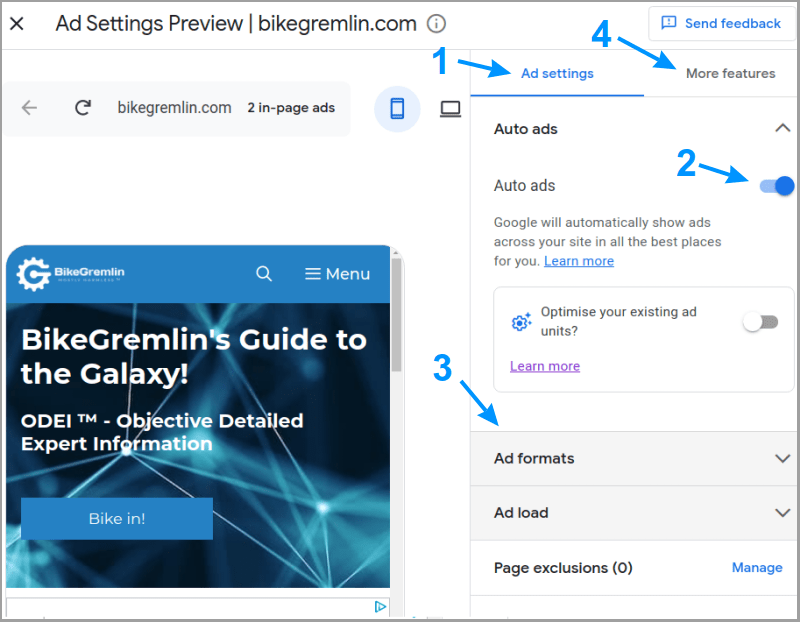
Picture 4
Options marked with number 3 in the picture above are for configuring which kinds of ads to show, and how many of them. They are self-explanatory, so I won’t be getting into the details – you can play with them and see in the preview screen on the left what each option does.
4. Privacy policy (GDPR and CCPA)
In the same menu shown in the picture above, you can also configure those annoying popup messages for GDPR and CCPA cookies & privacy consent. It’s better than adding another plugin to your website just for that:
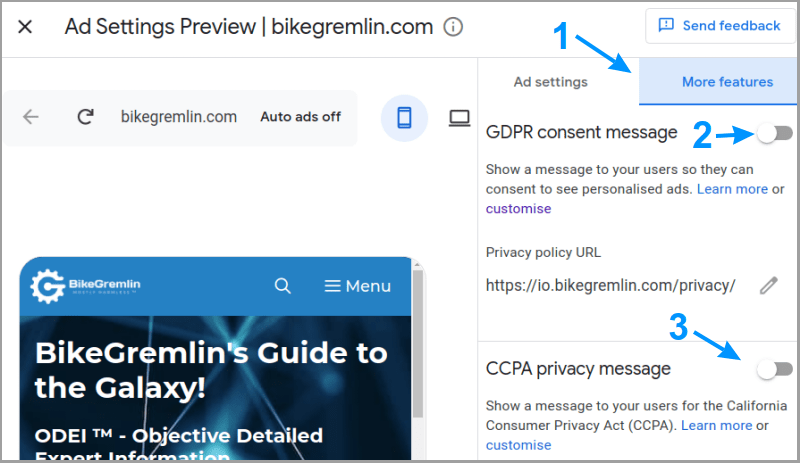
Picture 5
I left these off for now – just hate those annoying consent popups on websites. Choosing to just use my website privacy policy page and prevent Google from serving any personalized ads:
The options for configuring this are in the menu:
Content -> All sites> -> Manage Ad serving:
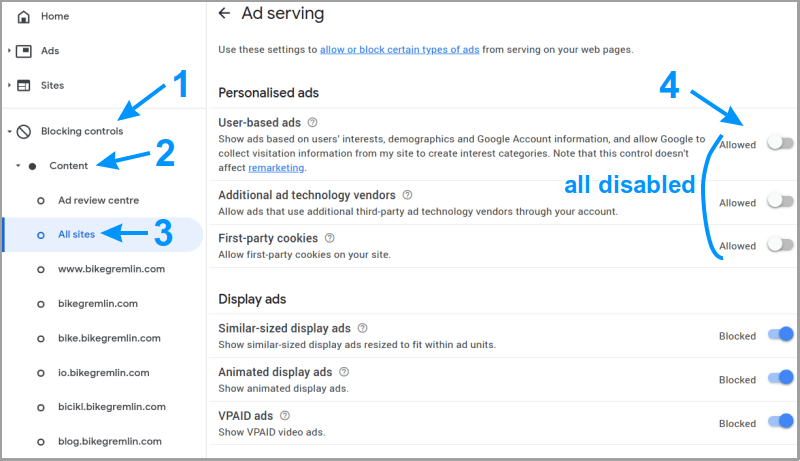
Picture 6
It is my personal opinion that GDPR and those other catches don’t really prevent the big corporations (and the security services) from tracking the Internet users – they just irritate website visitors and make problems for the website owners.
Update: legislators have officially lost their connection with common sense the moment we were forced to drive during the day with headlights on. Long story short: it seems there’s no escaping the boring pop-ups and GDPR/CCPA compliance nonsense.
5. Manual AdSense ad placement
Google offers various advert formats. In my opinion and experience, the following ones make sense:
- Display ads – adverts of various sizes and formats (square, horizontal and vertical) that you can place in various website sections.
- Matched content – Google’s recommendations of your website contents, with some adverts placed in between.
If you want ads in between article paragraphs, over the screen on mobile etc, just activate the Auto ads and be done with it.
5.1. Configuring and adding Display ads
Now let’s make a display ad and put it on the site:
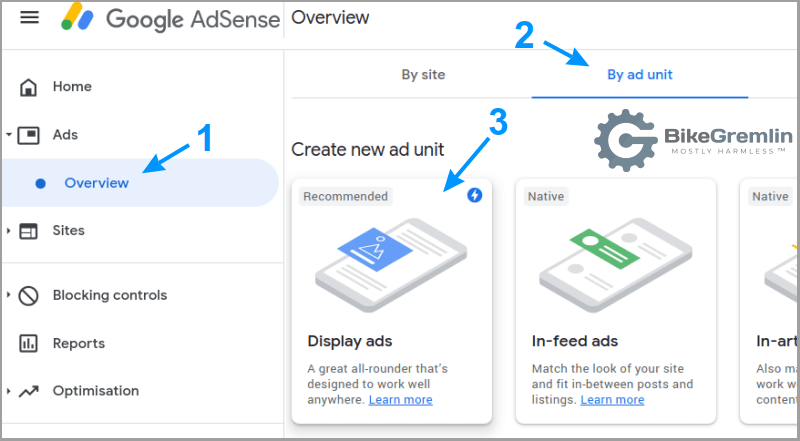
Picture 7
Now we need to name our advert (“Plata-o-plomo” in this case)and configure its shape:
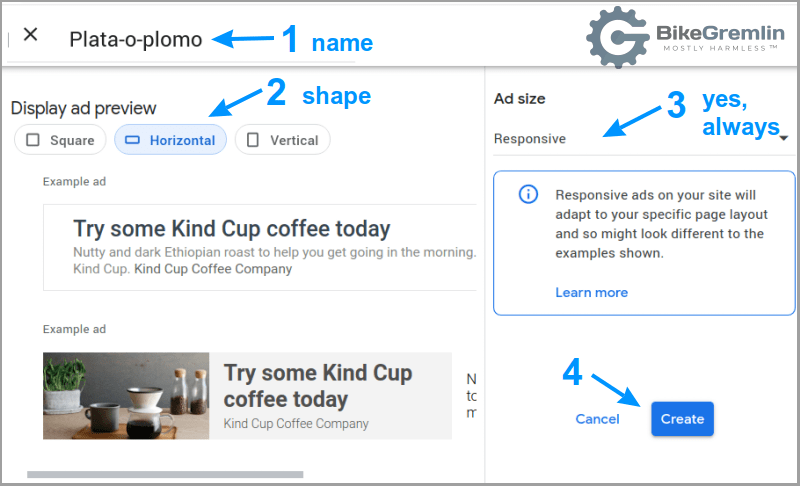
Picture 8
After you’ve clicked on the “Create” button, you’ll get the code for that ad. If you don’t write it down (copy/paste), you can always see it with a click of a button:
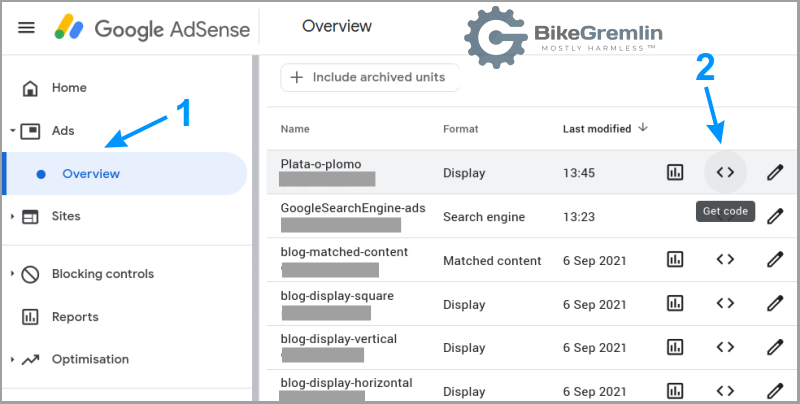
Picture 9
Here’s the code from our example:
<script async src="https://pagead2.googlesyndication.com/pagead/js/adsbygoogle.js?client=ca-pub-XXXXXXXXXXXXXXX"
     crossorigin="anonymous"></script>
<!-- Plata-o-plomo -->
<ins class="adsbygoogle"
     style="display:block; min-height: 250px"
     data-ad-client="ca-pub-XXXXXXXXXXXXXXX"
     data-ad-slot="YYYYYYYYY"
     data-ad-format="auto"
     data-full-width-responsive="true"></ins>
<script>
     (adsbygoogle = window.adsbygoogle || []).push({});
</script>
If you’ve added the AdSense code to your website’s header, as explained in chapter 2, remove the italic part of the code before placing it on your website (the lines above the advert name line, ” Plata-o-plomo” in this case). No need to add it multiple times, it can only create problems and slow your website down.
To minimise CLS (Cumulative Layout Shift – web.dev link), add the bolded part within the style definition (“min-height: 250”). The exact minimum height value may differ for your website, depending on the website’s layout and the chosen ad formats. Check which value fits best for the ads loaded on your site.
I could add this advert here, in the middle of the article, by adding a “Custom HTML” Gutenberg block with the advert code inside.
But I won’t. 🙂
You can use the same method (“Custom HTML” block) to place ads in widgets, and other places on your website.
5.2. Configuring and adding Matched content
In a similar way, we can add Google Matched content:
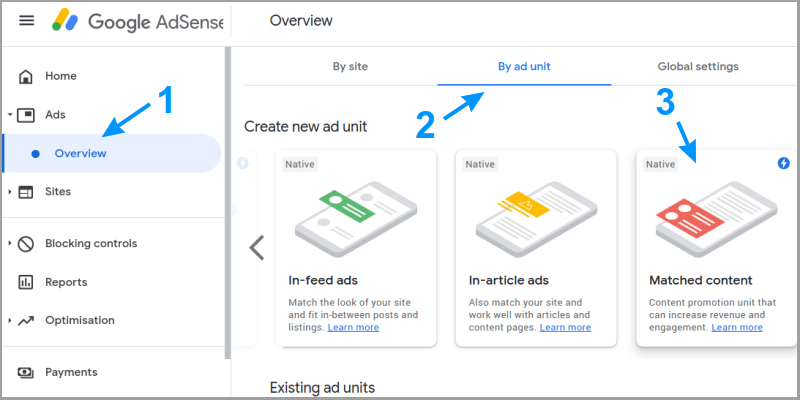
Picture 10
Now we can name it, and choose whether we want any ads along with our content:
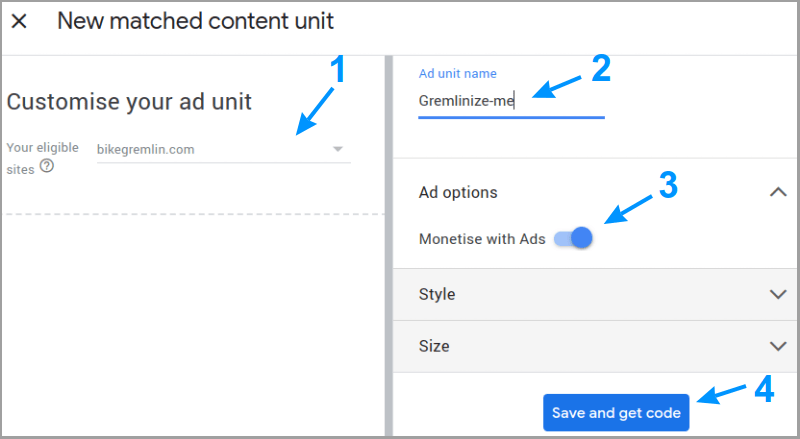
Picture 11
Here’s our code that we’ll place in a “Custom HTML” block, removing the bolded part:
<script async src="https://pagead2.googlesyndication.com/pagead/js/adsbygoogle.js?client=ca-pub-XXXXXXXXXXXXXXX"
     crossorigin="anonymous"></script>
<ins class="adsbygoogle"
     style="display:block; min-height: 250px"
     data-ad-format="autorelaxed"
     data-ad-client="ca-pub-XXXXXXXXXXXXXXX"
     data-ad-slot="YYYYYYYYYYY"></ins>
<script>
     (adsbygoogle = window.adsbygoogle || []).push({});
</script>
6. Google AMP adverts
I already wrote about the AMP technology in separate articles:
To show AdSense ads in AMP versions of your website pages, add this code to the functions.php file of your WordPress child theme:
// BEGIN ads for amp - goes into footer
$print_amp_auto_ads = function() {
	$ad_client = 'ca-pub-XXXXXXXXXXXXXXXX';
	if ( function_exists( 'is_amp_endpoint' ) && is_amp_endpoint() ) {
		?>
		<amp-auto-ads type="adsense" data-ad-client="<?php echo esc_attr( $ad_client ); ?>"></amp-auto-ads>
		<?php
	}
};
// For Paired/Native mode.
add_action( 'wp_footer', $print_amp_auto_ads );
// END ads for amp - goes into footer
Of course, instead of the “pub-XXXXXXXXXXXXXXXX”, place your Publisher ID (as shown in picture 2).
With AMP, you won’t have any control over where the ads are placed. Once you add this code, Google will place the ads where it thinks is best (on AMP page versions of course).
7. Conclusion
I was approved for Google AdSense when I had fewer than 50 high-quality articles on my website. There are many other similar monetizing platforms, but they all required a certain, rather high, number of monthly website visit(or)s. Google was the only one who monetarily supported my work from the start.

