
If you have a WordPress website, you are most probably familiar with spam comments, or website contact form spam. I still haven’t found a way to completely stop it, but I’ve managed to drastically reduce it, and this article explains how.
In a separate article, I explained how you can use CloudFlare’s WAF rules to add a fast and efficient spam blocking layer.
Update November 2023:
I’ve improved my spam protection by using The SEO Framework’s Honeypot (paid), and Cloudflare’s JS challenge (free).
1. Introduction – what is SPAM?
“Spam” is a cheap meat product that was mostly the only one available in Great Britain after World War 2. People were fed up with it at the time.
The legendary Monty Pythons made a sketch on it in 1970 (a newer spam sketch video).
Inspired by that, people started using the term to describe the annoying advertising emails that piled in their e-mail boxes. That’s how the modern meaning of the term “spam” was born.
Today, spam is ubiquitous on the Internet – both by people “manually” sending it (en masse), and by people making bots to spread it (en masse times million).
I’ve been running my WordPress websites since 2015. Comments below my articles are educational: they mostly contain concrete questions and answers. I didn’t want that to be lost in a sea of spam adverts. The same goes for my mail inbox. What did I do to stop spam?
2. WordPress anti-spam settings
The first thing to do is to secure your website – so it doesn’t get hacked and then used to spam yours, and other websites. For that, see the article: How to secure a WordPress website.
After that, we can move on to phase two: “How to not carry a lot of cash around.” 🙂
In other words: let’s disable the comments where they are not needed anyway. In the WordPress backend menu, we’ll choose the option: Settings -> Discussion. The following settings are good for a start (if you have a good reason to alter them, by all means, go ahead):
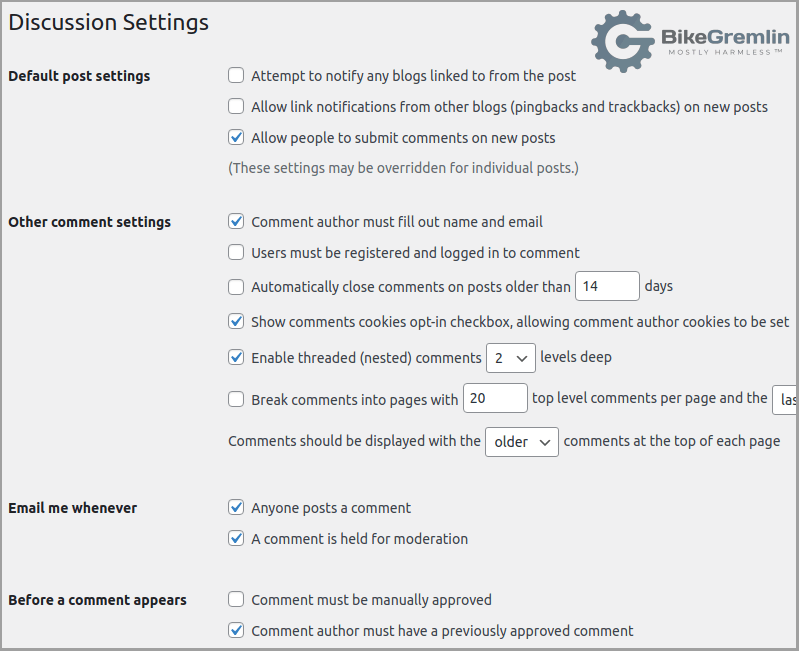
Picture 1
Each option is self-explanatory, so I won’t be going into details. Below these options, there are two large (white) boxes. Let’s see how to use those (the needed explanations are in the picture below):
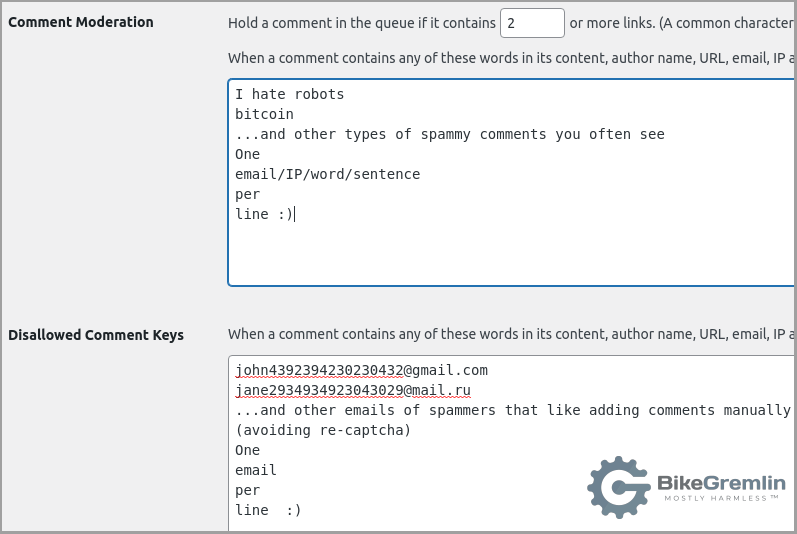
Picture 2
Now we’re left with the avatar section. A 100% secure solution is to completely disable them. But that’s ugly. If you are actively keeping an eye on your comment section, this will do:
Picture 3
3. Creating and configuring Google reCAPTCHA
Now we will create and configure Google reCAPTCHA spam protection for our website.
First, log into your Gmail account. If you don’t have one, create it (link to Gmail website) – the procedure is simple and I won’t be explaining it here.
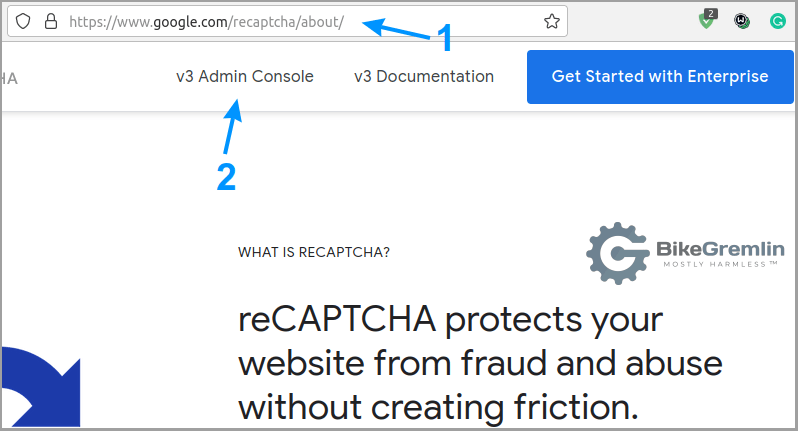
Then go to:
www.google.com/recaptcha/about/
Picture 4
Now we can list our website(s) and choose the options we like:

Picture 5
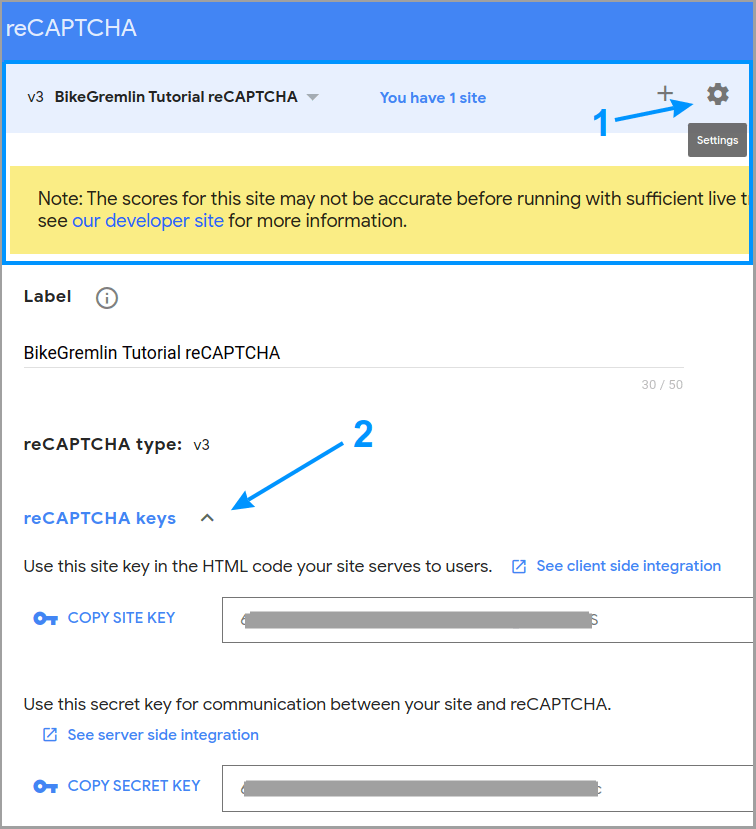
The next screen will display our public (“site”), and private (“secret”) keys. Write them down (copy/paste). Though, you can always see them by going to the Google reCAPTCHA admin console:
www.google.com/recaptcha/admin/
By clicking on the small sprocket (“Settings”), then on the “reCAPTCHA keys:”
Picture 6
Now we can go back to WordPress and see what all this “gymnastics” was good for. 🙂
4. WordPress reCAPTCHA anti-spam protection
Before you do anything else, configure WordPress for SMTP mail sending. This is important and it’s not related only to spam protection, but to good functioning in general (any kinds of website notifications etc).
It’s time for our efforts to pay off, only a few more steps:
- Installing a contact form plugin (optional)
- Installing and configuring a reCAPTCHA plugin
- Configuring the contact form plugin (optional)
Update August 2023:
I switched to Cloudflare instead of Google reCAPTCHA for spam blocking, along with using TSF Pro Honeypot extension.
– TSF Pro Honeypot explanation
– Cloudflare anti-spam configuration
reCAPTCHA can still come in handy for other uses (including some form protection), it is free and simple to set up, but I keep using it less and less (for reasons explained in the above-linked Cloudflare anti-spam article).
4.1. Installing a contact form plugin (optional)
If you want people to contact you via email from your website, there are two ways.
The first way is less practical for the visitors, but offers a better spam protection.
Write down your email in a “strange” way. It sounds silly, it should be relatively easy to program a bot to overcome this obstacle, but it’s proven to be very effective in my experience. What do I mean by “strange?”
My name (relja) @ this domain (bikegremlin.com).
You know how to contact me now, don’t you? And even the fact my email is bolded doesn’t bring in many spammers.
The second way is more convenient for the visitors, but a wee bit less spam-resistant (though still quite good).
It starts by installing the Contact Form by BestWebSoft plugin (how to install a WordPress plugin). And we’ll stop there for now – on to the spam protection, and then we’ll go back to configuring this plugin.
4.2. Installing and configuring a reCAPTCHA plugin
For running our Google spam protection on the website, we’ll install the reCaptcha by BestWebSoft plugin (how to install a WordPress plugin).
Then we’ll go to reCaptcha -> Settings to configure it. We’ll now use the public (“site”) and private (“secret”) keys we got from Google’s reCAPTCHA console as shown in chapter 3.
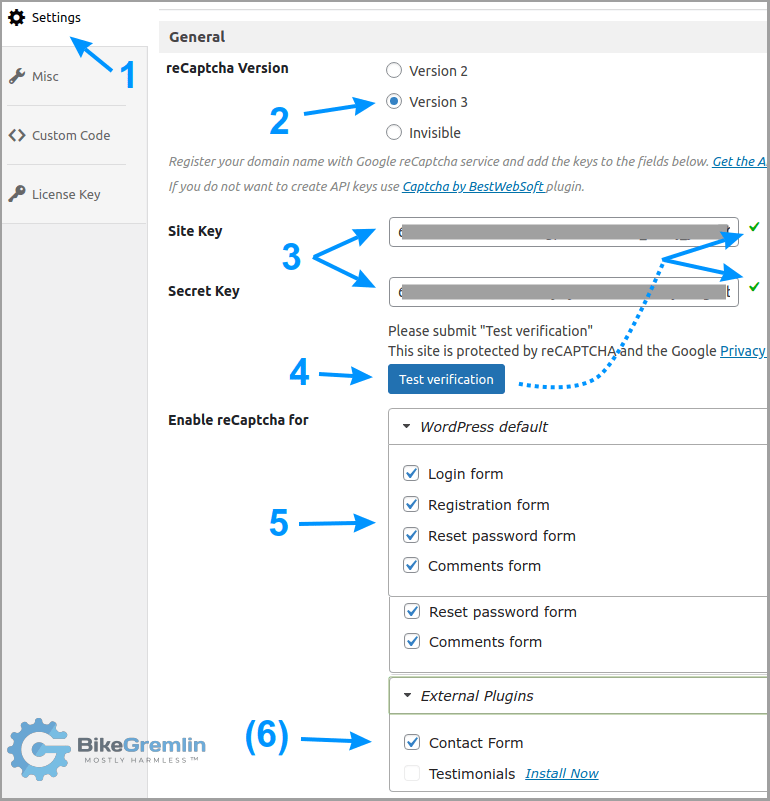
Picture 7
After a successful verification (3 and 4 in the picture above), we can configure the rest of the options and save our settings:
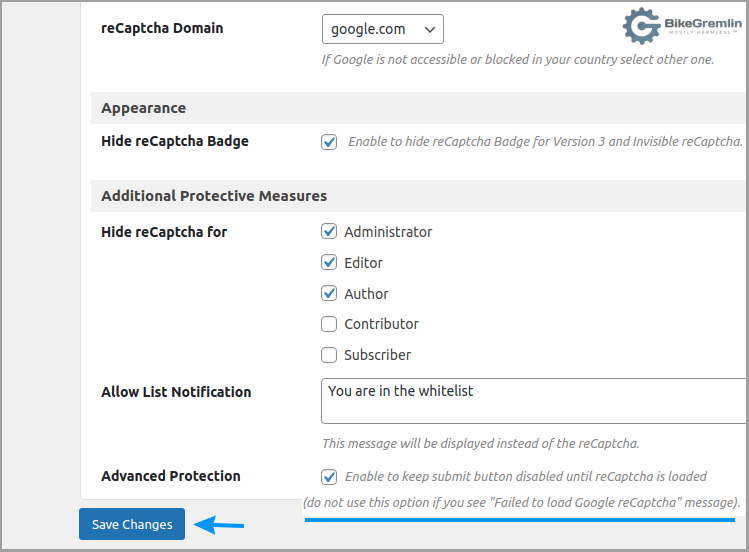
Picture 8
Don’t forget to purge/clean all the website cache after this.
Note/update:
reCaptcha V2 is a bit less efficient and it’s visible on the screen. However, it’s a lot less error prone when put behind a stricter Cloudflare protection. That’s why I’ve now switched to using the V2.
If you are using a website contact form, we’ll need to configure that plugin – read on.
4.3. Configuring the contact form plugin (optional)
Here I won’t be going into details on how to configure the contact form plugin (maybe in a separate article, until then, there’s BestWebSoft’s documentation). But I will explain all the settings related to spam prevention.
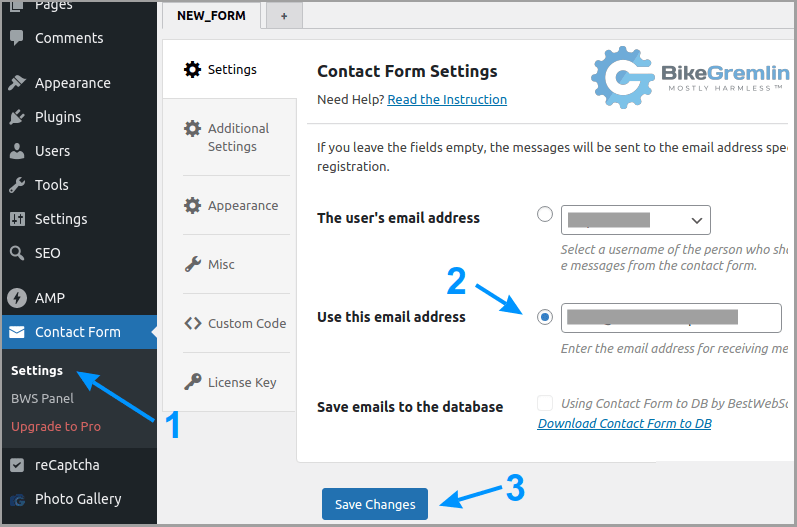
We start by entering an email address where we want all the “letters” sent via the website’s contact form to arrive:
Picture 9
Now we’re off to the “Additional Settings.” Under point 3 in the picture below, enter an email address that your website can really send emails from (how to configure WordPress for SMTP mail sending).

Picture 10
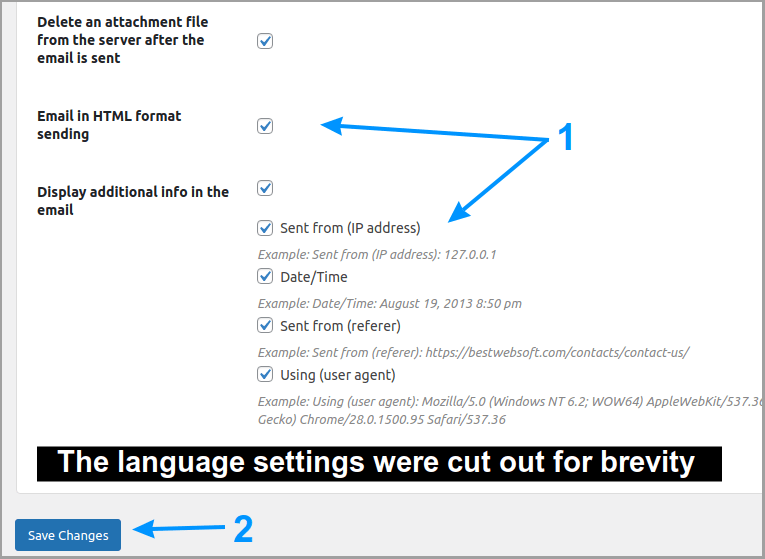
In the next screenshot, I’ve cut out the language and form field setting options – that is beyond the scope of this article.
Picture 11
Now you can add a contact form to any page by adding the “Shortcode” Gutenberg block with this code: “[ bestwebsoft_contact_form ]” (just remove any spaces between the text and the brackets).
5. Conclusion
It’s great that WordPress provides two-way communication with website visitors. Because of that one percent of people who think that spamming is a good idea, this kind of spam protection is necessary.
WordPress settings explained in chapter 2 can help a lot. You can manually create a spam list using the options shown in picture 2. However, every spam comment will be written to the database (and then deleted when you click on “Empty Spam”). This slows down the website performance to a degree. I think it’s better to have reCAPTCHA prevent spam comments from being posted in the first place.
Spammers keep coming up with new ways to pile websites with spam – while anti-spam protection tries to keep up. The methods explained in this article have worked fine for me so far. If anything changes, I’ll update the article.
6. AMP page reCAPTCHA troubleshooting
Update, 2022, August:
Because of various different complications and questionable benefits, I’ve decided to remove AMP from my websites, so you can skip straight to chapter 7. For more details, see my Google AMP case study.
At the time of writing the first version of this article, reCaptcha by BestWebSoft plugin doesn’t work with the AMP website version if you set reCaptcha Version to “Invisible.” If you insist on using this version (for whatever reason), you should disable (“Suppress”) this plugin for AMP.
I tested this for a few days. I hadn’t seen any spam from the AMP website version (on the “normal” website version, without reCAPTCHA there are dozens of spam comments per day). Though, as the picture above shows, this plugin provides a checkbox to “hide reCaptcha Badge for Version 3…” so that’s what I’ve opted for.
“Version 3” is less problematic in general, in my experience.
Nonetheless, just in case it helps anyone, here’s how to “Suppress” reCaptcha for AMP:
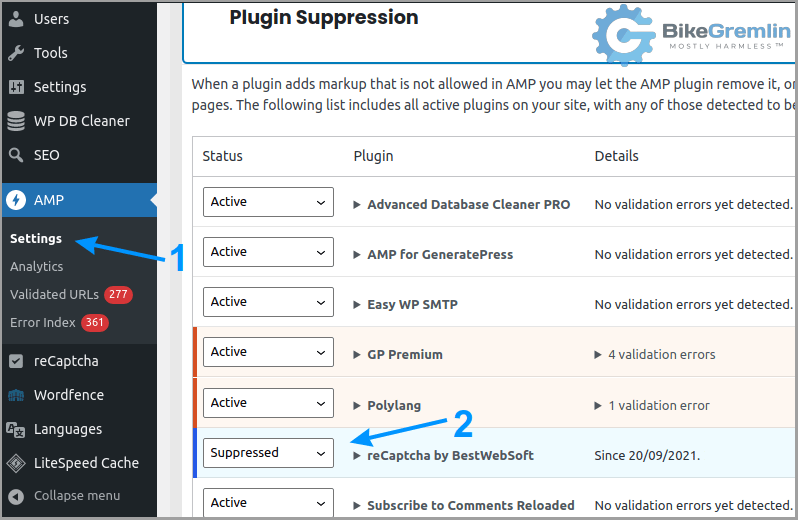
Picture 12
However, after one of the updates over the past month, I started having problems with comments on the AMP website version. This error was shown to anyone trying to comment:
“Error: User response is missing. Click the BACK button on your browser and try again.”
Even “Suppression” of the reCaptcha plugin (as shown in picture 12) and deleting the LiteSpeed cache didn’t help. I can’t easily solve this problem because I’m not sure if it’s caused by reCaptcha plugin alone, or by some conflict between it (or some other plugin) and the theme (or even with the LiteSpeed cache). That’s the “joy” of using WordPress.
A Solomon’s solution is configuring the Questions & Answers page to not use AMP, and adding a message shown only to AMP visitors, that contains a link to that page. The message is shown right below the “Post Comment” button. Here’s the child theme code for that:
// BEGIN comments for amp - goes after main content
$gremlin_amp_comments = function() {
if ( function_exists( 'is_amp_endpoint' ) && is_amp_endpoint() ) {
?>
<p>If you're having <strong>problems with posting a comment</strong> (from a smartphone),<br />
<visit the <a title="Questions & Answers Page" href="https://io.bikegremlin.com/18172/questions/" target="_blank"><strong>Questions & Answers Page</strong></a>.</p>
<?php
}
};
// For Paired/Native mode.
add_action( 'generate_after_main_content', $gremlin_amp_comments );
// END comments for amp - goes after main contentCode language: JavaScript (javascript)Here’s what the message looks like:
If you’re having problems with posting a comment (from a smartphone),
visit the Questions & Answers Page.
7. The SEO Framework (TSF) Honeypot protection
This summer (2022), the amount of spam has drastically increased. As if the bots have become smarter and are avoiding the reCAPTCHA protection. Which is why I decided to look for additional anti-spam methods.
I’m a huge fan of The SEO Framework (or, shortly, “TSF”). It is a WordPress SEO plugin, but in its paid (“Pro”) version, it also offers excellent spam protection using its “Honeypot” extension.
For more details you can read my full The SEO Framework (TSF) Pro reveiw.
TSF’s Honeypot works brilliantly, with zero missed spam comments so far. I’m using it in addition to reCAPTCHA. Layered security (just like layered clothing 🙂 ) is generally always a good idea.
TSF Pro (along with the Honeypot and other nice extras) costs $7 monthly (charged $84 annually). That is the only WordPress plugin which I’m using in its paid version. I think it’s worth it – not just for the spam protection (though its spam protection is really awesome, unsurpassed I’d say).
Last updated:
Originally published: