In this article I’ll explain the procedure of migrating one WordPress website using the free version of All-in-One WP Migration plugin. I’ll start with a few words on the plugin, and then explain the website migration procedure.
Contents: (clicking on “– T.O.C. –” at the end of each chapter, brings you back here)
- All-in-One WP Migration WordPress plugin
- AIO WP website migration procedure
2.1. Plugin install and database export
2.2. Copying all the “wp-content” directory files
2.3. Installing WordPress on destination
2.4. Installing AIO WP Migration plugin on destination
2.5. Uploading “wp-content” directory to the destination
2.6. Activating all the plugins at destination
2.7. Database import using AIO WP Migration
1. All-in-One WP Migration WordPress plugin
Also known as “AIO,” “AIO WP” etc. Like all the plugins on wordpress.org, it has a free version. That version is very limited, making the plugin inconvenient to use. It beats doing it all 100% manually, but it’s far from perfect. Fortunately, it’s also far from too bad – and this article I’ll explain how to migrate a WordPress website using the free version.
Paid version? I went to the plugin developer’s website, to see how much it costs, what it offers. The pricing policy and the options provided with the paid version are very unclear (or I’m as dumb as a doorknob – one not excluding the other). So I gave up on the paid version.
– T.O.C. –
2. AIO WP website migration procedure
AIO WP free version is limited to just over 100 MB export size. That is why I’ll only export the database, which is the most tricky part – and copy all the other files using FTP.
AIO WP does a good job with database export and import, editing all the links when a site is cloned from one domain to another.
For the remainder of this article, source will be the website we are migrating, and destination will be the location, or domain where we are migrating to.
There are many ways to do a migration. I’ll explain a procedure that is the most simple and easy to understand, beginner-friendly. The procedure is the following, briefly put, so you can get a clear picture before the more detailed explanations:
- Install AIO WP on the source website and export the database, downloading it to your computer.
- Copy all the contents of the source website “wp-content” directory to your computer.
You should now have a copy of all the “wp-content” files, and the database export on your computer.
If you are migrating a site, not cloning it, you should now edit the DNS or nameservers.
We’re done with the source, going to the destination: - Install WordPress on destination, and configure the hosting account to your preferences.
- Install AIO WP on the destination website.
- Copy the source “wp-content” files to the same directory on destination location.
- Activate all the plugins you will now see listed at destination.
- At destination, using AIO WP, import the source database.
Finally, if you are doing a migration, not cloning, you should configure DNS and nameservers.
– T.O.C. –
2.1. Plugin install and database export
The principle is the same for installing any free WordPress plugin – here I did it with AIO WP Migration plugin.
If you came here by clicking on a link from another article, disregard the database export part – that’s needed only for the here described website migration.
Free plugin installation is so simple that picture below says it all:
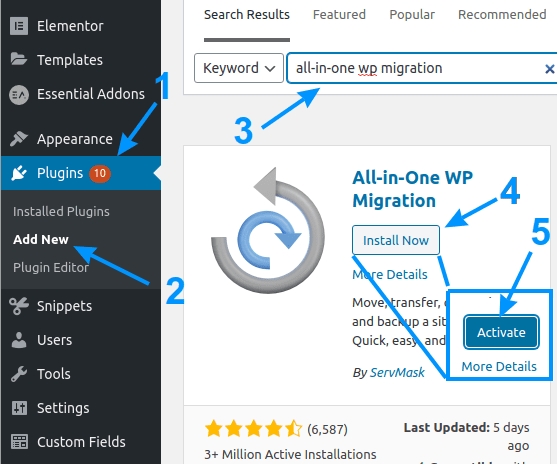
Picture 1
Short explanation of the picture:
- Click on the “Plugins” menu.
- Click on “Add New”, to install a new plugin.
- Search for the plugin you wish to install (in this case it’s “all-in-one wp migration”).
- When the plugin you want is shown in the search results, click on the “Install Now” button.
- After a successful installation, the “Install Now” button will turn into the “Activate” button. Clicking it will activate the installed plugin and it’s done. 🙂
In a separate article I explained a typical procedure for installing a paid plugin.
After having installed the plugin on the source website (the one we wish to migrate, or clone), we can export the database. Picture 2 says it all:
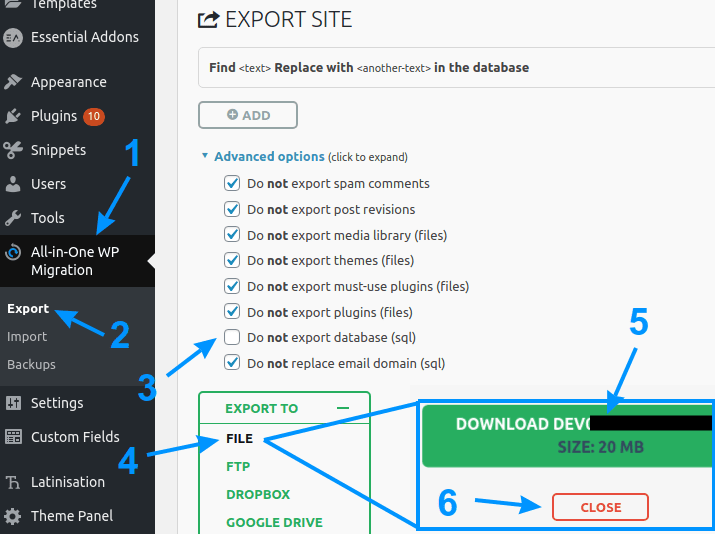
Picture 2
Let me explain what we did here:
- Choose “All-in-One WP Migration” menu in WordPress back-end.
- Click on the “Export” option.
- Everything we don’t want to export is checked – i.e. we left only the database.
- Click on the “EXPORT TO” options and select “FILE.”
- Click on the “DOWNLOAD source-website-domain.com”.
- It will let you choose where you wish to save the export on your computer. When the download is done, click on the “CLOSE” button.
2.2. Copying all the “wp-content” directory files
In a separate article I explained the procedure for copying the entire “public_html” directory (with all the files and directories inside). The example is made using cPanel control panel, but the procedure is similar if you are using DirectAdmin.
In this particular case, we don’t need the entire “public_html” directory, only “wp-content”. It is placed one level beneath the “public_html”. As far as everything else is concerned, the principle is basically the same.
For copying, you could also use a FTP client (like FileZilla), but copying is a lot faster if the files are compressed. That’s best done directly on the server. Here I’ll show how it’s done using the file-manager of DirectAdmin control panel:
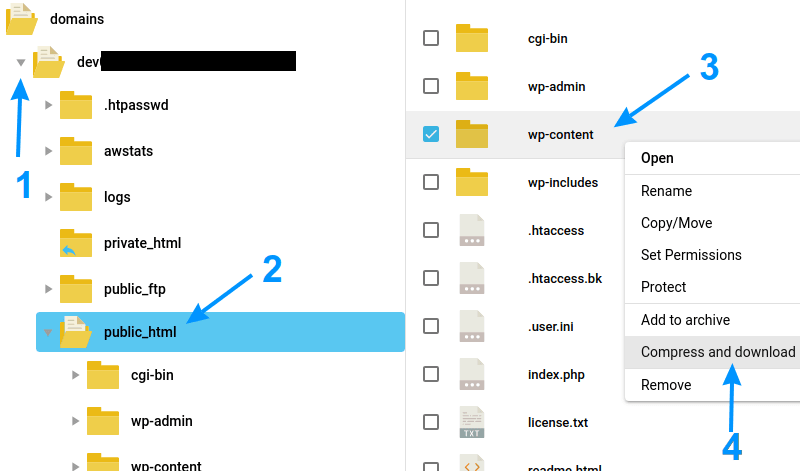
Picture 3
What exactly did we do here?
- Chose the source domain (there can be several domains under one account, though that’s not a very good idea in general).
- Open “public_html” directory (or wherever is WordPress installed on the source server).
- Right mouse button click on the “wp-content” directory.
- Select the “Compress and download” option in the drop-down menu that appears. You will then get to choose where to save the compressed directory on your computer.
Now we are done with the source website. Off we go to the destination.
– T.O.C. –
2.3. Installing WordPress on destination
If you are migrating a site, not cloning it, you should now edit the DNS or nameservers.
An alternative way, if your hosting server has Softaculous:
- Create the domain, and a sub-domain on the destination server.
- Install WordPress in the subdomain using Softaculous.
- Clone the website to the subdomain.
- After you’ve confirmed it all went well, copy the subdomain website to the domain, using one-click with Softaculous.
The advantage of this method is very little downtime. For more info on this, see how to use Softaculous with WordPress. I usually do migrations manually, just switching the IP address in DNS once it’s all done, but for those who don’t like doing that manually, this is probably a good solution for minimizing any downtime.
Now we need to configure the destination hosting account and install WordPress. I already wrote on these topics, so I’ll direct you to those articles:
- How to configure a hosting account (installing SSL/TLS certificates, selecting PHP version etc.).
- How to install WordPress.
2.4. Installing AIO WP Migration plugin on destination
After we copy all the “wp-content” files, and activate all the plugins, AIO WP will be active on the destination website. So we needn’t do anything in this step – it will be all done for us when we finish steps 5 and 6. 🙂
Chapter 2.1. shows how to install a plugin, and that works for every WordPress website and every plugin.
– T.O.C. –
2.5. Uploading “wp-content” directory to the destination
Entire contents of the “wp-content” directory, that we had saved from the source website, should now be copied inside the same directory on the destination website.
Files can be uploaded using FTP, or a control panel’s file-manager. Upload file option is clearly visible, straight forward, and I think it needs no explanation.
If you packed the entire “wp-content” directory as shown in picture 3, chapter 2.2, then upload that “wp-content.zip” file inside the “public_html” directory. Here’s how the file is un-packed using cPanel file-manager:
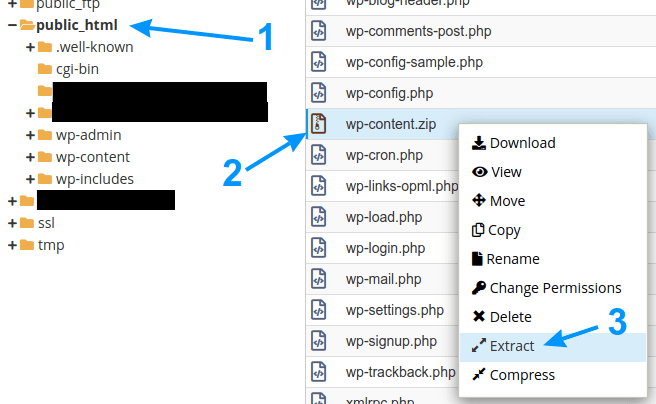
Picture 4
What we did here:
- Select the “public_html” directory.
- Right mouse button click on “wp-content.zip” file.
- Select the “Extract” option.
The procedure is virtually identical using DirectAdmin file-manager:
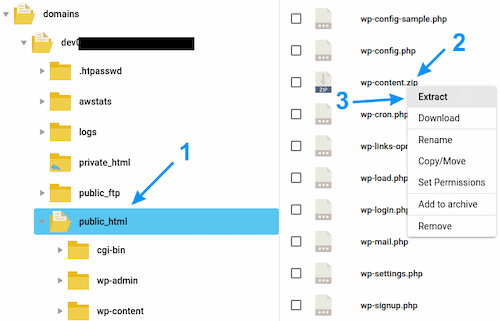
Picture 5
2.6. Activating all the plugins at destination
Now you should activate all the plugins that will be shown as installed in the destination website WordPress back-end:
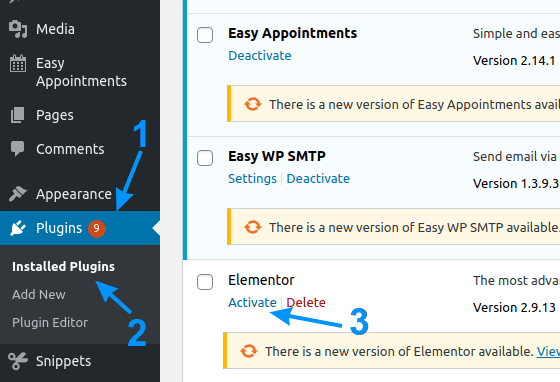
Picture 6
Explanation (DON’T UPDATE ANYTHING YET):
- Select the “Plugins” option in WordPress back-end.
- Click on the “Installed Plugins” menu item.
- Click on the “Activate” option for every listed plugin.
Don’t update anything (yet), just activate!
Yes, I know I wrote this twice.
Many plugins will open a configuration screen upon activation, but just go back to the “Installed Plugins” menu and activate all the plugins (no updating, no configuration).
– T.O.C. –
2.7. Database import using AIO WP Migration
The moment of truth… 🙂
Using AIO WP Migration plugin, we need to import the database (which we had previously exported from the source website):
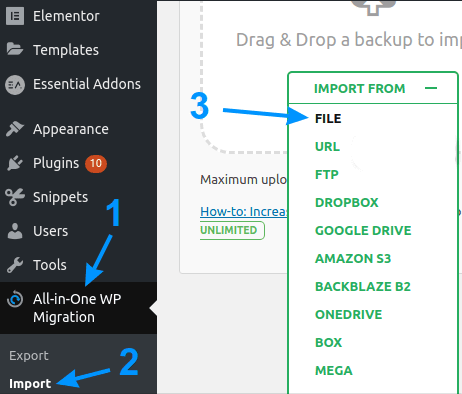
Picture 7
We’re nearly done:
- Select the “All-in-One WP Migration” option in WordPress back-end.
- Click on the “Import” menu item.
- Select the “FILE” option.
You will now be asked to select the database export file from your computer. After that, you’ll first see something like this:
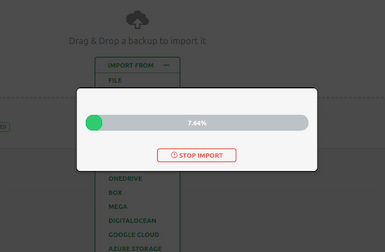
Picture 8
After a while, you’ll get a warning like this, just click “PROCEED >”:
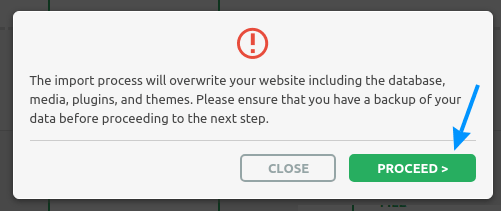
Picture 9
Now just wait a bit. Don’t close the browser tab. You’ll be notified when it’s done.
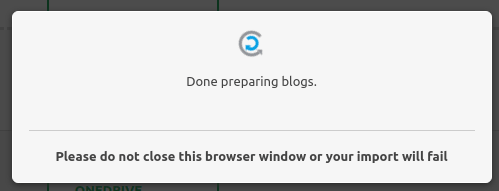
Picture 10
After this is done, click on the “FINISH >” button:
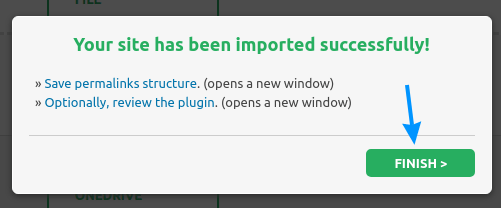
Picture 11
Now you should save the permalinks. This is a good idea after any WordPress website migration, or cloning:
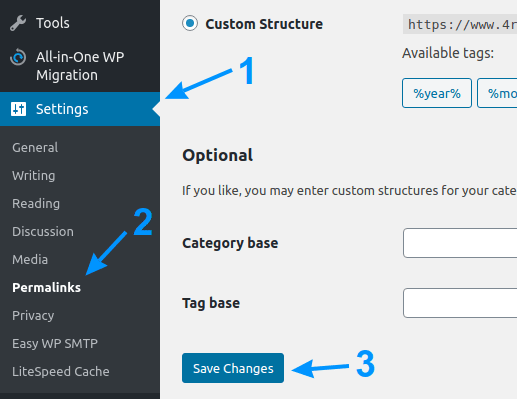
Picture 12
It’s simple:
- Choose the “Settings” option in WordPress back-end.
- Click on “Permalinks”.
- In the bottom-left corner click on the “Save Changes” button.
If you are using WordFence, it will ask you to click a button allowing it to get configured for the new server. The other options should remain as they were on the source website.
Finally, if you are doing a migration, not cloning, you should configure DNS and nameservers.
– T.O.C. –

