My notes on Obsidian.md software, as my reminder (if this helps anyone else – cool!). This is a work in progress. Please use the bikegremlin.net forum for any questions or corrections.
I have imported my Obsidian notes (my knowledge base) into my offline personal AI/LLM.
0. What Is Obsidian.md?
Obsidian.md (don’t mix it with the good people of Obsidian.net who brought us “Fallout: New Vegas” 🙂 ) is a powerful note-taking and knowledge management app that runs on your local device. At its core, it’s basically a fancy Markdown editor – but with some seriously useful features built around linking notes, organizing ideas, and building your own personal knowledge base.
It stores everything as plain text .md files, which means your notes are future-proof, easy to back up, and editable with any text editor. No cloud lock-in, no proprietary formats.
You can use Obsidian for anything from daily journaling to managing complex research projects — and customize it however you like with plugins, themes, and keyboard shortcuts. Whether you’re a student, writer, coder, or just someone who loves structured notes, Obsidian gives you the tools to build your own “second brain.”
I came across Obsidian when I was faced with Google problems (Google getting dumber and not finding my articles when I search for a phrase or a sentence from an article). I wrote a separate, more detailed article about the basic principles you can use to make Obsidian a powerful knowledge base (see the sources at the end), but here I just want to note that it has a very powerful search (among other benefits):
https://help.obsidian.md/plugins/search
0.0. Zettelkasten?
The paragraph above this section makes it sound like a Zettelkasten system software. Is that it? Well:
This is very similar to the Zettelkasten system, but Obsidian won’t let you work as a strict Zettelkasten system – you can’t set a unique identifier for each note, that is independent of the note’s title. Your system ends up depending on the software. In other words: There’s no dedicated field or system-level support for separating IDs from titles!
The upside is that it can auto-update titles and show a graphical knowledge map (“graph view”). So I would argue it to be a net-positive, even if it’s not strictly Zettelkasten! Yet, you must be careful with note titles. Sigh.
My interpretation and implementation of the Zettelkasten system using Obsidian:
BikeGremlin Deathnotes – My Zettelkasten System
0.1. Markdown
Obsidian uses Markdown as its core format – plain text files with .md extension.
Everything you write in Obsidian is saved as a Markdown file on your computer. That means:
- You can open and edit your notes with any plain text editor (outside Obsidian, too).
- Formatting like bold, italic, inline code, links, lists, etc, all follow standard Markdown syntax.
- You can also use Obsidian-specific enhancements (like [[wikilinks]], embeds, tags, etc.) – but these still live inside regular Markdown files, so they won’t break if opened elsewhere.
If you don’t like the idea of learning Markdown – give it a try, it may be worth it. But know that if a WYSIWYG editor is a must for you, Obsidian is not that!
0.2. Auto Save!
There is no save button. It’s not a bug, it’s a feature! 🙂
Obsidian writes changes to disk almost instantly after you stop typing – typically within a fraction of a second. So unless you yank the power plug the very moment you hit the last key, your sentence will be there when you reopen it.
Sure, if you’re working on something critical, it’s always smart to have versioning or backup in place, e.g. via Git, Obsidian Sync (paid service to Obsidian), or a cloud sync service like pCloud (affiliate link) which is what I’m using.
See about syncing below.
1. Obsidian Software Installation
I have created a directory where I’ll store all the Obsidian notes/files.
It is inside my synced pCloud vault (affiliate link), so I can use Obsidian on different computers while syncing my notes (more details about syncing).
Right at the start (after the installation gave me the first window) I set the Obsidian to use “Open an existing folder as a vault“.
1.1. Vault – What The Hell Is That?!?
Vault is just a fancy name for an installation or an instance root (or a similar term).
In other words: vault is the name for the main directory where all the Obsidian-related information (notes etc.) and settings are stored. You can create several separate vaults with different configurations.
1.2. Linux Mint and Ubuntu Installation
I chose the .deb option for Linux Mint and Ubuntu (2 computers):
https://obsidian.md/download
Installation is done by command prompt or using GUI:
right click -> Open With Software Install (for Ubuntu)
right click -> Open With GDebi Package Instgaller (for Mint)
1.3. Windows Installation
Download and run the installation .exe file. The installation is standard, simple (yes, next etc.).
2. Things To Look Out For!
Putting this right near the beginning. If you ever doubt human stupidity and shortsightedness, know that a very popular “power-note” application creates… wait for it:
filenames with
A) blank spaces!?!
B) that are case sensitive for crying out loud!?!?!
This is all nice and dandy until something on your computer/OS goes less-than-ideal or until you switch from Linux (with case-sensitive file names) to Windows (without them). One example, even when it’s all good is that Linux will let me make “file.md” and “File.md” as two different files – but Windows can be confused by that!
Likewise, for people who write in languages like my native, with funny latin letters (Š, š, Ž, ž, Đ, đ, etc.) and cyrilic script (Бајк Гремлин) – using those characters in file names is asking for trouble down the road.
My conclusion and (personal) opinion is that whoever allowed this into production, and whoever doesn’t see this as a problem is shortsighted and unexperienced!
So, hoping to save myself some headache, I set some rules and plan to stick to them. I decided to:
- use-hypens-and-lower-case-letters-for-my-note-titles (filenames)
- keep-all-the-directory-names-in-lower-case-and-also-with-hypens-between-words
3. Syncing To Different Computers
3.1. Syncing The Settings
Another important thing to know before any tuning and configuration – Obsidian settings are stored in:
YourObsidianVault/.obsidian/
This stores: plugin settings, installed themes, hotkeys, sidebar layout, etc. When I sync this directory and files, settings are transferred to other devices where Obsidian is using the same synced directory/vault.
I now have these files saved there:
- app.json
Stores general app settings (e.g. whether to show the sidebar, safe mode toggle, etc.). - appearance.json
Theme, font size, light/dark mode preferences. - core-plugins.json
Which core plugins are enabled (like Templates, Daily Notes, etc.) - hotkeys.json
I still don’t have this file, but it should appear when I configure some keyboard shortcuts. - templates.json
Settings specific to the Templates plugin (e.g. directory location) - workspace.json
UI layout – open panes, split view state, etc.
3.2. Syncing All The Notes And Files
For my use case, it is simpler to sync the entire vault, including all the files/notes attachments etc. Do do that, I’m using a pCloud (affiliate link) synced directory on several Windows and Linux computers.
There are two downsides to using pCloud:
- It doesn’t work well with an iPhone.
For that, I would need to use iCloud… which doesn’t work very well with Windows and Linux. So, I had to make a choice (and I’m not much of a smartphone fan). - It sucks when dealing with a locked file (either an open Obsidian .md file, or a KeePass encrypted file or similar), and it also sucks when dealing with many small changes of many small files (as is often the case when using Obisidian).
The second problem can’t seem to be solved even by not running pCloud while Obsidian is open.
A potentialy more reliable but paid option is to use Obsidian sync for about $5 (1 GB of storage) to $10 (10 GB of storage) per month (or more if you need more than 10 GB of storage).

Picture 1
Obsidian Sync should work fine for both the computers and smartphones (including iPhones). I plan to write an email to Obsidian and see if they’ll let me test this for free (and maybe even pay for the option even if they don’t because the software is very useful for my work and writing).
What works for me (for now) is using Mega.nz sync. See below:
3.2.1. Mega.nz Settings For Obsidian Sync
With a few tricks, this can work better than most other alternatives I’ve tried.
Go to:
Settings -> Sync -> … (3 dots) -> Manage exlusions -> untick the “.” files.
Mega.nz sync application for Windows and Linux offers the following exclusion options:
| Type | Criteria | Target |
|---|---|---|
| – Files – Folders – Files and folders – Extensions | – beginning with – containing – ending with – equal to – Matching wildcard | Expression the options listed in the columns to the left apply to. Here, you can use a comma (“,”) to separate several listed items. |
Table 1
These settings are very poorly docummented (Mega.nz should fix that).
There, enable syncing of “.” (hidden) files and directories.
This is disabled by default. You enable it by unchecking the Exclusion box:
” File and folder name | Begins with | . “
Also, disable syncing of the following files, by adding an exclusion rule:
| Type | Criteria | Target | Why Exclude Sync |
|---|---|---|---|
| Folders | equal to | cache | Local cache |
| Folders | equal to | .trash | Deleted stuff |
| Files | equal to | workspace.json | Computer-specific |
| Files | equal to | workspace-mobile.json | Smartphone-specific |
| Files | equal to | .DS_Store | Mac specific |
Table 2
Another way to “play” with these settings is to edit the “.megaignore” file, and add this:
-:cache/
-:.trash/
-:workspace.json
-:workspace-mobile.json
-:.DS_Store
3.2.2. pCloud Settings For Obsidian Sync
pCloud is more buggy in my experience so far. Still, it might benefit from some conflicting files and directories exclusion (worth a shot).
Preferences -> Settings -> Exclusions
In the box titled “The following files will be excluded” you can enter semicolon (“;”) separated lists, and use wildcards like astersks (“*”), and question mark (“?”). So, I added this (and clicked on the “Apply” button afterwards):
workspace.json;workspace-mobile.json;.obsidian/cache;.obsidian/.trash;“.DS_Store” was already listed by default.
For now, this hasn’t helped – pCloud is still useless for Obsidian sync – it can only serve as a (cold) backup storage.
3.3. Saving On Storage Space
Having a huge vault makes syncing a hassle, costing you efficiency (in addition to time and money).
I have decided to use my file hosting server to keep any PDF documents or any other files apart from images that I want to be shown directly within a note. You can use any local storage for this (if you aren’t moving around much) or cloud storage option (if you often switch computers/phones and locations – as I do).
With such a policy, you can store a huuuuge amount of notes in way less than only (or “only”) 1 GB (my first hard disk was a Western Digital Caviar with whole 540 MB of storage space! 🙂 ).
4. My Obsidian Setup / Configuration
I took good advice and ideas from this video.
4.1. Directories
I started by creating these directories (in my “obsidian-relja” home directory for Obsidian):
- 100-rough-notes
For writing down stuff I want to look into later. - 200-source-material
For listing sources, book pages and similar with my comments.
Note names here start with “s-” (as “Sources”) for easier search and clarity. - 300-tags
For better idea and note indexing. - 400-indexes
A second way of indexing notes and ideas (like WordPress categories and tags) - 500-articles
Long articles that are not really notes (website article and YouTube video scripts – full, long drafts). Replacement for Word/typewriter, not real atomic notes!
Note names here start with “b–” (as “Bikegremlin” article 🙂 ) for easier search and clarity. - 600-main-notes
Notes – this is the main notes directory - district-9
For my projects. Drafts of several ideas and notes to be turned into articles and video scripts – another replacement for Word/typewriter, not atomic notes!
Note names here start with “p-” (as “Project”) for easier search and clarity. - templates
For storing formatting defaults I can use for different note types.
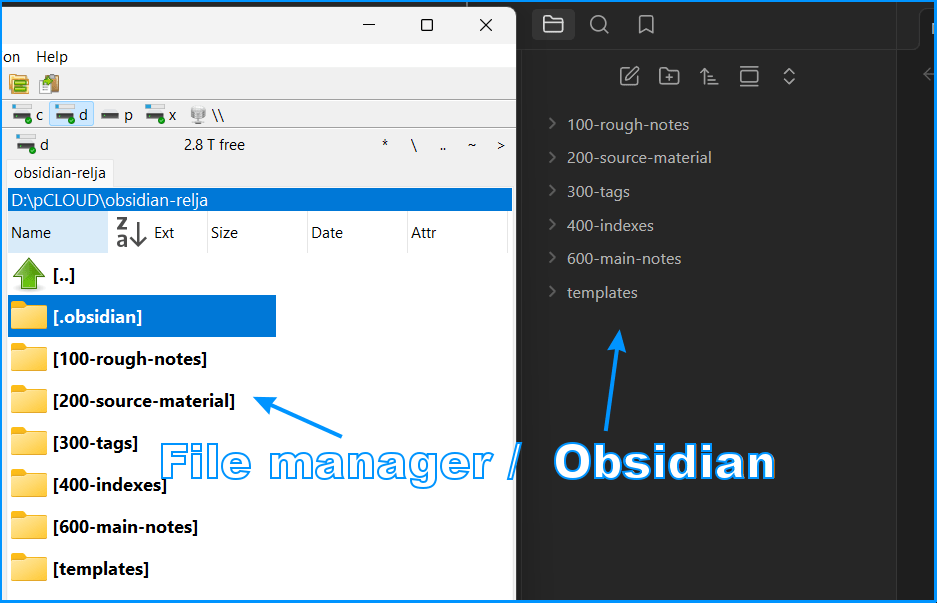
Picture 2
4.2. Configuration Options
I will go over the options as they are in the menu. Picture below shows how to access the options & settings:
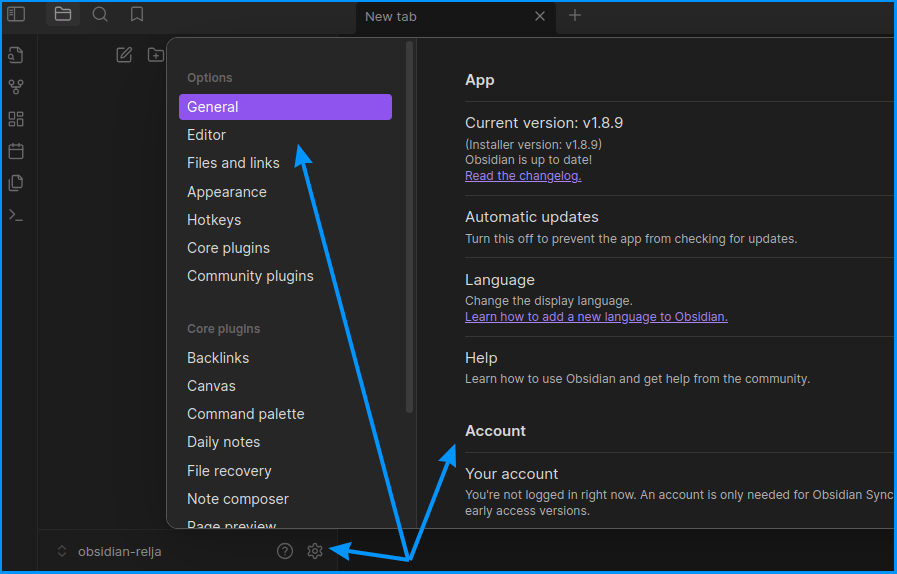
Picture 3
Let’s go over the options from top to bottom, across all the option groups (as shown in the picture above). I will only comment the settings that I haven’t left on the default setting.
General
- Automatic updates – disabled
Auto updates make baby Jesus cry. Say no to automatic updates, decheck that option. You don’t want an untested update to mess my stuff up. Let the others do the beta testing. - Notify if startup takes longer than expected – enabled
Just to keep an eye on how the app and the computer work.
Editor
- Always focus new tabs – disabled
I prefer to stay where I am when I click on a link, and have it open a new tab beside. - Indent using tabs – disabled
“Turn this off to indent using 4 spaces”.
Yes, I am willing to die on this hill! 🙂
Files and links
- Deleted files – Move to Obsidian trash (.trash folder)
Apart from the fact Obsidian uses the term “folder” for a directory, this looks like a good option for a remotely synced installation used on different computers. The downside is you must manually delete the .trash directory’s files from time to time (it is hidden so you must let your system “see” the “hidden” files). - Default location for new notes – In the folder specified below
Folder to create new notes in – 100-rough-notes - New link format – Absolute path in vault
Again, trying to configure it to be as universal as possible, so that it works the same on different computers – synced. - Default location for new attachments? – In subfolder under current folder
Hope this will keep stuff more tidy.
Appearance
- Base color scheme – Dark
I generally don’t like dark themes for most stuff, but with things like (Kate) text editor, Discord, and Obsidian, it seems more natural and nicer on the eyes before the dawn. 🙂 - Zoom level (under Advanced) – 110%
Makes all the text and icons a bit larger – for us old men. 🙂 - CSS snippets – see visual customizations below.
Hotkeys
Search for a term, click plus, and add a hotkey combination. Obsidian lets you know if there already is such a combination (“1 command with conflicts”). You can also find the command for a given key combination, by clicking on the small keyboard icon (top-right corner) and then pressing the key combination.
- Move current file to another folder – ALT + M
I aim to keep my custom shortcuts wtih ALT so as to not confuse them with the default ones that usually use CTRL. - Templates: Insert template – ALT + T
To quickly set a template for a new note. - Use dark mode – ALT + D
- Use light mode – ALT + L
For quick swapping of modes depending on the lighting.
Core plugins
- Random note – enabled
It’s a good idea to visit my own notes from time to time and see if I should update them (I do that with my website articles whenever I get any visitor/viewer questions).
Community plugins
You can exit restricted mode (turn it off) to enable community plugins, but I’m not sure that’s a good path to take in the long run.
Backlinks (core plugins)
- Show backlinks at the bottom of notes – enabled
Templates
- Template folder location – templates
No slashes or anything. I firste created a “templates” directory under my “obsidian-relja” vault, so at the same hierarchy as the “.obsidian” directory.
I am hoping this, along with date and time format settings, will help keep things hard-set and uniform when syncing between different computers. - Date format – YYYY-MM-DD
- Time format – HH:mm
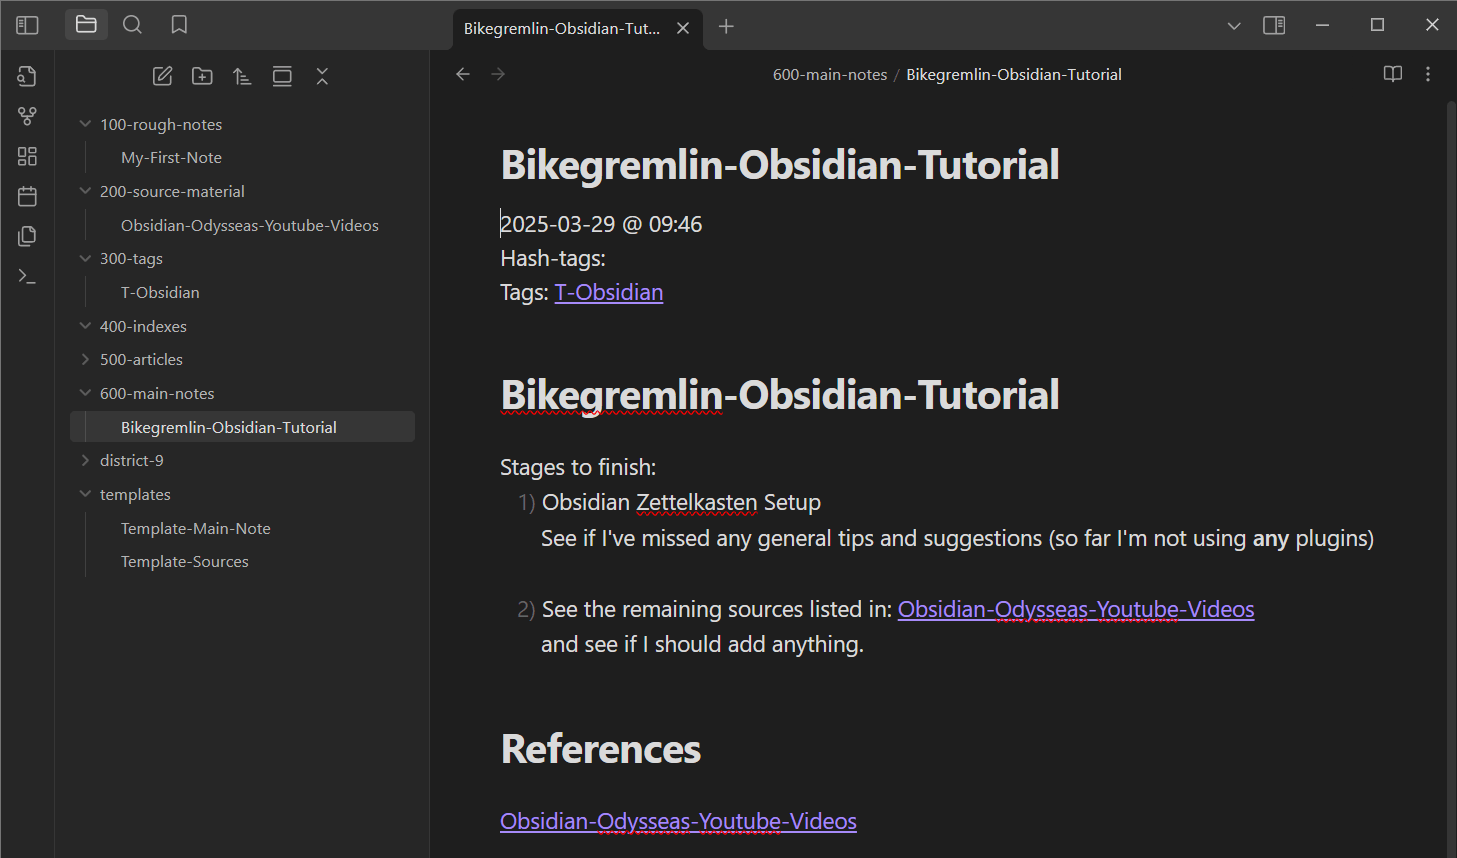
4.3. My “Main-Note” Template
This is what the template for my Main-Note (as titled) looks like (using markdown):
I’ve created this in my “templates” directory, to use for notes.

Picture 4
The markdown “code” you can copy-paste:
Compared to the picture above, I have changed “Status:” to “Hash-tags:”, and removed the empty lines between the first three lines.
{{date}} @ {{time}}
Hash-tags:
Tags:

# {{Title}}


# References
4.4. Visual Customizations
I wanted to make the bold text stand out more compared to normal text. To do that, I went to the snippets directory:
obsidian-relja/.obsidian/snippets/
There, I created a “relja-custom-styling.css” file, with this code:
/* BEGIN Enhance bold text visibility in default theme */
strong, b {
  font-weight: 800; /* Makes text slightly thicker */
  font-size: 1.03em; /* Makes text slightly larger */
}
/* END Enhance bold text visibility in default theme */
Now I could go to menu:
Settings -> Appearance -> CSS snippets
Click the refresh icon, and my new CSS was listed. All I had to do now was to enable it with one click.
Note – the altered CSS is not shown in editing mode (I must click the mode option in the top-right corner to switch to reading mode – or use CTRL + E to switch between modes).
I made a customization for larger font sizes using the same principle:
“relja-font-sizes-larger-but-not-headers.css”
– but this is not needed thanks to the zoom option.
/* BEGIN === Obsidian: Enhance base font and bold styling === */

/* 1. Base font for editor and preview paragraphs */
.cm-s-obsidian .cm-line:not([class*="HyperMD-header"]),
.markdown-preview-view p {
  font-size: 18px;
  line-height: 1.6;
}

/* 2. Base font for sidebars (file explorer, backlinks, search) */
.nav-file-title-content,
.nav-folder-title-content,
.search-result-file-title,
.search-result-file-matched-text,
.backlink-pane,
.backlink-pane .search-result-container {
  font-size: 18px;
  line-height: 1.6;
}

/* 3. Bold styling in editor and preview paragraphs */
.cm-s-obsidian .cm-line:not([class*="HyperMD-header"]) strong,
.markdown-preview-view p strong {
  font-weight: 800;
  color: var(--text-accent);
  font-size: 1.05em;
}

/* 4. Bold styling in sidebars */
.nav-file-title-content strong,
.nav-folder-title-content strong,
.search-result-file-title strong,
.search-result-file-matched-text strong,
.backlink-pane strong {
  font-weight: 800;
  color: var(--text-accent);
  font-size: 1.05em;
}
5. Writing
5.1. Writing A Note
To create a new note, I can use “CTRL + O” shortcut. Type the title (Obsidian will auto-search and list any notes with a similar title). I can click on the listed searched existing note if I prefer to edit an existing note. If I press “Enter”, a new note gets created with the given title.
When a new note has been created, I can use the “ALT + T” keyboard shortcut (the hotkey I had created) to select the “Main-Note” template I had created for the new note.
Now, my note is formated as set with the template. Like magic! 🙂
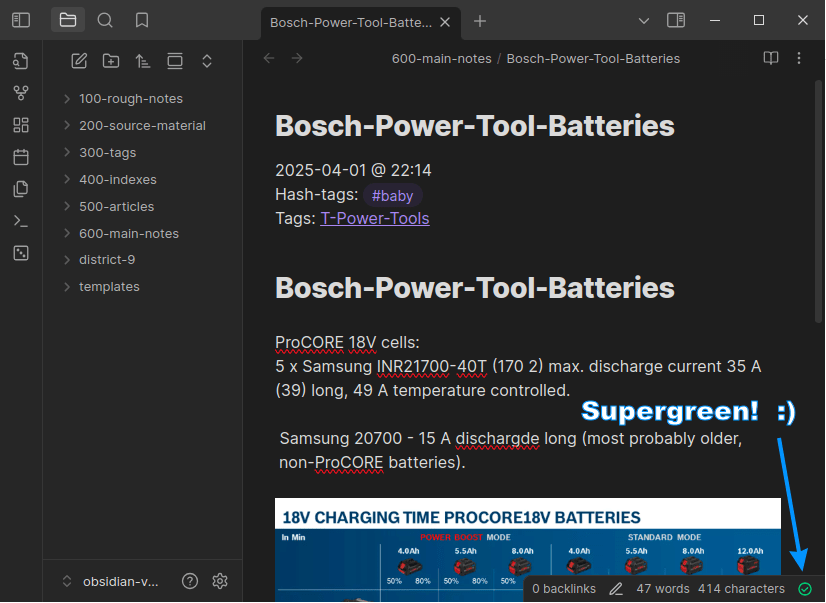
Don’t be worried about a red warning icon in the bottom-right corner – that’s just Obsidian asking for your money (notifying you that you aren’t using Obsidian’s paid-for sync service). You can ignore it (I’m using pCloud for syncing).

Picture 5
5.1.1. Adding An Image/Picture
To add a picture, you must either manually copy it and then link to it using a double bracket (“[[“) to open a quick-search interface – or just drag-and-drop. No insert image menu to select an image.

Picture 6
5.2. Writing A “Tag”
I had configured a directory for “tags”. The idea is to use notes stored there as tags, so I can link to them from different notes (hence the quotation marks).
For making it clear, without confusing the file system, I’ve decided to name each “tag” with a starting “t-“. For example: “t-wordpress-security”, “t-bicycle-compatibility” and similar.
Will see how this fares in the long run.
5.3. Making An Index
Once a tag grows (e.g. 8+ notes), I can turn it into a mini Index:
- Open the tag note (in the “300-tags” directory).
- Add structure: subheadings, links, summaries.
- Move it to the “400-indexes” directory.
5.4. Articles
This is the most questionable section that I might ditch later on. The idea is to write full-length long-form articles and video scripts here, before publishing them publicly.
5.5. Projects (“district-9” Directory)
I intend to use this for any structured, multi-step work (e.g. translating a tool manufacturer’s bicycle tool catalogue, helping an ESL child with English, making a video series, etc.).
For better clarity, all the project notes start with a “P-“.
This can contain short notes (all related to a given project) like:
- “To-do” lists
- Meeting summaries
- Planning outlines
- Relevant source links and references
Each note here is a project dashboard – a “control room” with links to all the pieces involved.
5.6. Links – Internal and External
To insert an internal link in Obsidian, you can just type a double open square bracket ( ” [[ ” ) and get a menu with a quick search for the existing notes – or make an internal link to a new note (it will create a blank new note with the title you used in the link).
For external links, you can just copy-paste hyperlinks, or mark a portion of text, then right-click and choose the “Add external link” option (this menu also lets you add an internal link in the same way).
6. Tips And Guides
- Make the notes easy to read and – I dread the word – “skim” (use paragraphs and subtitles if needed).
- Make them short and to the point. One screen (or say ~ 500 words) and one idea per note is a good rule of thumb.
- To expand upon an idea, make a separate note and link to-and-from in your notes (know what I mean?).
- References: link to notes discussing similar ideas, source material notes, and use the tag-notes.
Yes, I am considering to make a separate directory (“500-articles”) for long-form writing in Obsidian, but I’m not sure if that will later mess up with the quick search function. So, I may keep the publishing on my forum and my websites and YouTube channels.
My current Obsidian setup screenshot, as an example (that I will hopefully look upon in a few years and laugh at my own stupidity 🙂 ):
Picture 7
See my updated Obsidian setup (no Upper case in filenames):
BikeGremlin Deathnotes – My Zettelkasten System
Yes, it is like a recursion: using Obsidian to write about Obsidian. The irony. 🙂
7. Migrating to Obsidian Sync
The good people from Obsidian were kind enough to give me a discount so I can test their paid Sync option.
7.1. Migrating to Obsidian Sync
Do not sync a directory (vault) that is synced using some other tool.
1) Ideally, copy your full vault to a separate directory (on a non-system drive on Windows ideally). For extra clarity and to avoid confusion, I copied the directory from “obsidian-relja-01” (in my Mega.nz synced directory) to “obsidian-vault-relja-01” on the “D:” drive in Windows (home directory is a good choice on Linux).
2) Then, I opened that vault (“obsidian-vault-relja-01”) in Obsidian -> which then allowed me to close the existing (old) vault (“obsidian-relja-01”).
3) Settings -> Sync -> Log In
After that, there is a button to “[Choose]” a remote vault.
Since I haven’t got any Obsidian Sync vaults, the only option available was the “[Create new vault]” button.
This gives me the following options to fill in:
- Vault name: “relja-01-obsidian-sync”
To clearly indicate what it is. - Region: Europe
Whatever is closest makes sense. - Encryption: End-to-end encryption
Most secure and most private. - Password: admin123 (joking 🙂 )
Now I clicked on the “[Connect]” button.
After that, I got a warning about my existing vault, asking if I wish to merge (“Confirm Merge Vault”) to which I clicked “[Continue]”.
All I had to do now was enter the encryption password, which is “admin12…” – joking, again. #dadjoke 🙂
Two options now: “[Manage excluded folders]”, and “[Start syncing]”.
Being a curious monkey, I had to see what the first button does! 🙂 It just gives you an option to exclude a certain directory from the syncing.
Once you’re done, you can start syncing. If you did it all correctly, you get a green tick notification for an active Obsidian Sync:
Picture 8
Note the sync status icon in the bottom right corner changes when you are syncing a newly added vault, or changes to your “old” vault (if the vault is connected and using the Obsidian Sync service):

Picture 9
7.2. Connecting My Phone (IOS)
Without the paid Obsidian Sync, syncing a smartphone is a hassle.
See the sources for a decent tutorial how if you think it is worth spending a Friday night or two troubleshooting (I am not being sarcastic – the student-days-me would have enjoyed that 🙂 ).
The first thing to do is to install the Obsidian app (“Obsidian – Connected Notes” on IOS):
https://obsidian.md/download
Then I opened the app, chosing:
“[Use my existing vault]” -> Obsidian Sync “[Connect to Obsidian Sync]” ->
Entered my email and password and clicked “[Sign in]”
“[Choose an existing vault]” -> Click on the “relja-01-obsidian-sync”
Now I get an unintuitive button “[Create a vault]”, because there is no vault sync copy on my phone yet.
All I had left to do after that was:
- Click “[Start syncing]”, and enter my vault’s password (the now famous “admin123”).
This will show an overview of the sycned stuff. - Click the “[Start syncing]” button again!
This will, finally, start the sync.
7.3. Syncing Another Computer
A tricky part is syncing a computer that already has my “old” (Mega.nz) synced directory. How do I connect it to my Obsidian Sync?
- The first thing to do was create a new directory (on “D:” drive on Windows, and in my user’s “Home” directory on Linux):
“obsidian” - Aftewr this, I opened Obsidian, clicked on the “old” vault (“obsidian-relja-01”), and chose the option “Manage vaults.”
- Then, I closed the main Obsidian window (just kept the Manage vaults window open).
- There, I clicked on “Open vault from Obsidian Sync [Sign in]“.
Entered my email and password (admin123, as anywhere else LOL). - After that, I could see my existing Obsidian Sync vault (“relja-01-obsidian-sync”) and a “[Connect]” button.
- Then I got to enter the “Vault name” (I left it with the already filled-in “relja-01-obsidian-sync”), and click the “[Browse]” button to pick a location (the directory I had created in the first step). Finished by clicking the “[Create]” button.
A new directory is created under the “obsidian” directory:
“obsidian/relja-01-obsidian-sync”
I now had to enter my vault end-to-end encryption password (different from Obsidian account login password), and the “[Start syncing]” button (much like the first PC setup above).
96. Sources
- How to sync Obsidian using GitHub – so that it works on mobile:
https://meganesulli.com/blog/sync-obsidian-vault-iphone-ipad/
A very nicely written guide, but it is still quite complicated. - Obsidian: The King of Learning Tools (FULL GUIDE + SETUP):
https://www.youtube.com/watch?v=hSTy_BInQs8
First basic Obsidian introduction and tutorial video. - Effective Note-Taking to Remember More + Create New Ideas:
https://www.youtube.com/watch?v=_t9R1AnB7ho
The basic principle of “atomic notes” or Zettelkasten explained. - How to become an expert with Obsidian (FULL GUIDE):
https://www.youtube.com/watch?v=IMfz9E7g-Hk
Further explanations of the working principle (how to write notes using the system discussed in the two videos linked above and in this article). - My article explaining the Zettelkasten system:
Zettelkasten – Deathnotes 😈 – “Atomic Notes” - Obsidian forum:
https://forum.obsidian.md/ - Obsidian software:
https://obsidian.md/
Last updated:
Originally published: