Summary
My tried-and-tested DaVinci Resolve export settings for YouTube - fast, decent quality, and not too big. Just what works (so far).
My “YouTube export settings” for DaVinci Resolve Studio 19.x. A work in progress.
DaVinci Resolve Free (the non-Studio version) won’t let you use “GPU acceleration” but many other options are still available.
Introduction
This is intended as a personal reminder and reference. Hoping to get feedback, suggestions and corrections. It is my opinion, based on my experience and, well, testing and asking around. I am an amateur hobby YouTuber (among other things), not a professional video editor. So I don’t claim for this to be perfect, good fit for everyone, or even very good – just the best that I could figure it out for now (will try to keep this up-to-date as I learn new stuff).
Step-by-Step: Custom Export Settings for YouTube
Start in the Deliver tab. Choose “Custom Export” to unlock all advanced settings.
Deliver Tab -> Custom Export
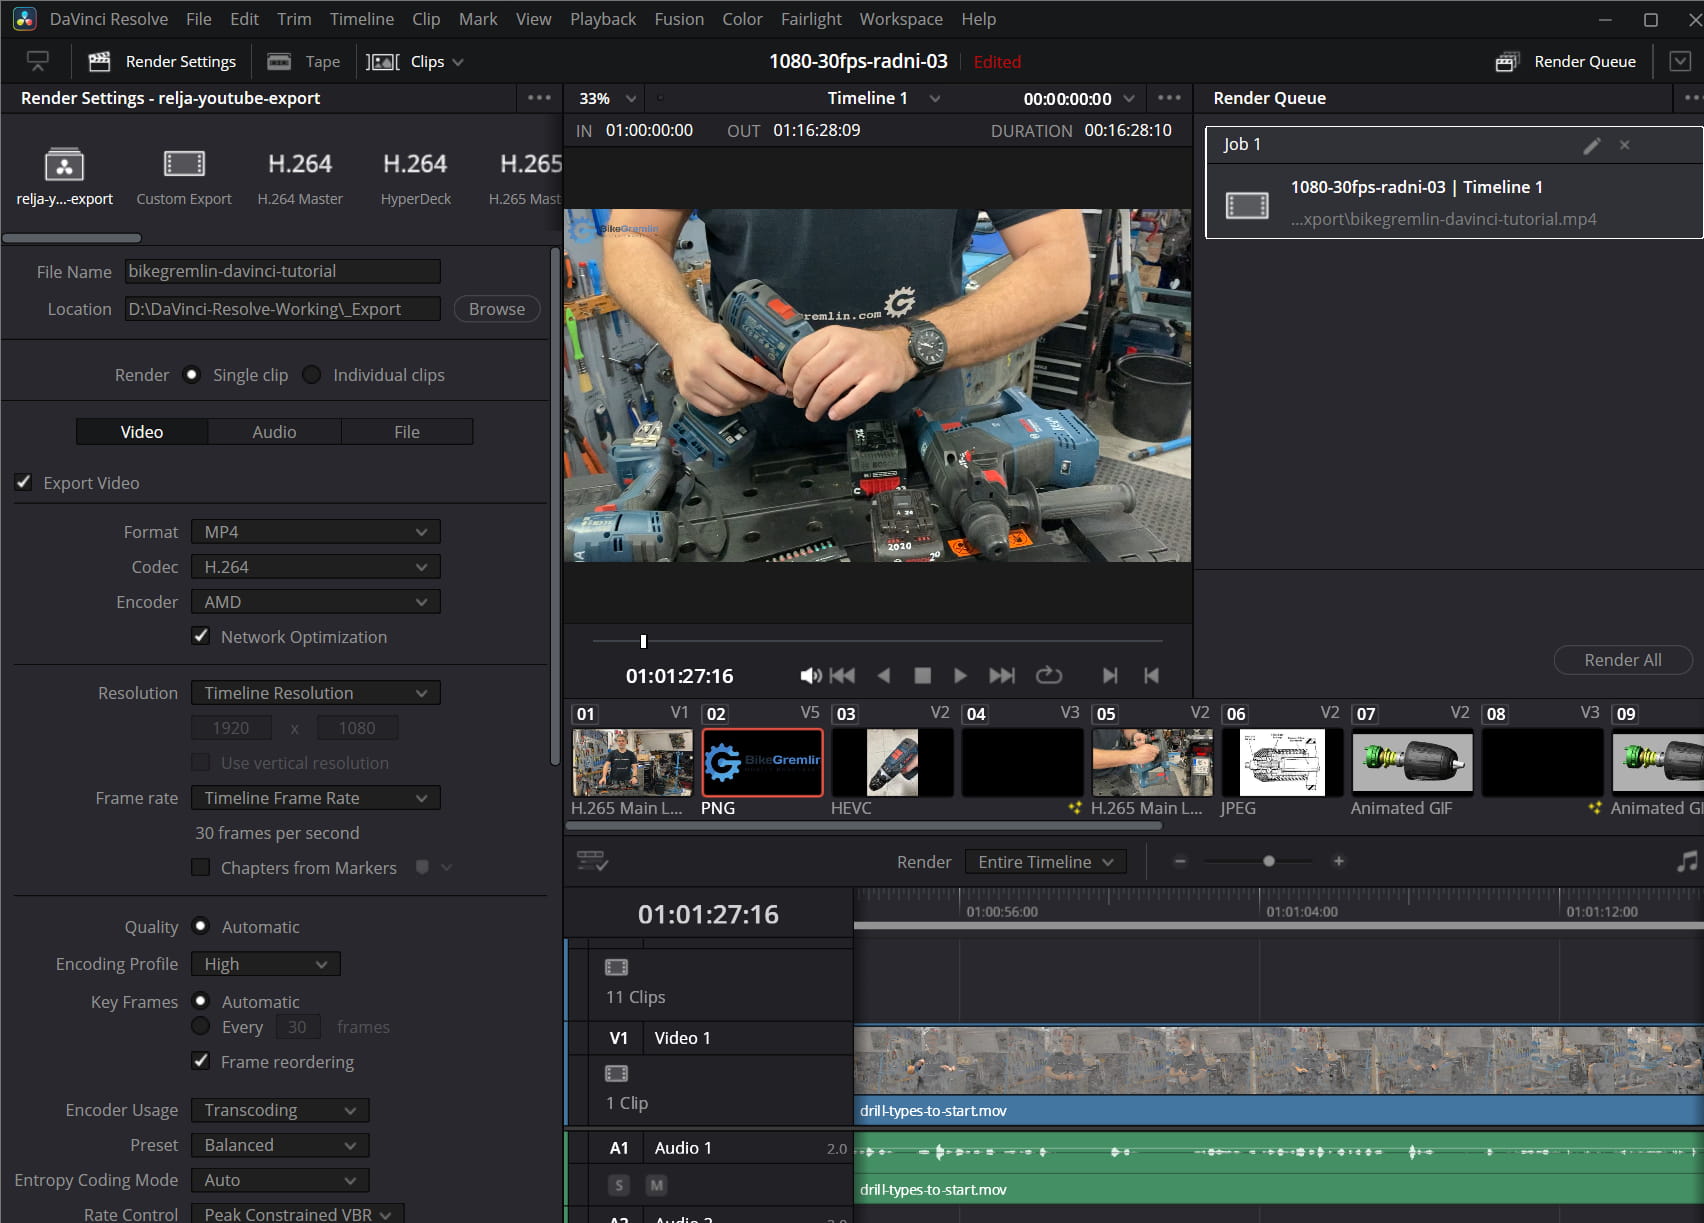
Video Tab
Format settings
- Format: MP4 (see the codec discussed section for details)
- Codec: H.264 (again, see the codec discussed section for details)
- Encoder: AMD (uses hardware acceleration for faster rendering, if you have an Nvidia card, choose that option of course)
- Network Optimization: Checked (moves metadata to the beginning so YouTube can process it all faster)
- Resolution: Timeline Resolution (so it will respect my timeline settings)
- Frame Rate: Timeline Frame Rate (again, same)
- Chapters from Markers: Unchecked
Encoding Settings
- Quality: Automatic (locked when using hardware encoding)
- Encoding Profile: High (ensures better compatibility with modern devices and gives teh encoder more flexibility, like using B-frames and CABAC)
- Key Frames: Automatic
- Frame Reordering: Checked (enables the use of B-frames, which are more efficient and result in smaller file sizes and better quality at the same bitrate)
- Encoder Usage: Transcoding
- Preset: Balanced
- Entropy Coding Mode: Auto (letting the encoder choose between CABAC for better compression, and CAVLC – based on the other settings)
- Rate Control: Peak Constrained VBR (allows the bitrate to adapt to scene complexity while capping the peak)
- Target Bitrate: 20,000 Kb/s (see the bitrates discussed section for details – important)
- Peak Bitrate: 30,000 Kb/s (again, see the bitrates discussed section)
Advanced Settings
- Pixel Aspect Ratio: Square (1:1 pixel shape – “Cinemascope” is only used for ultra-wide film-style exports 2.35:1 etc, which I don’t need)
- Data Levels: Auto
- Retain sub-black and super-white data: Unchecked
- Color Space & Gamma Tag: Same as project
- Gamma Tag: Same as project
- Data Burn-In: Same as project
Render Settings
- Bypass Re-encode When Possible: Checked
- Use Optimized/Proxy Media: Unchecked
- Use proxy media: Unchecked
- Use Render Cached Images: Unchecked
- Force Sizing to Highest Quality: Checked (check if using scaling/zoom effects)
- Force Debayer to Highest Quality: Unchecked (only applies to RAW footage)
- Enable Compatibility with Legacy Players: Unchecked
- Render All Video Tracks: Checked
- Enable Flat Pass: Off (flat pass disables all colour correction and grading)
- Disable Sizing and Blanking Output: Unchecked (I want my zooming in and similar to be shown)
- Trigger Script At: Unchecked (no post-renders scripts for me, for now)
Audio Tab
Audio settings
- Export Audio: Checked
- Codec: AAC (for h.264 codec)
- Bit Rate Strategy: can’t change this for AAC
- Track Data Rate: 320 Kb/s
- Sample Rate: Same as project (48000)
- Render One Track Per Channel: Unchecked (only check this if exporting multi-mono or separate stems like left/right split, or isolated VO/music/sfx)
- Output Track 1: Bus1 (Stereo)
Audio Normalization
- Normalize audio: Unchecked (I do this in Fairlight, before exporting – so no touching any other options here)
File Tab
- Filename uses: Custom Name
- Custom name: e.g. how-to-replace-brake-pads-yt1080p30
- File suffix: blank (leaving this blank, can be used for versioning)
- File subfolder: blank (specify for grouped exports)
- Use ( ) digits in the filename: 8 (has no effect for full timeline exports)
- Each clip starts at frame: Unchecked (makes sense to check for individual clip exports)
- Render without timecode: Unchecked
- Start timeline timecode at: Unchecked
- Replace Existing Files: Not allowed (Resolve protection against overwrites)
Render Speed
- Render Speed: Maximum (faster render, no quality loss with hardware encoder – reduce to 90 or 80 in case of bugs)
Saving Your Preset
Once you’ve set everything up:
- Click the three-dot menu next to “Custom Export”
- Choose “Save As New Preset…”
- Name it something like “yt-1080-60-custom1”
- Optionally, export the preset as a file for backup or use on other machines.
My settings exported (with 12,000 Kb/s Target Bitrate):
https://files.bikegremlin.com/obsidian-files/relja-01/relja-youtube-export-render.xml
Bitrates Discussed
For maximum quality, without wasting storage space, here’s a simple overview table:
| Resolution @ FPS | Target Bitrate (Kb/s) | Peak Bitrate (Kb/s) |
|---|---|---|
| 1080p @ 30 | static: 8,000 fast motion: 12,000 | static: 12,000 fast motion: 16,000 |
| 1080p @ 60 | static: 12,000 fast motion: 16,000 | static: 16,000 fast motion: 24,000 |
| 4K (2160p) @ 30 | static: 25,000 fast motion: 35,000 | static: 35,000 fast motion: 53,000 |
| 4K (2160p) @ 60 | static: 35,000 fast motion: 53,000 | static: 53,000 fast motion: 68,000 |
Table 1
Why H.265 Isn’t Ideal for YouTube Uploads (Yet)
1. YouTube Re-encodes Everything
YouTube doesn’t keep your original file, no matter how efficient or high-quality it is.
Instead, it transcodes (re-encodes) your upload into its own formats for streaming – often multiple versions at different resolutions and bitrates.
This means any quality gain or compression efficiency from using H.265 won’t be preserved, so you get no real advantage uploading in that format.
2. Slower Uploads for Minimal Gain
H.265 files are smaller, but at high bitrates (common for YouTube uploads), the difference isn’t dramatic.
Also, encoding to H.265 is more CPU/GPU-intensive, which can result in slower render and upload times – especially on less powerful systems.
3. Compatibility Issues
While H.264 is universally supported across nearly all devices, browsers, and media players, H.265 playback is still hit-or-miss on older systems and web browsers without hardware decoding.
If you’re previewing your video locally, sharing it before uploading, or keeping a universally playable copy – H.264 is the safer bet.
4. YouTube’s Internal Preference
YouTube’s infrastructure is optimised for H.264 uploads (as far as I know – as noted at the start of this article).
Some users have reported:
- Longer processing times
- Delayed availability of HD/4K versions
- Possible lower prioritisation in YouTube’s internal queue
There’s currently no known benefit (like faster VP9 encoding or better quality retention) from uploading H.265.
When Is H.265 Useful?
H.265 does have a place – just not necessarily for YouTube uploads:
- Archiving your videos locally – Smaller files with similar quality
- Saving YouTube renders for backup – More efficient than ProRes or high-bitrate H.264
- Sharing with people using modern devices – Good for mobile or limited-bandwidth use
- Uploading to platforms that accept H.265 natively – Rare, but possible
Recommended Workflow
- Export to H.264 for YouTube
High bitrate, high quality, maximum compatibility. - Keep an H.265 version for archiving
If you’re low on storage or want to keep efficient backups. - Or better yet: keep your original project files and source media
This gives you the flexibility to re-render in the future, however you like.
TL/DR
Use H.264 for YouTube uploads – it’s faster, safer, and works best with YouTube’s pipeline.
Use H.265 for space-efficient local backups or sharing with modern devices.
Conclusion
These are the settings I currently use for exporting YouTube videos with DaVinci Resolve Studio 19.x – based on testing, googling, and good old trial and error. They aim to balance render speed, compatibility, and quality, especially for hobbyist YouTubers like myself who want solid results without massive file sizes or complex post-processing.
I’ll keep updating this as I learn more or as new versions of Resolve change things. Feedback and suggestions are more than welcome – especially from people who’ve found better ways or spotted any mistakes.
Sources
- YouTube’s own video format recommendations:
https://support.google.com/youtube/answer/1722171 - Blackmagic Forum (many discussions over the years, didn’t remember to note the best ones for this particular topic, but it’s worth a search if you need some good video-editing tips):
https://forum.blackmagicdesign.com/
Last updated:
Originally published: