My notes on how I configured Plex to work via Tailscale. Intended to help my friends and serve the future me as a reminder. 🙂
Note: while I’m happy to share, and even provide some help and advice on the BikeGremlin forum, I do not have the time to offer technical support for the services discussed here – my time is limited.
1. Introduction
Why bother when Netflix exists? Well… here’s why.
1.1. What Is Plex And Why Use It?
Netflix and Spotify killer 🙂
Plex (homepage) is a media server application that allows you to stream your own media – films, TV shows, music, and photos – to other devices. You install the Plex Media Server on a computer or NAS that stores your media files. Then, you can use the Plex app or a web browser on other devices (phones, tablets, smart TVs, etc.) to access and play that media.
As of Spring 2025, playing music requires the Plexamp application (download page) – while the original Plex application is used for all the other media. Your Plex server, used to host all that, is still one and the same.
Plex automatically organises your media, fetches metadata like cover art and descriptions, and provides a slick interface (usually – LOL). It supports remote access, meaning you can stream your media from anywhere, not just on your home network – but this typically requires opening ports on your router, which can be a security risk (hence the Tailscale – see below).
Plex has both free and paid tiers. The free version covers most features, while the paid Plex Pass adds advanced features like hardware transcoding and mobile sync (at the time of writing, Plex still tends to offer discounted lifetime licences on Black Friday).
1.2. What Is Tailscale And Why Use It?
NordVPN Don properly (pun intended). 🙂
Tailscale is a modern VPN built on the WireGuard protocol (Wiki link). It creates a secure, encrypted mesh network between your devices – computers, phones, servers – without needing any manual port forwarding or public IP addresses.
Each device gets a static private IP address within your Tailscale network. This lets your devices connect to each other as if they are on the same local network, even if they are in different places (for example, your home server and your phone on mobile data).
Tailscale handles device discovery, NAT traversal, encryption, and access control. It is especially useful for personal servers (like Plex), remote administration, and secure access without exposing ports to the internet.
Tailscale is free for personal use, with limits on users and devices. You can also share access to specific devices or services with other Tailscale users, making it great for private setups with friends or family.
Yes, you can configure port forwarding and run Plex without Tailscale, but this is more secure (and while more complex, it doesn’t require you to configure port forwarding on your router, so that part is simpler at least).
2. Create or Sign In to Your Plex Account
One small login for you, one giant step for media freedom.
You need a Plex account to use the apps, and also to complete the server setup (if you want to be the one hosting films and music for your family). You can register or log in using email, Google, Apple, or Facebook (I recommend email – fewer moving parts).
3. Server Setup
The part where you turn a PC into a media mafia boss.
3.1. How To Install Plex Server
Point, click, install – like it’s 2010 again.
This part is needed only if you wish to host and share, not for just watching.
Installing Plex Media Server is pretty straightforward. Here’s how I did it on my system – steps may vary slightly depending on your operating system, but the general idea is the same.
3.1.1. Download Plex
Go to the Plex downloads page and choose the version that matches your system:
- Windows
- macOS
- Linux
- NAS (Synology, QNAP, etc. – for the rich 🙂 )
(Synology vendor lock in briefly discussed)
In my case, I used the Windows version.
3.1.2. Install and Run
Run the installer and follow the prompts. Once installed, Plex will launch in your default browser. If not, open this address manually:
http://localhost:32400/webThat opens the Plex Web App – your main way of managing the server.
3.1.3. Initial Server Setup
Give your server a name – something you’ll recognise, especially if you have more than one Plex server in the future.
You can then start adding media libraries (Films, TV Shows, Music, Photos). Plex will scan these directories and try to match them with metadata.
Tip:
Use a clean directory structure like this:
/media
  /films
    /film-name-year/
      film-name.mp4
  /tv-shows
    /show-name/
      /season-01/
        episode-name.mkv
It helps Plex fetch the right info.
3.1.4. Configure Remote Access (Optional)
If you’re using Tailscale (like I am), skip the normal “Remote Access” setup for now. We’ll get to that later (section 5.1).
If you’re not using Tailscale, Plex will try to set up port forwarding automatically – but this can be unreliable and you should configure it manually. Tailscale fixes that, and is a bit more secure. 🙂
3.2. How To Install Tailscale
VPN, but make it magic (and slightly less painful).
Tailscale needs to be installed both on the Plex server and on any device you want to use to access it (like your phone, tablet, or laptop).
3.2.1. Download and Install
Go to the Tailscale downloads page and choose the right version for your operating system:
- Windows
- macOS
- Linux
- Android
- iOS
Download, install, and run the app.
Linux script for installation (though I’ve had better results using the package manager – sigh):
curl -fsSL https://tailscale.com/install.sh | sh
3.2.2. Log In And Configure
The first time you run Tailscale, it will ask you to log in. You can use a Google, Microsoft, GitHub, or Apple account. I used a plain Gmail account – works fine.
Logging in connects your device to your private Tailscale network.
To manage your Tailscale settings, open:
https://login.tailscale.com/admin/machines
Under “Settings”, you can configure “User management” and “Device management” – both have an option to tick for “manual approval” which can be a good safety measure.
Go back to Plex:
Settings -> Network -> Custom server access URLs
Add your Tailscale IP there in the form of:
https://100.x.x.x:32400
“A comma-separated list of URLs (http or https) which are published up to plex.tv for server discovery.”
3.2.3. Repeat for All Devices
Install and log in to Tailscale on each device you want to use:
- Your Plex server (the one hosting the media)
- Your phone, tablet, or laptop (whatever you want to watch or listen from)
Once that’s done, they’ll all be on the same virtual private network (VPN), and able to talk to each other as if they were in the same room.
You’ll be able to access the Plex server using its Tailscale IP address – which we’ll cover next.
3.3. How To Keep The Server Running?
Because waking it up every time is not very Don-like.
Do you want your Plex server to run and be accessible even when you aren’t logged in – just as long as your PC hosting it is turned on?
For that, you need to run both Plex, and Tailscale as services (to start running upon boot, not upon your login).
Tailscale has a neat checkbox “Run Unattended“.
With Plex, it is more complex (pun intended), and you’d need to google how to configure it to run as a service (on whichever operating system you are using to run the Plex server). Explaining this is beyond the scope of this article (and definitely something that Plex should copy from Tailscale or at least write their own decent tutorial for it).
3.4. Give Users Your Tailscale VPN Access
Make your media “an offer they can’t refuse” – securely.
Log in to your Tailscale account and open the admin console:
https://login.tailscale.com/admin/machines
See your server machine listed, hover the three dots to the right of it, and click on the “Share” option.
Enter an email address of the person you wish to invite to your Tailscale Virtual Private Network.
The user should get an email, with a link (“Accept device invite”).
Note:
You can’t share a device with yourself. Just install Tailscale and log in using the same account as your Tailscale server. If device approval is enabled, the new device will show up for approval; if not, it’ll be auto-added.
3.5. Give Users Plex Access
Let them in… but not too far in.
To add users to your Plex server, go to settings:
Manage Library Access -> Grant Library Access ->
enter a Plex username or email (used to register a Plex account).
4. Install Tailscale and Plex – Users
For your friends who say “I don’t get how this works.”
- Create a Plex and a Tailscale account.
- Let the Plex server owner know the email you used to register both of those accounts.
- Install the applications on your devices.
- Accept the Tailscale invite email from the Plex server’s owner (by clicking the “[Accept device invite]” button).
Enter the plex server’s IP address in your browser:
http://100.x.x.x:32400/web
5. What When It Doesn’t Work?
Because it won’t. At first. Maybe later too.
Yeah – it’s a “when” not an “if”.
Plex adds complexity on its own. Add Tailscale on top – and you’ve got yourself a nice little admin/tech-support job to serve your friends and family. If your friends and family are not very tech. savvy (or very young or elderly), it can still get overwhelming. Hell, Plex on its own is often seen as too complicated (compared to using a TV or “even” Netflix and the likes).
There is an alternative that is a bit more risky:
5.1 Plex Port Forwarding – 32400
The risky back-alley way (but hey, it works).
A way to make Plex work without the Tailscale is to allow connections from outside, via port forwarding.
For that to work, you’d need to configure your Plex server’s router to forward a certain port. That is extra work one time – but simpler for your friends and family in the long run (no need to mess with Tailscale).
Yes, port forwarding is a bit more risky. You are relying on Plex for security (and in case of any bugs, zero day exploits etc… well).
It goes without saying that you’ll use 2FA, strong password and similar.
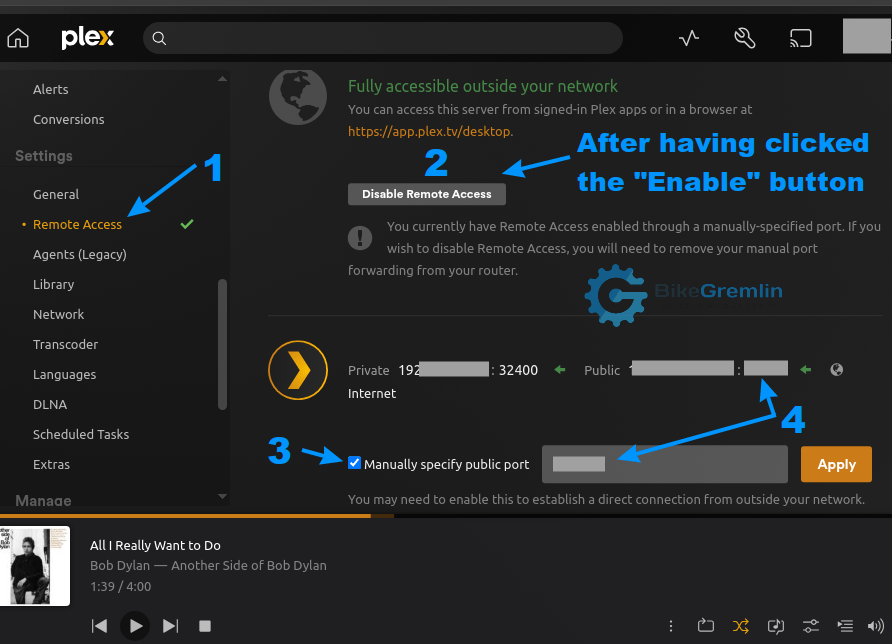
To enable this, go to Plex settings
- Settings -> Remote Access -> [Enable Remote Access]
- Check “Manually specify public port” and set a port in the 20,000 to 50,000 range (just not the default Plex 32400 port).
It goes without saying that you must play Bob Dylan for this to work! 🙂
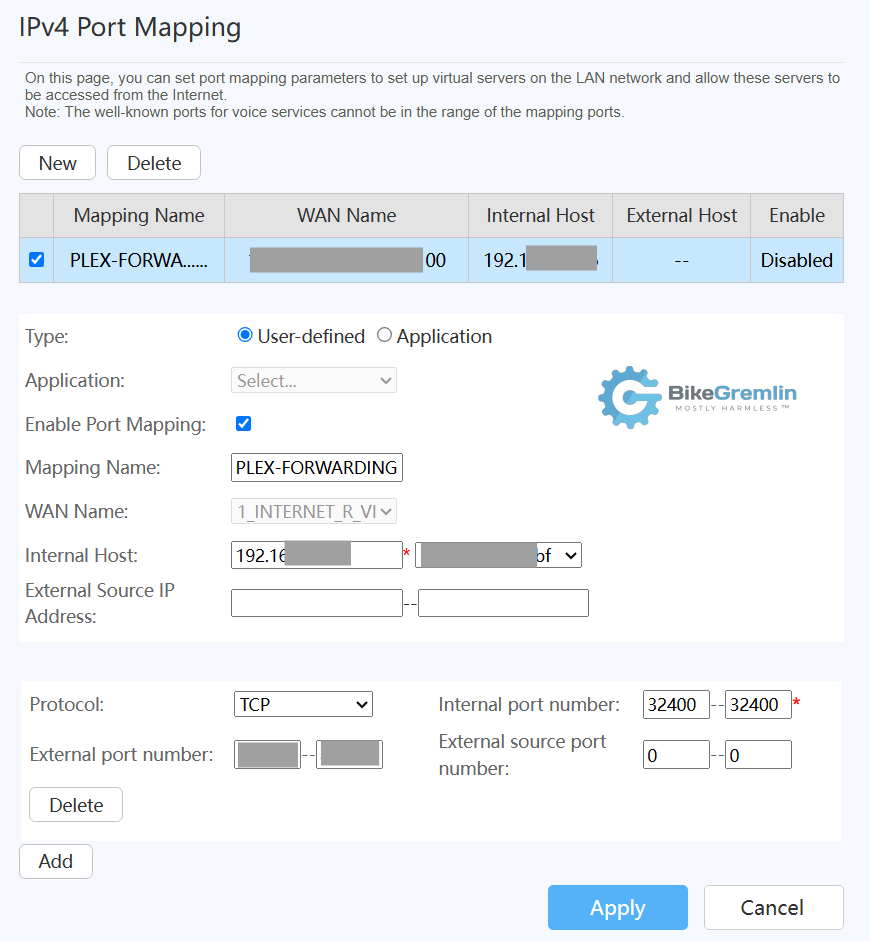
Now, you must log into your router (often 192.168.1.1 by default), have admin privileges, and configure port forwarding (or “port mapping“) from the port you manually specified, to the 32400 port.
Set your PC’s network card as the source IP address (and configure your PC to have a fixed IP address in your local network, preferably, and use a high number so it doesn’t get any collisions with DHCP… or play more to configure your DHCP reservations based on MAC address if you are really bored LOL).
For the External IP leave the full range unless you want to limit who can access based on the IP address(es).
Select the TCP protocol (that’s what Plex uses).
Set internal port number to be the Plex 32400 (or 32400 ~ 32400 if your router forces you to set a range).
For external port number, set the one you configured manually (or manual ~ manual if your router forces you to set a range).
For external source port number – leave blank (or set to 1 ~ 65535 if your router insists on your providing a range).
Here’s an example (once you’ve clicked the “[Apply]” button, status under the “Enable” column should change to “Enabled”):
5.2. Tailscale Port Forwarding – 41641
This is more secure compared to the above-described Plex port forwarding. The principle is the same as shown in the picture above, with some important differeces:
- Set the protocol to UDP (instead of TCP)
- Forward 41641 to that same port -> 41641
Why Would You Do This?
In case Tailscale can’t establish a direct connection otherwise. Tailscale normally uses NAT traversal and peer-to-peer connections, but it can fall back to relays (DERP nodes) if direct connectivity fails.
DERP = low bandwidth (~10 Mbps max), high latency.
No port forwarding on your router might block Tailscale’s ability to establish direct connections, forcing relay use.
Plex (and Jellyfin for that matter) require higher bandwidth for smooth playback – especially for (high-bitrate) 1080p/4K, which relays can choke.
How Is This Safer Than Forwarding Plex Ports?
- Traffic is fully encrypted (WireGuard) and authenticated via your Tailscale login
- No services are exposed to the Internet
- No open HTTP interface, no risk of web attacks
- Plex security flaw won’t open a vulnerability for unauthorised access.
Even if someone scanned and found your public IP had UDP 41641 open, they:
- Couldn’t handshake with Tailscale
- Couldn’t sniff the traffic
- Would get nothing in return – Tailscale ignores unauthenticated requests
How To Confirm It Works (Directly)?
First go to:
https://login.tailscale.com/admin/machines/
Click on your server. It should display the port under endpoints:
101.66.99.102:41641  (that is your external IP address)
192.168.1.69:41641  (that is your internal IP address)
Open the command prompt on the server and type:
tailscale statusYou should see something like this:
100.92.42.24    your-server           your-nick@ server's-OS-
100.93.69.69  your-connected-device      connected-device-user@ device's-OS     active; direct 212.200.21.32:32206, tx 11317064 rx 244760
Your connected device’s IP address will be shown, along with a random port (“212.200.21.32:32206” in this case), but the important part is to show “direct“.
6. Conclusion – instead of a foreword
Look what they did to my boy…
As I was fighting the flu – half asleep with a fever, half awake – I ended up watching The Godfather (Part I) on Netflix. It’s one of those films I like to revisit from time to time… once a decade or so. 🙂
The next day, feeling a bit better and ready for Part II, I found it had been pulled from Netflix.
This setup isn’t really about saving money. It’s about keeping what’s good and valuable, and being able to share and revisit (and discuss) it – with people you care about, whenever you want.
Because some things shouldn’t just vanish overnight.
Sources
- Troubleshooting Remote Access
Plex support article - DERP servers
Tailscale DERP nodes explained on theri website - Connection types
Tailscale technical overview article
Last updated:
Originally published: