
This article is basically my personal notes about installing, configuring and securing Blesta. Feel free to help yourself, but don’t blame me if something goes wrong. 🙂
This is a work in progress – I’ll update the article as I figure out more stuff.
1. Introduction – what is Blesta?
Blesta is software that lets you set up a billing and service selling portal, customer support portal, and knowledge base.
It is primarily aimed at web-hosting services, but you can make it work for other stuff as well. A cool feature is you can configure it to offer support service via email. That is: a customer sends an email to your support department’s address, and Blesta turns the email into a support ticket automatically.
Compared to all the similar software options I’ve tried, Blesta is the best (or the least bad for the pessimists like me 🙂 ).
Disclaimer
I’m not endorsing, nor selling Blesta, and am in no way affiliated with the company that makes the software – I’m just a (dumb) user. Blesta is not perfect. It too has bugs, hiccups, and logs show occasional PHP errors. However, thanks to the spirit of our times, for better or for worse, despite looking like it’s held together with duct tape and WD-40, it is still the best and most robust software for its use. And, just as importantly, its developers are actually listening to the user feedback and working hard to patch and improve it (unlike WHMCS for example). That’s why, after having tested several alternatives, I’ve decided to go with Blesta, and give my money to the good people of Blesta’s team.
2. Recommended system requirements
Here’s a link to the software’s official site explaining the Blesta system requirements.
Configure your hosting account. Extensions for PHP 8.2, 8.3. or 7.4:
Recommended system requirements:
- PHP version 7.4 (8.1 for Blesta 5.6 and newer versions; 8.2 for Blesta 5.9 and newer, 8.3. for version 5.11 and newer).
- PHP extensions:
curl (version 7.10.5 or later), gd, gmp, iconv, imap, ioncube_loader, json, ldap, libxml, mailparse, mbstring, openssl (version 1.1.1a or later), PDO, pdo_mysql, simplexml, soap, and zlib. - MySQL version 5.7.7, or MariaDB version 10.2.2 or later with max_allowed_packet = 128M or higher, and wait_timeout = 3600.
- Apache, IIS, or LiteSpeed Web Server.
- ionCube PHP loader.
- memory_limit set to 256 MB or greater.
- max_input_vars set to 10000 or greater (Config options with many options/prices can exceed the default 1000).
What some of the above-listed PHP extensions are used for:
- The gd extension is recommended for better image support during PDF generation and internal captcha generation.
- The gmp extension is highly recommended for better performance.
- The iconv extension is required for special character encoding and decoding.
- The ioncube_loader extension – won’t work without it, as far as I know.
- The imap extension is required to send and receive mail via SMTP and IMAP.
- The libxml extension is highly recommended as it may be required to interface with some systems.
- The mailparse extension is required for parsing incoming emails.
- The mbstring extension is required by some optional features.
- The simplexml extension is highly recommended as it may be required to interface with some systems.
- The soap extension is required for automatic VAT tax handling.
- The zlib extension is highly recommend for better performance.
For better performance, ensure that the following directory is writable by the webserver:
- home/user_name/public_html/cache/
for cPanel - home/user_name/domains/domain_name.com/public_html/cache/
for DirectAdmin
If you are installing Blesta under a directory with your cPanel/DirectAdmin account, the paths will include the directory path after the “/public_html/” and before the “/cache/”. So, if you want Blesta to run under example.com/blesta/, the paths would look like this (say our cPanel/DirectAdmin username is john):
- home/john/public_html/blesta/cache/
for cPanel - home/john/domains/example.com/public_html/blesta/cache/
for DirectAdmin
3. Installing Blesta
Create a database and a user for the database, and write down this info, along with the DB user password.
Go to the official Blesta website and download the latest install.
When you get the .zip file, it will contain a directory called “blesta”.
Extract the contents of that directory to where you wish Blesta to run (either a subdirectory or your main public directory, such as “public_html”).
For the remainder of this tutorial, I’ll assume the username is “john,” that we’re using cPanel, and that Blesta is installed in the root of the public directory using “example.com” domain.
“Just make sure, if you’re moving installs maybe, make sure to save your blesta.php in config directory, as it contains your encryption key.”
Aleksa Đorđić from code-cats.com (my Blesta PayPal buttons plugin affiliate link)
3.1. Cron job configuration
For all the automated services, like billing, invoice notifications etc. to work properly, you need to configure a cron job. To configure the cron job, you need the following info:
- Your Blesta installation’s index.php path.
- Your PHP (7.4) path.
In our case, Blesta’s index.php path is:
/home/john/public_html/index.php
And here’s how to figure out your PHP path. In our example, it is:
/opt/alt/php74/usr/bin/php
Generally, the cron job looks like this:
/your-php-path -q /your-index.php-path/index.php cron > /dev/null 2>&1
The last part (“> /dev/null 2>&1”) is important to prevent having a ton of logs written to your server whenever the cron job runs. For our example, here is what the cron job would look like:
/opt/alt/php74/usr/bin/php -q /home/john/public_html/index.php cron > /dev/null 2>&1Code language: JavaScript (javascript)If you don’t configure this properly, your Blesta dashboard Home screen will show red in the “System Status” widget (“revs dial will be all the way to the left). However, even if you configure everything properly, you may see this:
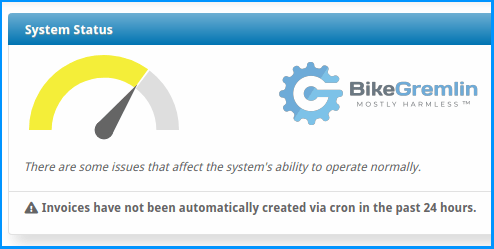
Picture 1
To check if it’s a false alarm, go to:
Tools (main menu) -> Logs -> Cron (tab)
and see the dates and times when cron was run.
If you configured the cron job to run in 5-minute intervals, the log should show the most recent run every time you check it.
4. Securing your Blesta install
By default, anyone can access the “example.com/admin/“. This isn’t a huge problem, generally, if it weren’t for the fact that anyone can force a Blesta update by simply visiting “example.com/admin/update“
To prevent unauthorized access and make Blesta more secure, I’ve used Cloudflare Access to block the /admin/ path without an authorization. Relevant link:
https://developers.cloudflare.com/cloudflare-one/applications/configure-apps/self-hosted-apps/
Update:
I wrote a step-by-step tutorial for configuring the Cloudflare Zero Trust protection.
For it to work as intended, it’s a good idea to have your email server/client whitelist this email:
[email protected]
To re-test the authentication, here’s how to reset your auth. session (if it hasn’t expired) – just visit one of these two links:
<your-application-domain>/cdn-cgi/access/logout<your-team-name>.cloudflareaccess.com/cdn-cgi/access/logout
The source of this tip:
https://developers.cloudflare.com/cloudflare-one/identity/users/session-management/
5. Customizations
5.1. How to change the favicon
Go to your Blesta install directory, and then open this path:
app -> views -> client -> your-theme-name
Replace the “your-theme-name” with the Blesta theme you are using. A path example:
public_html/app/views/client/bootstrap
Then, find the file named “structure.pdt“.
Within that file, find the line that starts with:
<link rel="shortcut icon"Code language: HTML, XML (xml)Here’s an example of that line:
<link rel="shortcut icon" href="<strong><?php echo $this->view_dir;?>images/favicon.ico</strong>" />Code language: HTML, XML (xml)See the part that is put in bold letters? Replace that part with a full URL of your favicon.ico file (wherever you’ve uploaded it). Don’t forget to leave the quotation marks.
Here’s an example of what that looks like:
<link rel="shortcut icon" href="https://example.com/favicon.ico" />Code language: HTML, XML (xml)
5.2. Customizing the home page
The home page is designed and edited using HTML code (link to a free online HTML editor). In order to customize, go to:
Settings (top-right corner) -> Company (tab) -> Plugins -> Installed (tab) -> Portal -> Manage
6. Configuring Blesta to work with cPanel
You can configure Blesta to create accounts for your cPanel hosting packages.
Creating and configuring cPanel hosting packages using WHM is a topic for a separate article.
We’ll be going back and forth between WHM (cPanel) and Blesta.
Blesta will need a cPanel API to do its magic. So the first thing to do is create an API token in WHM. To do that, go to:
WHM -> Development -> Manage API Tokens -> Generate Token
You should whitelist the IP address of your server running Blesta, name you API, and deselect the privileges you don’t want it to have. Click “Save” when you’re happy.
Write down the token – better yet, copy/paste it to your KeePass database (link to my YouTube).
You will also need your server’s hostname, and your WHM account username.
Now go to Blesta:
Settings -> Modules -> Available (tab) -> cPanel -> Install
If all went well (why shouldn’t it? 🙂 ), the cPanel module will then appear under the “Installed” tab. Click on the “Manage” button, then click on “Add Server,” and fill in the required fields:
- Server Label – here, you must enter “DeadPool”…. OK, OK, I’m joking, name it however you wish. 🙂
- Hostname – your hosting server’s hostname goes here.
- User Name – your WHM account username.
- Token (or Remote Key) – copy/paste the WHM API token.
- Use SSL when connecting to the API (recommended) – checked.
- Account Limit – how many accounts created do you think is wise/possible.
- Name server 1 and 2 – your hosting server’s nameservers (the one cPanel accounts are using if they aren’t on Cloudflare or similar).
If you have several servers, you can create Server Groups, and assign several servers to one group.
Now, go to Packages (main menu) and create package groups and packages.
When creating a package, click on the “Module” tab, select the “cPanel” module and the server you want for the package. Choose a server group (if you’ve created one), and select a hosting package (you’ll see a dropdown list of the packages you have on the server – as you had created them under WHM).
Here, you can also add plugins, like IP Unblocker, if you’ve installed it (it’s a good idea). Just click on the arrow to move it from the “Available Plugins” list to the “Assigned Plugins” list.
The “Welcome Email” tab is next. Click on the “Load Sample Email” button, and edit to your liking (it’s simpler than writing it from scratch).
The “Configurable Options” tab requires a separate chapter (creating groups and options). This tab lets you add configurable options you had already created to your package.
7. Configuring Blesta to work with DirectAdmin
This procedure is basically identical to the above-explained cPanel integration. Only, you will install the “DirectAdmin” module instead of the “cPanel” module:
Settings -> Modules -> Available (tab) -> DirectAdmin -> Install
Then, the DirectAdmin module will be listed under the “Installed” tab in the “Modules” section – go there and click on the “Manage” button for the module.
Click on the “Add Server” button. Enter your DirectAdmin server’s hostname, DirectAdmin’s port (2222 usually), your DirectAdmin username and password, and nameservers.
If your DirectAdmin runs on a port different from the default 2222, edit the module’s file:
/components/modules/direct_admin/apis/direct_admin_api.php
Find these two lines and edit them by replacing the “2222” with your DirectAdmin port:
var $apiUrl='http://directadmin-install:2222';

$this->apiUrl = rtrim($url, "/") . ":2222";Code language: PHP (php)
8. Multilingual Blesta – adding languages
I’ll be blunt: Blesta’s support for my native (Serbian, Serbocroatian) sucks, badly. I’m not sure about the situation for other languages, but I have my doubts – the following text will probably explain why. However, there’s no reason to make the most of it, and here’s how (while I’m certainly hoping to see improvements in the upcoming Blesta updates).
For start, here is where you can download Blesta language packs:
https://translate.blesta.com/
Here is my contribution for the Serbian latin (i.e. Serbocroatian) language pack (I’ve translated all the missing pieces I found):
https://files.bikegremlin.com/programs/control-panels/sr_rs-5.5.2-bikegremlin-2020-10.zip
Whichever langauge pack you download, it is zip-packed. Inside the package, there’s a “public_html” directory, underneath which there are three directories:
- components
- language
- plugins
You want to copy these directories (un-zipped) to the directories where you Blesta is installed – those directories will already exist in your Blesta directory. Then, go to:
Settings -> General -> Internationalization
There, you will see the new language, and you can click on the “Install” option.
You will now be able to translate some options and messages to your language. Email templates, for example (my translation does fix some system email templates that you don’t get to translate otherwise for Serbian at least, like email confirmation template).
At the time of writing, because of a bug, Knowledgebase article translation doesn’t work on the frontend (the default language version is always shown, regardless of which language you select).
You can link directly to a certain language version of your Blesta page. To do that, just add:
“?lang=language_code”
to the end of the URL.
The language codes can be seen in the Internationalization settings:
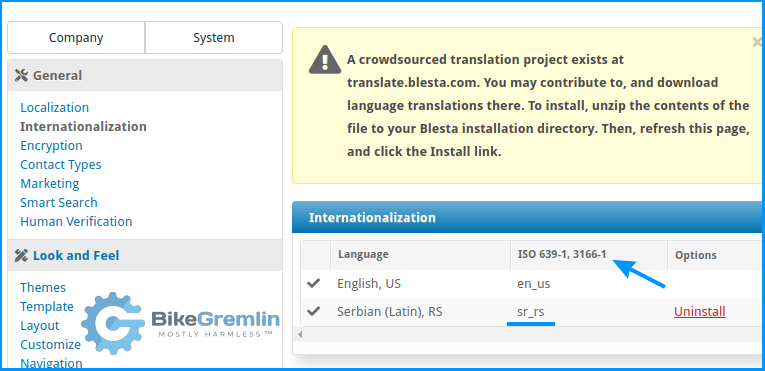
Picture 2
So, for our example.com install, a link to an /order/forms/ page would look like this:
- https://example.com/order/forms/?lang=en_us
for English - https://example.com/order/forms/?lang=sr_rs
For Serbian
Neat, isn’t it? 🙂
It’s too early for any conclusions. This is a work in progress. Blesta works fine, despite the above-noted problems (that make it a bit more work with non-English speaking clients). As a man falling off a 10-storey building says: “So far, so good!” 🙂
As with most of my articles – any additions or corrections are more than welcome.
9. How to update/upgrade Blesta
See the stuff defined in chapter 3 of this tutorial. Basically: in this example, we are running Blesta on the “example.com” domain, and our cPanel user is “john”.
When you download a Blesta update or a patch, you’ll get a .zip file that usually contains this:
- [blesta]
directory - [hotfix-php8]
directory - README.MD
file - LICENSE
file
Since Blesta sucks with PHP 8.X, all we care about is the world peace “blesta” directory. Update: Blesta 5.6 version works fine with PHP 8.1. We still only care about the “blesta” directory (as the “hotfix-php8” directory is used only if you can’t use ionCube loader and must rely on SourceGuardian). We want to copy all the contents of that directory to a place where our Blesta is installed. It contains a list of directories (with files in each one).
Update 2024:
Blesta 5.9 (and newer) works with PHP 8.2.
Update 2025:
Blesta 5.11 (and newer) works with PHP 8.3.
We want to copy these contents over the existing directories (and files) in our Blesta install directory (overwriting them). The way I do that is:
- Extract the original Blesta update/upgrade file.
- Compress the contents of the “blesta” directory in one .zip file (not the directory itself, but all the directories inside of it) – say “bikegremlin-blesta.zip“.
- Upload the file “bikegremlin-blesta.zip” to
/home/john/public_html/ - Extract the file, overwriting any existing files.
You can log in to your Blesta as admin (just in case) and go to:
https://example.com/admin/upgrade
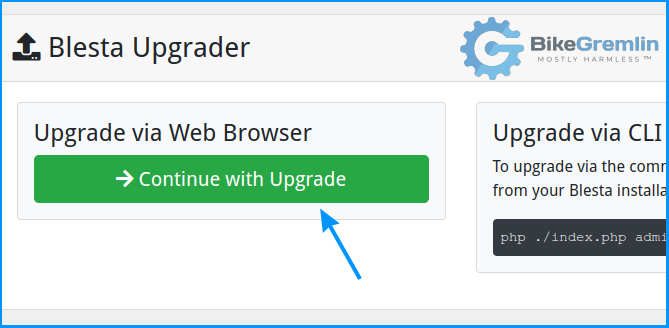
Picture 3
You will then get a screen with a button that says “Upgrade.” Click on it and wait.
After a short period, you should see something like this:
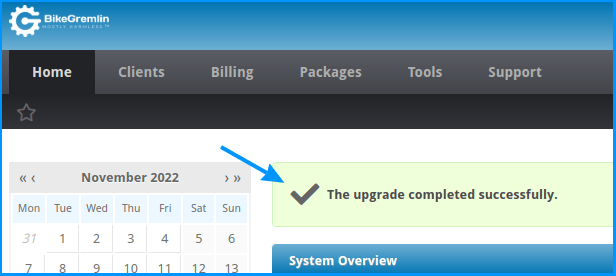
Picture 4
10. Blesta DirectAdmin module problem – solved
I ran into a problem with Blesta’s DirectAdmin module. It wouldn’t load user packages I had created on a DirectAdmin reseller hosting server. cPanel module worked just fine, but DirectAdmin just wouldn’t. Here’s how the problem manifested itself:
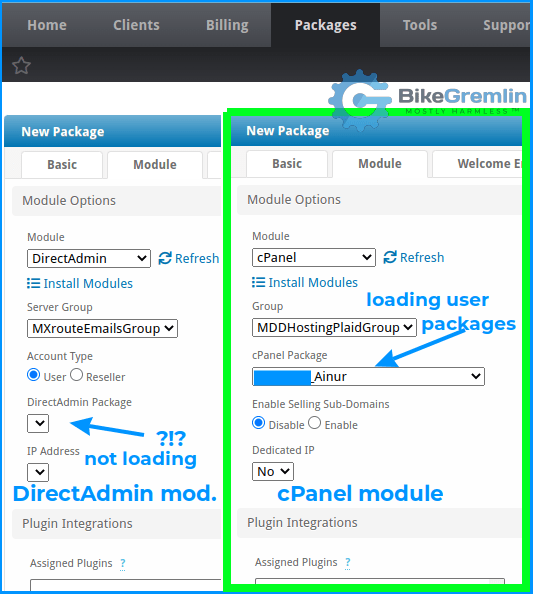
Picture 5
My Blesta install is on a cPanel reseller hosting server (with MDDHosting). As it turned out, the problem was caused by my Blesta install (cPanel) server not allowing outbound connections via port 2222, which is the port used for connecting to DirectAdmin servers.
Figuring this out took a lot of time and head-bashing by both the reseller hosting providers (for cPanel and DirectAdmin), and Blesta technical support. All the guys spent hours trying to figure it out and were really willing to help (I didn’t get any “the problem’s not on our end, bug off!” answers).
Ports or IP addresses being blocked was suspected by most tech. support guys pretty early on. What complicated things was that the cPanel hosting provider whitelisted port 2222 for inbound, not for outbound connections (only those who never do any work never make any mistakes).
So, if you run into a similar problem, double-check the firewall settings and make sure that the needed IP addresses and port 2222 are open.
If you are interested, on the LowEndSpirit forum, there is a full discussion about this Blesta DirectAdmin module troubleshooting procedure.
11. Tips & Tricks
To quickly see the pending orders, you can use a hyperlink:
https://example.com/admin/widget/order/admin_main
Let’s add it to the staff menu.
Go to
Settings -> Look and Feel -> Actions (on the left – yes, very unintuitive interface)
Click on the + (plus) icon and then select “Staff Navigation Menu”
Name it (“PENDING orders” for example)
Copy/paste the URL as shown above, just replace the “example.com” with your Blesta portal’s (sub)domain.
12. Direct Admin server connection problem after an IP address change
This took me a few hours to figure out. What had happened:
- My MXRoute DirectAdmin reseller email hosting server changed its IP address (moved stuff to a whole new server).
- The server kept the same hostname.
When a customer tried to “buy” my Direct Admin service, it would not deploy, got stuck in the “Pending” state. The first thing I did was check the Blesta logs:
Tools -> Logs -> Module -> DirectAdmin entries
There, I found this error (“lucy.mxrouting.net” is my DirectAdmin server’s hostname):
lucy.mxrouting.net
a:3:{s:5:"error";s:1:"1";s:4:"text";s:21:"Cannot Create Account";s:7:"details";s:40:"That IP does not exist in your list<br>
";}Code language: PHP (php)
How I’ve fixed it?
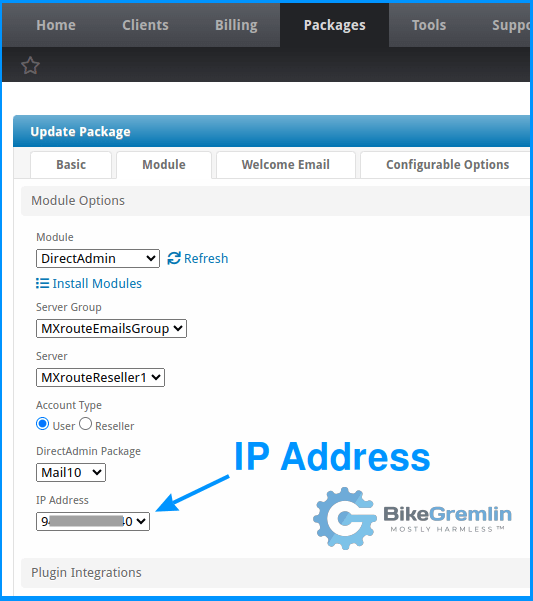
- Packages -> Packages ->
Edit every package related to the “problematic” Direct Admin server.
Double check if your current DirectAdmin service IP is “imported” properly, by clicking the “Module” tab and checking the “IP Address” field.
No need to change anything, just click “Edit” and then “Update Package” (bottom-right corner button). - Delete the currently ordered service.
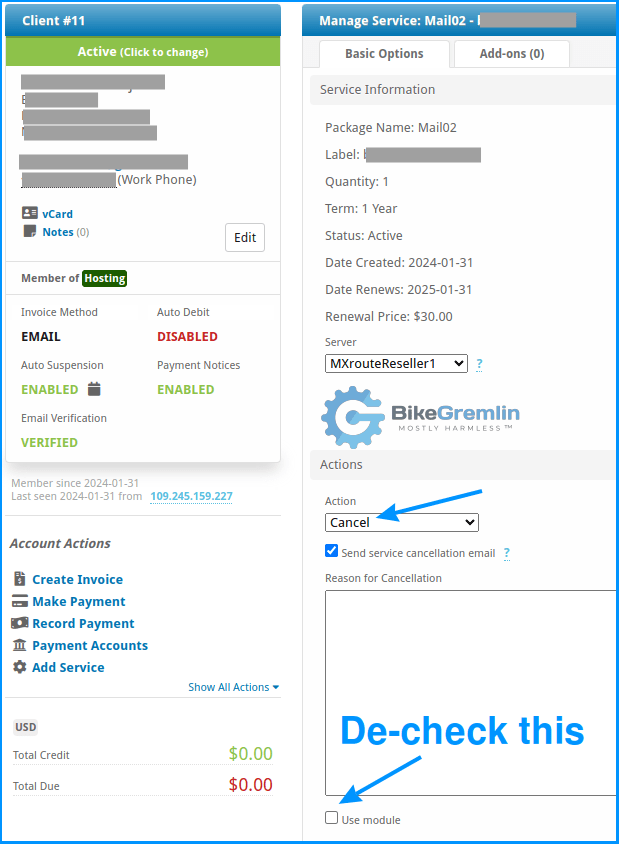
Clients -> The affected client -> Services -> Manage (for to the Direct Admin service)
-> Actions -> Cancel -> De-check the “Use module” checkbox. - Order the service again and it should all be good.
If you don’t enter the correct password for your (new?) server, you’ll get this error (“lucy.mxrouting.net” is the server’s hostname):
lucy.mxrouting.net
a:0:{}Code language: CSS (css)
Some screenshots for help:
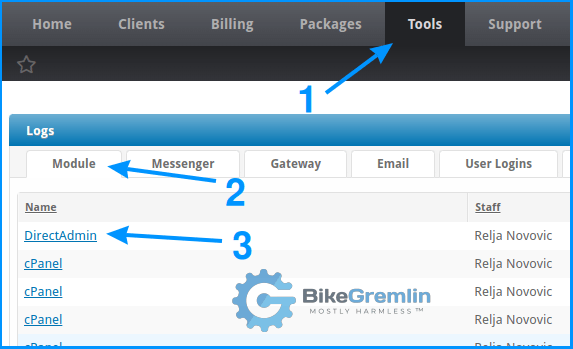
Click on the field, not on the hyperlink to see the log
Picture 6
Picture 7
Picture 8
– on my dick I carry your w8! 😛
Kudos to the MDDHosting, MXroute, and Blesta tech. support for really helping out with this great speed and competence. Though it’s fair to note that this is apparently a known bug in Blesta that really should be patched.
Last updated:
Originally published: