How to create a Google Analytics account for your website and how to set it for tracking website statistics using Google’s Analytics tools. An example will be made for a new WordPress website, but the principle is the same for any other. I’ll provide step by step instructions with pictures. Separate posts explain how to set up another useful tool: Google Search Console, and how to fix problems with Google Analytics on a WordPress site.
Since you are interested in this topic, I suppose you could find another article I wrote useful, one that explains how to do SEO for a website.
1. What is Google Analytics for?
If you are interested in knowing the average number of website visitors (per day, month, for the past six months…), where the visitors are coming from, average page load time, which pages are most visited and many other stats, Google Analytics is a very good free tool that for it.
In this post I won’t explain how to see and read those stats (there are many tutorials on the Internet and the user interface is quite easy and intuitive), but I’ll explain how to create an account and “connect” it with your website.
2. Creating a Google analytics account
Create a Google (Gmail) account if you don’t have one, or want a separate one to be used with the website.
Go to analytics.google.com and log in using the Google (Gmail) account of your choosing.
There you will get an option to sign up with Google analytics.
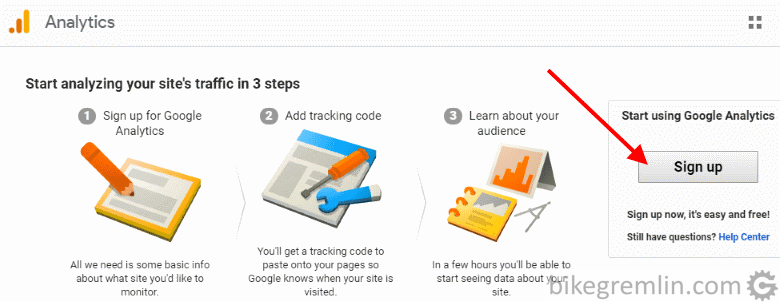
Picture 1
After clicking the “Sign up” button, you’ll be taken to a page to fill in information for the account and your website.
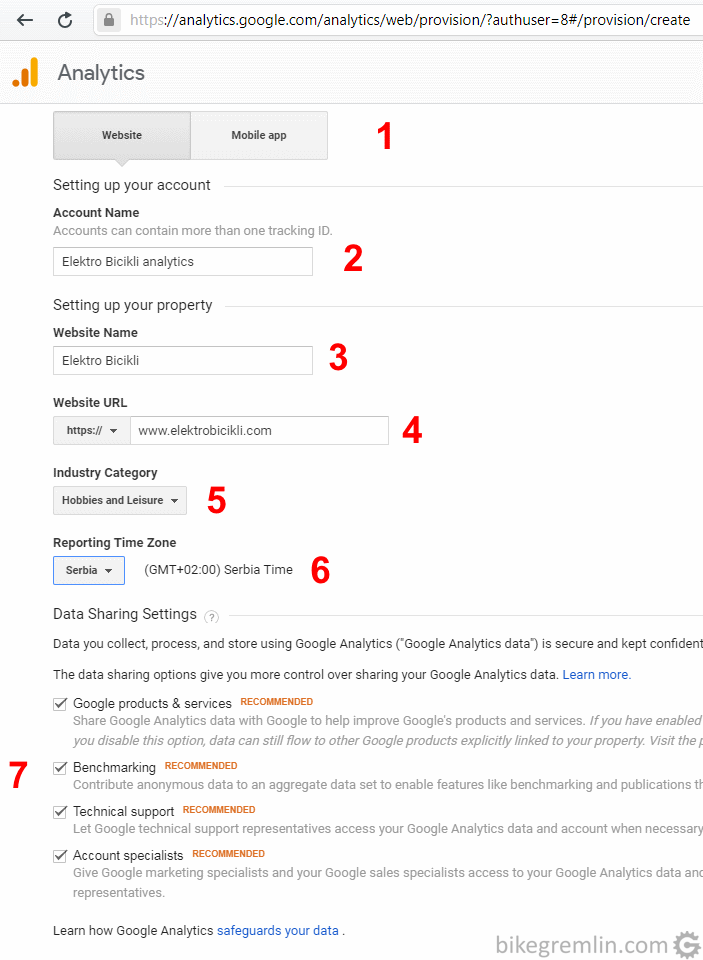
I think the picture is self-explanatory. If you have any questions, use comment field below this post.
Picture 2
All that’s left is the “classic” “I Agree”.
Picture 3
This concludes the account setup and you’ll be automatically redirected to Google Analytics control panel.
3. Connecting Google Analytics with your website
Now we need to get the statistics “tracking code” to be placed on the website. One analytics account allows setting up multiple websites (called “properties”).
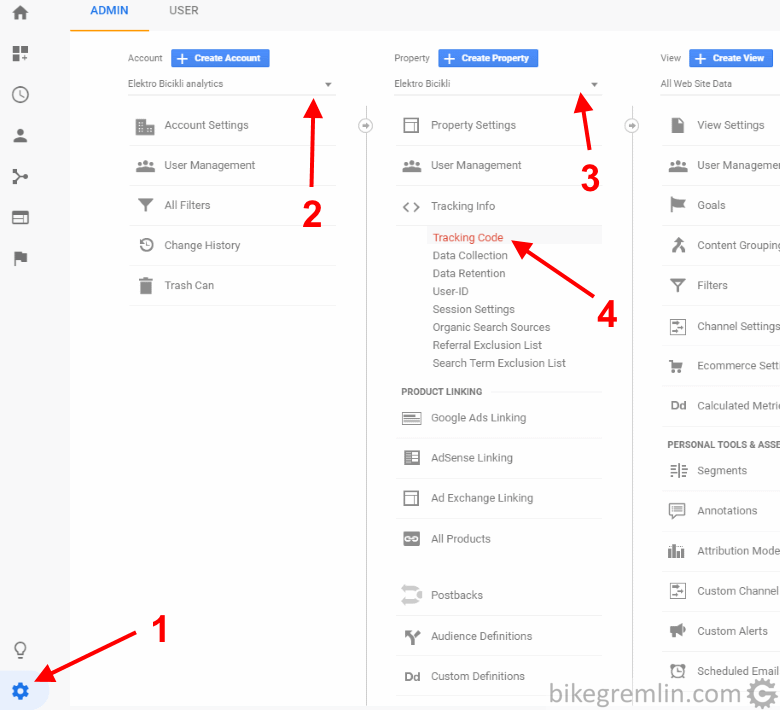
Choose the account name (2)
Choose the “property” (your website) (3)
Click on “Tracking Code” (4)
Picture 4
Afer this you’ll get the code that should be added to the website.
Picture 5
Now, this code needs to be added to the website. With all the websites, generally, the code from picture 5 can be copied to the <HEAD> section of every page you want to track. For WordPress websites, this can be done in several ways:
- Using a plugin, like Google Analytics Dashboard for WP for example.
- Creating a child theme and adding the code to the header.php, or functions.php of the child theme.
The code can be copied as it is in Google Analytics if adding it to header.php. Just paste it below the line containing “wp_head()”. If using functions.php, then a slight alteration is needed:
// BEGIN Google Analytics

function ns_google_analytics() { ?>
   <script async src="https://www.googletagmanager.com/gtag/js?id=UA-XXXXXXXXX-X"></script>
   <script>
      window.dataLayer = window.dataLayer || [];
      function gtag(){dataLayer.push(arguments);}
      gtag('js', new Date());

      gtag('config', 'UA-XXXXXXXXX-X');
   </script>
   <?php
}

add_action( 'wp_head', 'ns_google_analytics', 10 );

// END Google AnalyticsCode language: JavaScript (javascript)
4. Testing if Google Analytics “works”
Now it is time to test if it all works. Open a page on your website (disable ad-blocker if you are using one).
In a separate browser tab open Google Analytics control panel and see if “Active Users right now” shows the website pages you are browsing. If yes – it’s working! 🙂
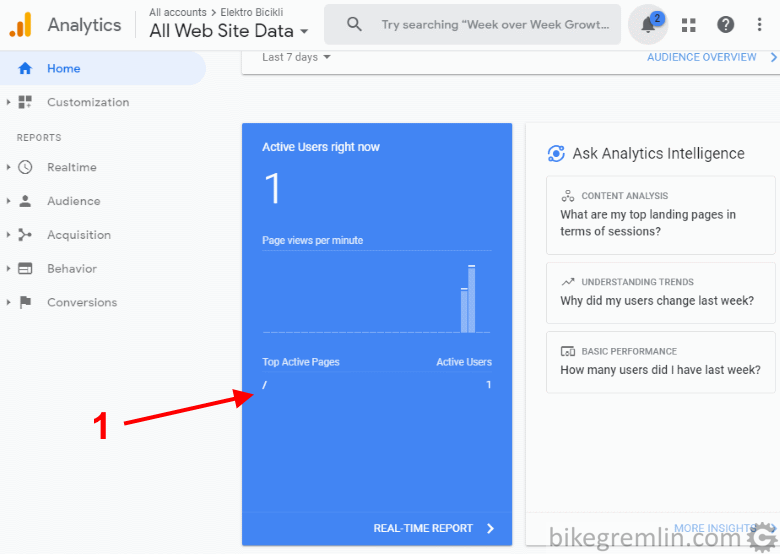
In this test, I had opened the website home page – (1) pointing the root ” / “.
Picture 6
In case it is not working:
- Check if browser’s ad-blocker has been turned off when viewing website pages.
- Have you correctly copied the Tracking ID (picture 5)?
- Has the implementation code been copied correctly (brackets, semicolons etc.)?
5. Connecting Analytics with an AMP version of a WordPress website
Once you’ve implemented and tested Google Analytics with your website, if you are using AMP, you will have this extra step to configure tracking for the AMP website version (over half the visitors today use mobile phones, and they often land on AMP if you have it).
In separate articles I’ve explained in great detail:
If you have a WordPress website, the second article gives easy-to-follow instructions for implementing Google Analytics tracking for AMP – without using any extra plugins!
For the websites that aren’t WordPress, the first article gives detailed information and links to the official AMP documentation – but it doesn’t contain step-by-step instructions for connecting Analytics with AMP.
6. Google Analytics V4 changes – how to connect that
The latest version of Google Analytics, V4, has a slightly different looking user interface:
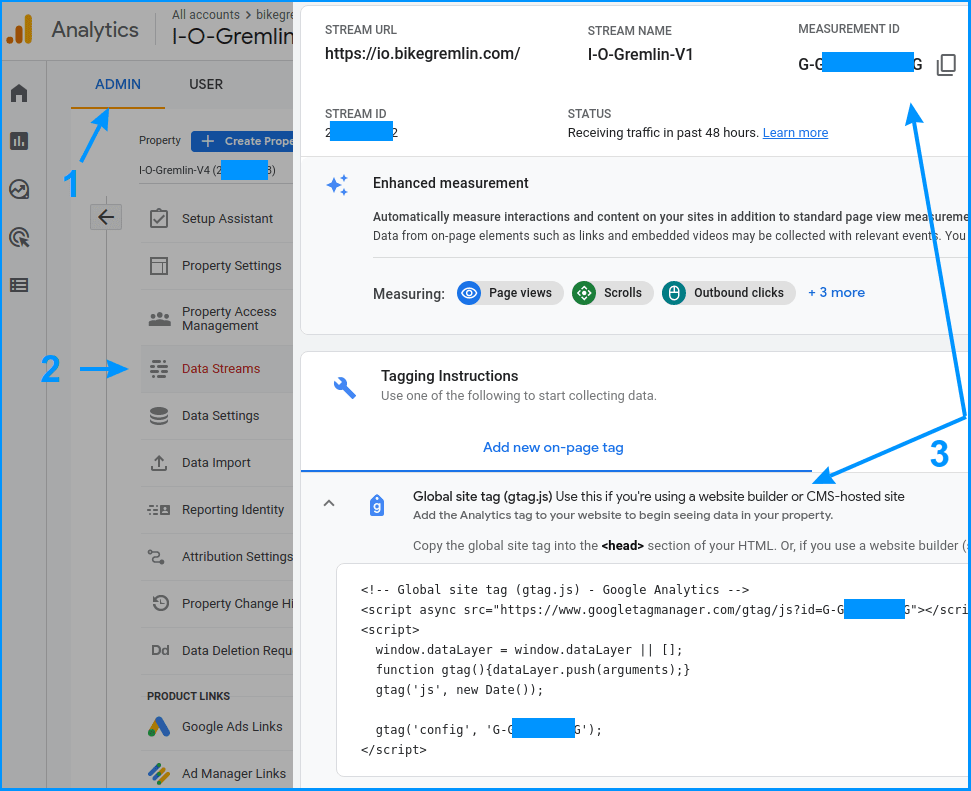
Picture 7
The tracking code from picture 7 should be copied (with your tracking number, of course). If you are using WordPress (or some other CMS), it’s best to add the following code into your child theme’s functions.php file:
// BEGIN Google Analytics V4
function ns_google_analytics() { ?>
<!-- Global site tag (gtag.js) - Google Analytics -->
<script async src="https://www.googletagmanager.com/gtag/js?id=G-XXXXXXXXXX"></script>
<script>
  window.dataLayer = window.dataLayer || [];
  function gtag(){dataLayer.push(arguments);}
  gtag('js', new Date());

  gtag('config', 'G-XXXXXXXXXX');
</script>
  <?php
  }
add_action( 'wp_head', 'ns_google_analytics', 10 );
// END Google Analytics V4Code language: HTML, XML (xml)
Last updated:
Originally published: