Important update (25th July 2021):
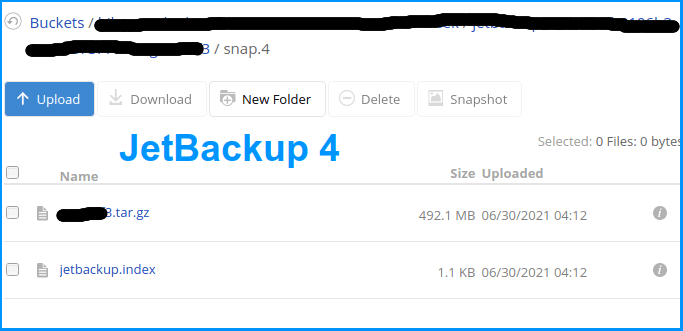
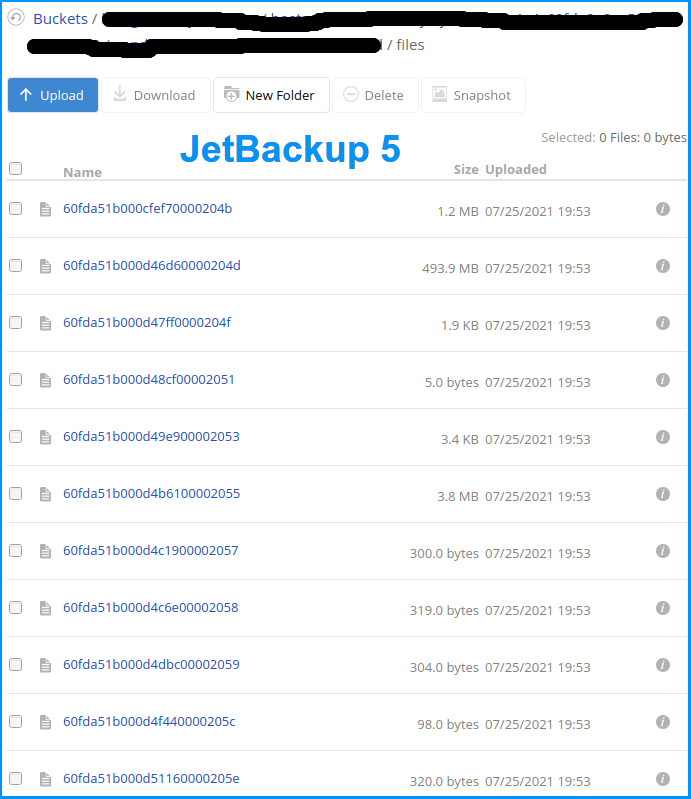
Newest JetBackup 5 version makes backups that can be used by hosting providers (server admins) to backup and restore systems but won’t make a backup of database and files that can be used without a server with JetBackup installed – hence the backups it creates aren’t what I’d call useful & reliable as a web-hosting client.
In other words – it’s become practically useless in my opinion.
Hence, whether a hosting provider offers JetBackup or not is no longer of interest to me – in fact, I’m looking for those who offer other backup solutions that can be used, and not exclusively JetBackup.
“Manually” created downloads within each cPanel account are still working OK (though fail for accounts over a few GB in size!) – but the automated backups are affected (those that are the essence of this article and of a good backup strategy).
Pictures explain it better:
Se an alternative way, using free open-source software:
WHM Backup Solutions automated reseller hosting cPanel account backup
I have already written about the importance of making regular backups. Since automated, routine tasks are one of the things computers and servers were made for, this is task is best done using automation, as I will explain in this post. In order for this to work, the following requirements are needed:
- To have a storage space where backups can be uploaded (using FTPS, SFTP, or an application).
- To have the JetBackup application installed, with rights (permissions) to run full cPanel account backups – this is often given with reseller hosting accounts (depending on hosting provider), and can be installed on a VPS, or a Dedicated server.
In this example, I’ll be using storage for which the setup is explained in the post: Backblaze B2 Cloud Storage setup, but the principle is the same for using FTP storage, Google Drive, Dropbox, Amazon S3 etc. (for details on options, you can see the post: Cloud storage options). So it is understood that we’ve already created all that is explained in the Backblaze B2 storage setup article and that it is all clear.
NOTE: After creating a backup, test if restoring from the backups works. First in a test, then in your production environment. Only after successfully confirming that the restoration process works can you rely on the created backups. Very educational experience on the topic: Postmortem of database failure at GitLabs.
I will provide step by step instructions (for novices) and put them in a structured way (for experts to skip to the part they need help with). Let us begin:
1. Entering JetBackup menu
The example is for WHM (Web Host Manager) control panel:
Log in to WHM and click on the option “JetBackup”.
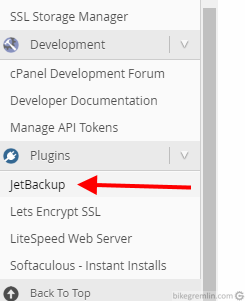
Picture 1
Yes, it really is that simple, nothing more to add. On to the next chapter:
2. Setting up backup destination
Select the menu for “Destination” setup.
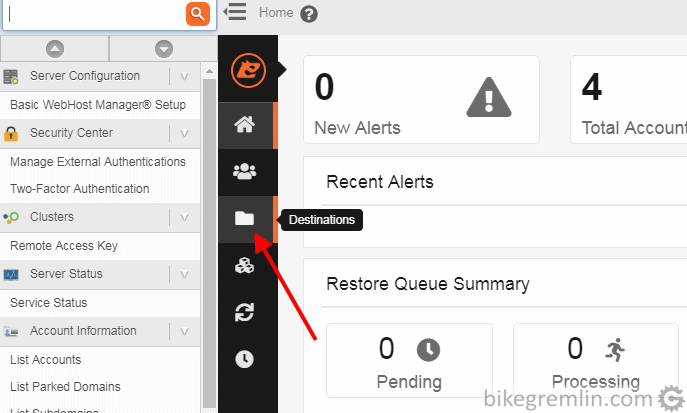
Picture 2
There click on “+ Create New Destination” (picture 3).
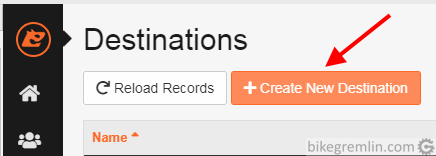
Picture 3
Now choose the storage type for backups to be uploaded onto. For this example we are choosing “Backblaze” of all the available options.
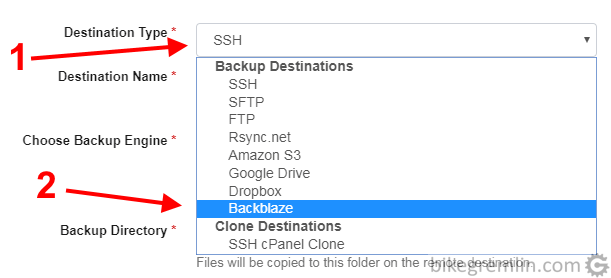
Choosing “Backblaze” for this example (2)
Picture 4
Now we need to fill in the shown fields. In the text about creating a Backblaze Bucket, we had already created a bucket named “backups-and-cat-pictures“, a directory in that bucket called “Backups” and written down key ID and the key itself.
Now we will create a backup destination called “Gremlin Weekly Backup“.
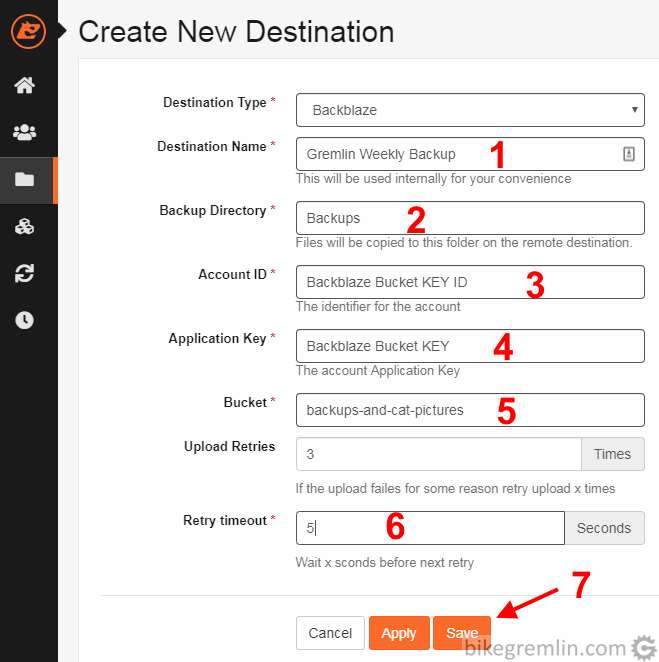
Previously created directory in Backblaze bucket – it has to exist (2)
Previously written down Backblaze Bucket Key ID (3)
Backblaze bucket Key (4)
Previously created Backblaze storage bucket (5)
The rest is self explanatory I think
Picture 5
If everything was properly entered here, after clicking “Save” you will get the following notification: “Success! Destination Created Successfully”. Newly created destination will be shown in the “Destination” menu.
In case of an error, check whether you have correctly entered Key ID and key and whether the bucket and the directory entered exist with the same name on your Backblaze account.
I would store monthly backups in a separate directory, like “Monthly-backups”. For that I would make another destination with all the same options except (2) “Backup Directory”. Principle is the same, so I won’t be writing a practically identical manual for this.
After having created required backup destinations, we will move on to the next step:
3. Creating automated backup tasks
Now we should open “Backup Jobs” menu to set up automated backups to the destination we created in the previous step.
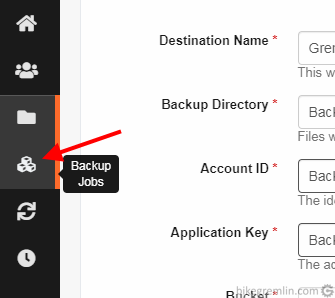
Picture 6
Similarly to the Destinations menu, here at the top there is a “+ Create New Backup Job” option – click on it.
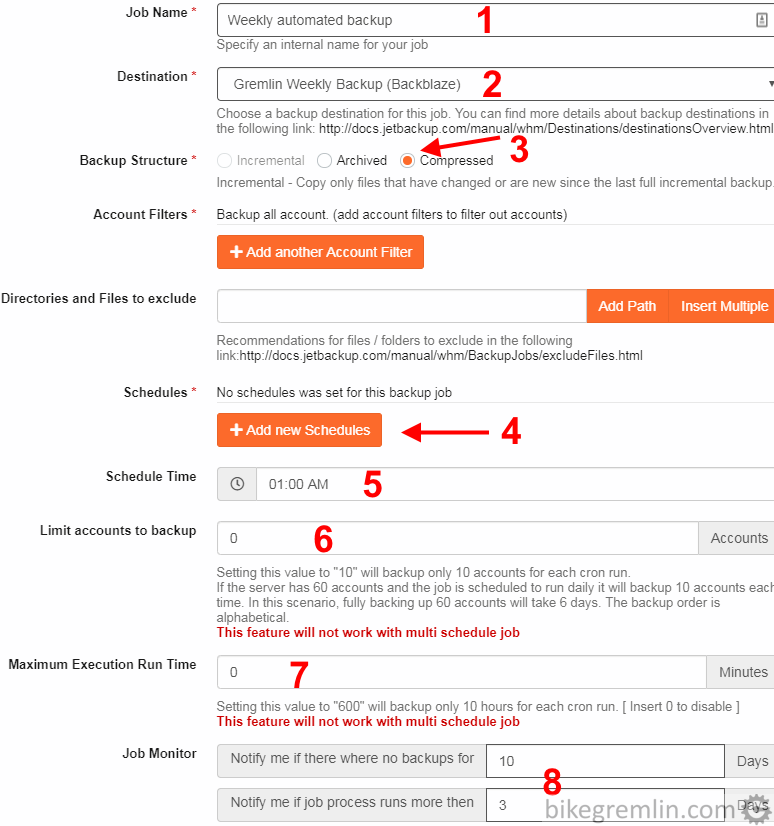
Choose a previously created backup destination (2)
Choose compressed, to take up less disk space (3)
“+Add New Shcedules” is explained below (4)
Choose the hour:minute time when the job will be run (5)
Max number of cPanel accounts to be backed up – “0” means as many as there are (6)
Max backup job execution time – “0” means as long as it takes (7)
Notifications in case of problems. For a weekly backup, 10 days of not completing is worrying (8)
Read on the explanation for “Add New Schedules” before clicking save
Picture 7
Explanation for (4) “+ Add New Schedules”:
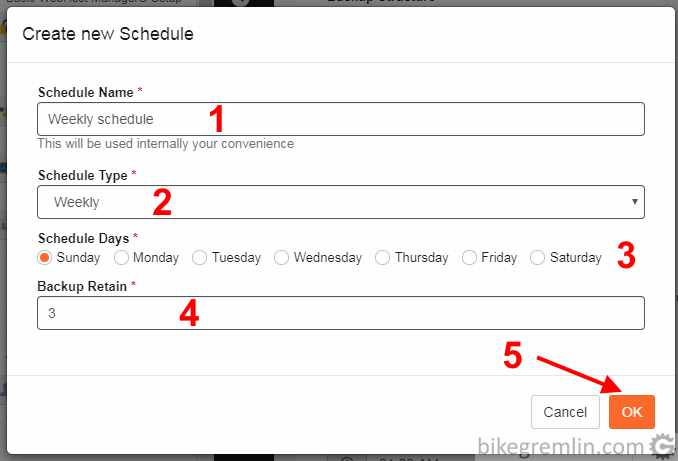
Choose a schedule from the drop-down menu, here we chose “Weekly” (2)
Pick a week day to run it – since we chose “Weekly” (3)
How many backups will be kept (oldest one is deleted if there are more) (4)
Click “OK” (5)
Picture 8
Of course, it can be similarly setup to run once per month, twice per month etc. When this is set up, you’ll be returned to the “Backup Jobs” menu, where you should click “Save”. You should then get a message: “Success! Backup Job Created Successfully”.
4. Final notes
These backups are run using “cron jobs”. Which means, on a busy server, your set up time for a backup will just put its cron in a queue. It might run several hours later – once its turn comes, after all the previously queued cron jobs have finished.
In addition to weekly backup, it is good to have a monthly one, keeping the last 10 to 12 backups, as I’ve explained in the post about backups. Certainly, after major edits/updates of website, in addition to these automated backups, backup can be made manually, to avoid loosing all the hard work.
Making such backup puts some serious load on the server. Many hosting providers already make automated JetBackup full cPanel account backups, but there is still no way of automatically downloading these backups to your cloud storage (only manual downloads to your computer when logged into a cPanel account).
A constructive and informative discussion about backups is lead on WebHostingTalk forum in the thread: “Cloud backup options“.

hello , i need your help . i have a directadmin reseller account . i am new to reseller business . if hosting company ban my reseller account , my business will be dead with my user data . so i need to keep my own backup for my clients . so that i can restore all the website to another reseller hosting if i got banned . but i dont know how to do it .i need cheapest way possible . for now i just need 25gb backup storage .
i use updraftplus to backup my wordpress website . this plugin also restore my data from cloud storage . i dont have to download and then upload to new location . is there any system like this ?
I don’t really understand the question/problem.
Please clarify.
I want to keep backup Of my reseller account. Sorry for bad English.
You could back up each cPanel (or DirectAdmin) account.
So they can be imported on another server.
This article explains how that can be done using JetBackup, while in a separate one, I wrote about backing up DirectAdmin reseller accounts.