
In this post I will systematically show all the steps needed to start a website development. WordPress is used for this example, but the principle is the same for any other CMS, or a static HTML website.
This (making a WordPress site) series:
- [01] Email
- [02] Domain registration and nameservers
- [03] Hosting
- [04] DNS
- [05] Hosting setup and SSL
- [06] Staging and development
- [07] Visual and functional design
1. Introduction and basic terms
In this post, as in most others, I will give many links. Most links are leading to other pages of this site, where certain terms/topics are explained in more detail. They usually lead to a certain chapter on a linked page, with the needed explanation. When you need an explanation, I suggest you open a link in a new tab, so you can later get back to where you were in this post.
Here’s a brief overview of all the WordPress website development and maintenance costs.
1.1. Disclaimer and a brief digression
To start with a disclaimer: I am not what you would call a professional website developer. I’ve had some experience with my own websites, and done a few for friends and some clients, but it’s not something I make a living of. All the information given here is: “to the best of my knowledge”.
For anyone interested, I get paid for a job of “systems administrator”. A company lets me fiddle with their servers, network infrastructure and also likes it when I fix a problem with user computers & software. The job is very nice, communication is very good and direct:
– When everything works: “What are we paying you for?”
– When something doesn’t work: “What are we paying you for!?”
Scientists, managers and me too are yet to answer these questions…
Picture X
Back to the topic.
1.2. Website development
This term relates to creating website’s visual look and functionalities: menus, search options, mailing list subscription, website caching, Google AMP implementation, SEO etc, depending on the wants, needs and budget. Usually, during the website design and development, some basic content is added, at least as a “backbone”. Sometimes, all the content is added, especially when it’s a re-design of an existing website.
What exactly is done in terms of visual design and functionalities can vary greatly. It depends on the agreement (if it’s being done for a client), or on decisions (if one does it for themselves).
1.3. Website maintenance
This term is not strictly related to website development, but I think it should be explained. Sometimes, website maintenance requires some changes in the looks and/or functions – then it’s related to website development.
Website maintenance in the narrower meaning of the term means “keeping an eye on the website and the hosting server”. Notably, checking:
- Is website online and does it load normally.
- Are SSL/TLS certificates properly installed and renewed on time.
These two things can be automated using a (free) tool HetrixTools (affiliate link). - If WordPress, or some other CMS, is used – are all the plugins and themes updated and do they work properly after the updates. Automation of this process, for several different websites, carries a security risk that in case the automation tool gets hacked, all the websites can be affected/hacked. This goes especially for WordPress plugins for automated updates. For example: InfiniteWP security problem. Also, it is best to test in a staging environment (more on this later) before applying any updates to live, production websites. Of course, it is best to do a backup before any updates.
- Are website backups made regularly (especially after any content updates). Are the backups tested – does restoration from the backups work (backup integrity checking). An example of website backup automatization (using JetBackup tool).
- Is website visible to search engines (Google) and are there any problems with that. A good tool for this is Google Search Console (GSC – how to configure).
- Is the hosting server overloaded (an example of hosting server load testing). If it is, you will need to optimize website, improve website caching, or get a more powerful website hosting – one not excluding the others, but I’d go in the given order.
- Checking if all the software licenses (for software, plugins, themes etc.), hosting account(s) and domain registrations are renewed (paid) in time.
- Website and hosting server checks for hacks and viruses. I wrote a post on how to secure a WordPress website.
- Keeping an eye, eliminating and preventing spam comments and registrations to the website. Because they can damage domain reputation and email deliverability. You don’t want a bot, or a spamer using someone else’s email, then the email owner marking the notification from your website as spam, because they didn’t have anything to do with it. Likewise, spam comments/registrations with non-existent email addresses will result in your mail server sending many emails that “bounce” (can’t be delivered) – resulting in you ending up in a black list.
These just some of the most important things regarding website maintenance. A modern website is usually not a set-and-forget thing. I don’t know if this is useful for experienced developers, but I would post a link to this chapter if anyone asks why I charge (that much) for website maintenance and why is it even needed.
1.4. Website staging (testing) environment
When a website is developed, whether making a new, or re-designing and old website, it is advisory to do it in a separate, test environment – also called “staging” when a maintenance of an existing website is concerned. Same goes for any plugin, or theme updates – at least if you ask me. What is this?
Ideally, it is a completely separate installation, either on a local computer, or on a separate hosting account, using a different (sub)domain. For example:
This website is io.bikegremlin.com. That is a “live“, or a “production” website. I could create staging on my local computer, or on a different subdomain, such as staging03.bikegremlin.com.
When development is finished, staging website is migrated (cloned) to the live website – practically replacing it if there was an old website on the domain. Visually, it can be presented like this:
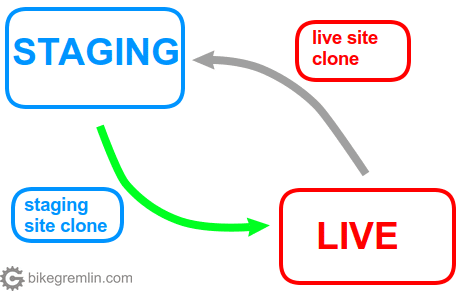
Picture 1
Of course, if a website is made from scratch, then the grey arrow (cloning the live website) won’t exist.
2. Creating a staging (development) environment
Changes and website development is technically done most quickly on a local computer. It can also be done on a hosting server, using a different domain, or a subdomain (as explained in chapter 1.4.). Even though local computer can be configured to resemble a hosting server, I personally prefer doing the final test(s) on a real hosting server. For that use I find reseller hosting account(s) to be very practical.
For setting up a staging environment on a hosting server, you can use my explanation of hosting account for WordPress setup. Just use a different domain, or a subdomain (like staging03.yourdomain.com). You can also then use Softaculous to make a staging website copy with just a few clicks (provided your hosting provider offers Softaculous).
If the hosting server has Softaculous installed, you could use it to both install WordPress, and create a staging website copy – that can later be easily synced to the main site using a few mouse-clicks. For more details, see:
Softaculous WordPress installation and staging environment management.
Setup on a local computer:
- For staging on your local computer, the easiest way is to use Local by Flywheel. I made a short tutorial (and video) on how to install and configure Local by Flywheel.
- Besides this, those using Windows can also install WAMP (how to install and configure WAMP).
For those using Linux: how to install and configure LAMP.
Local by Flywheel is very simple to use. Option 2 (WAMP/LAMP depending on whether you use Windows, or Linux) is more like a real server. I.e. you will have to create a database using PhpMyAdmin tool, or similar.
Whichever method you choose, you will have all that’s needed to install WordPress (or some other CMS, or create a static HTML site). That is: a working server with a database, and a database user with their access password. Write it all down:
- Domain, subdomain, or a directory (if you want a local install) where you will be making a staging site.
- Database name.
- Database user name.
- Database user password.
3. WordPress installation – locally, or on a server
If WordPress is to be installed locally, we will create a directory for it (so that each website can get its own, separate directory):
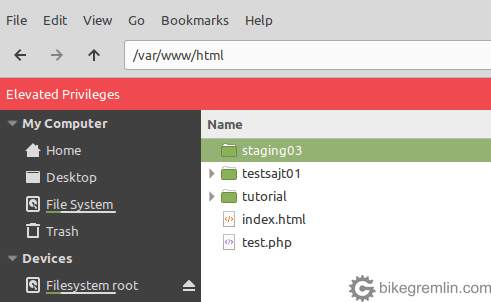
Picture 2
If the installation is to be done on a server, with cPanel (shown in picture 3), the important directory is:
home/user/public_html
While DirectAdmin uses:
home/user/domains/domain_name/public_html
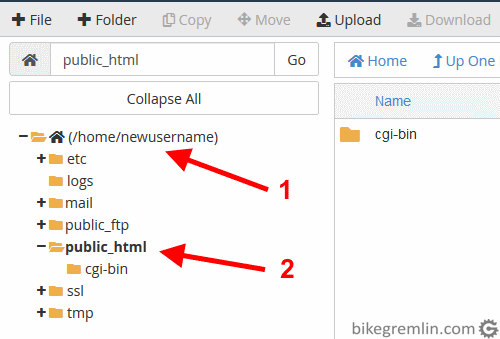
Picture 3
Now go to https://wordpress.org/download/ and download the latest WordPress version. That file should be uploaded to a directory (either locally, or on the hosting server, as explained above). You can upload this file to a server using a FTP client (I like and use FileZilla – it’s free). Or you can use file manager from a server control panel (either cPanel, or DirectAdmin, or a third one).
To keep this text shorter, post about website backup shows how to use cPanel’s file manager. Only now you will use “Upload” instead of “Download” and “Extract” instead of “Compress”, once you have uploaded the WordPress installation .zip file.
Other posts show the use of file manager in DirectAdmin. Here it is shown how to choose a directory and extract .zip files in DirectAdmin.
Catch: when you extract WordPress installation files, they will be placed inside a directory called “wordpress”. They should be moved to the root of the desired directory, so you don’t have to type: www.mydomain.com/wordpress to get to your website.
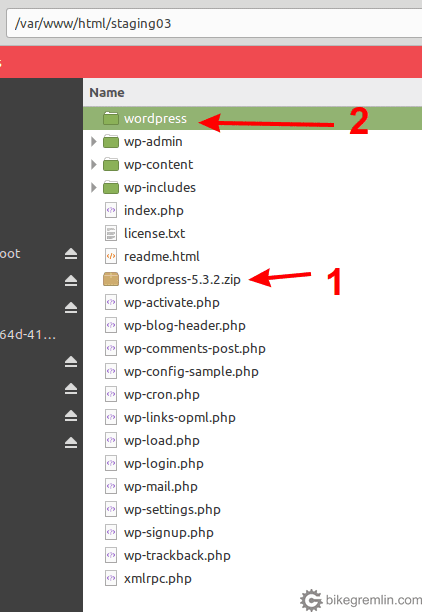
After extracting it, all files were placed inside the “wordpress” directory (2)
All the other files shown in this picture have been moved (copy paste, or cut-paste) from out of the “wordpress” directory.
Picture 4
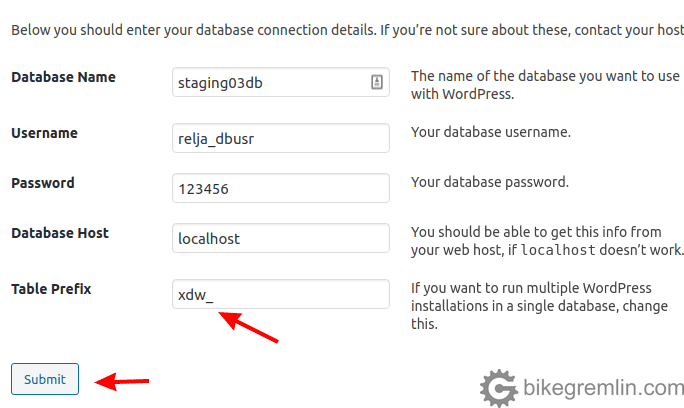
Now, for this example, I have locally created the following:
- directory “staging03”
- database “staging03db”
- user “relja_dbusr”
- user’s password “123456” (you should always use strong passwords, not like this)
And now I’ll go to localhost/staging03
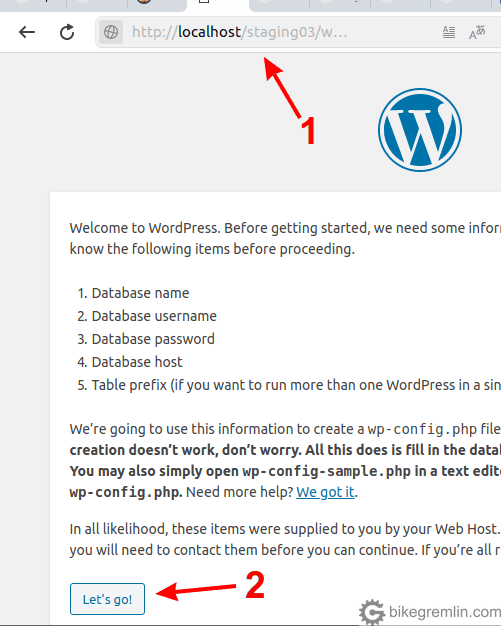
Picture 5
Picture 6

Picture 7
Picture 8
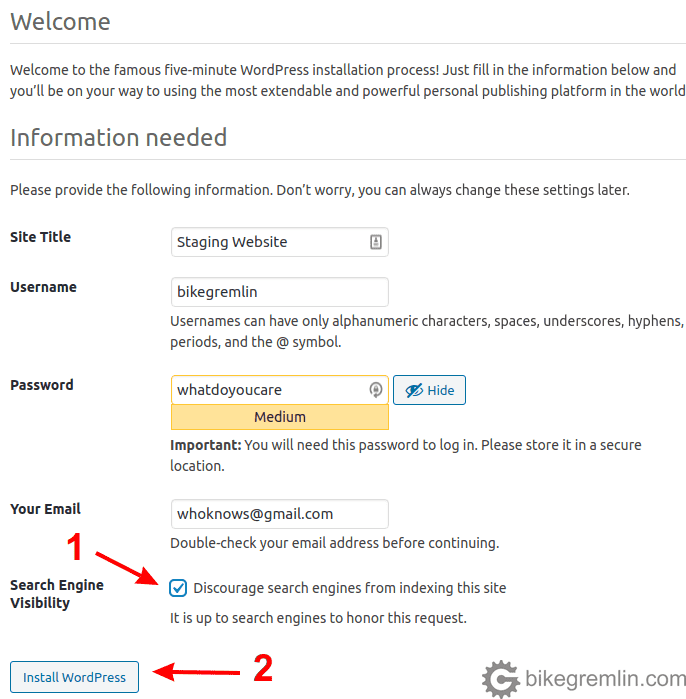
After this, you will get a screen for logging into the WordPress backend, using the username and password you chose (in picture 8).
4. Conclusion
If you have followed all the previously explained steps, you should now be ready to develop and design a WordPress website. After it is all set, you will clone it to the real domain, where it is supposed to be once ready and published.
I plan to use a website I’ll start developing these days, as an example of how the whole design process goes. At least show some basics – as much as I manage and am able/allowed to. Until then, you can play by yourself – you have a test ground built now! 🙂 Those who are really curious can see about HTML and CSS basics explained. They could come in handy.
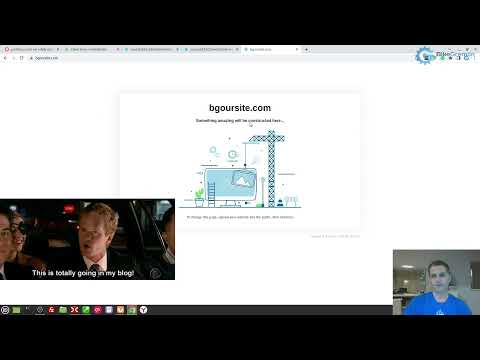
5. VIDEO demonstration of how to install WordPress and make a staging copy
I’ve made a video showing how to install WordPress (both manually, and using Softaculous), and how to configure and secure it:
Last updated:
Originally published: