In this article I’ll explain how to easily create a staging copy of a WordPress website, or how to clone it, using Softaculous – a tool that often comes with shared, or reseller hosting packages that use cPanel, or DirectAdmin control panels.
1. Introduction
1.1. What is Softaculous?
Softaculous (link to their website) is most commonly misspelled computer related term. 🙂
OK, on a more serious note: it’s a software that provides automatic (“one click”) installation of various scripts and software on a server. It also provides management of the installed stuff – as I’ll explain here in terms of WordPress installation management.
1.2. What is cloning a website?
Website cloning is similar to copying, i.e. migrating a WordPress website. With one exception – (sub)domain is altered. To put it simply:
- migration would be moving io.bikegremlin.com to another hosting server (it doesn’t make much sense making a migration to the same hosting server),
- while cloning would be making a copy like staging01.bikegremlin.com, and placing it on another, or on the same hosting server.
1.3. What is a “staging” website?
Staging website is a copy of a website (with the same theme, setup, plugins, often even content) used for testing any changes, or updates, before pushing them to the main (production) website.
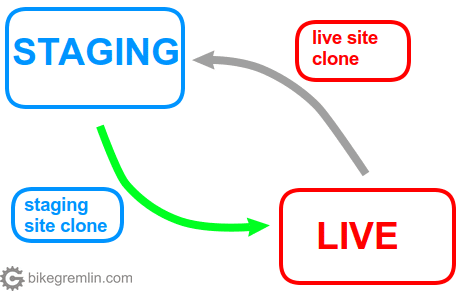
Picture 1
Staging site is usually created on a local computer (how to create a staging website on your local computer), or on a hosting server, using a sub-domain. The advantage of using a hosting server (via a sub-domain) is that testing can be done in an environment that is as identical as possible to the production site environment.
This website is on a (sub)domain io.bikegremlin.com. A staging site could be placed at: staging01.bikegremlin.com, or something similar. I would not recommend placing the staging site in a sub-directory (like io.bikegremlin.com/staging01) for several reasons, that are beyond the scope of this article.
2. Softaculous and WordPress
Softaculous offers easy installation of WordPress, cloning an installed WP website, configuring backups, and activating/deactivating automated updates.
This last option is also available in WordPress backend since version 5.5 (see WordPress 5.x and Gutenberg editor) – and it is something I would not recommend enabling for a production website: test any updates on a staging website copy first, before pushing them to the production.
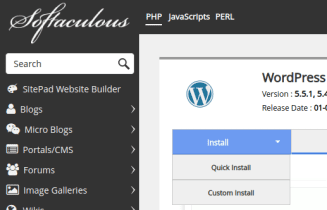
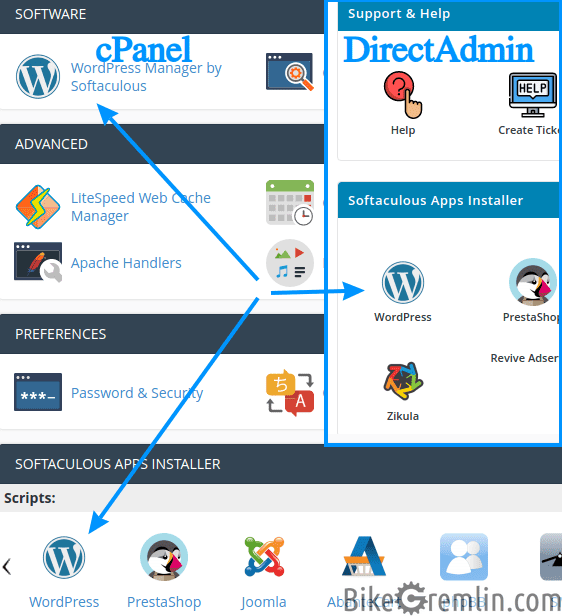
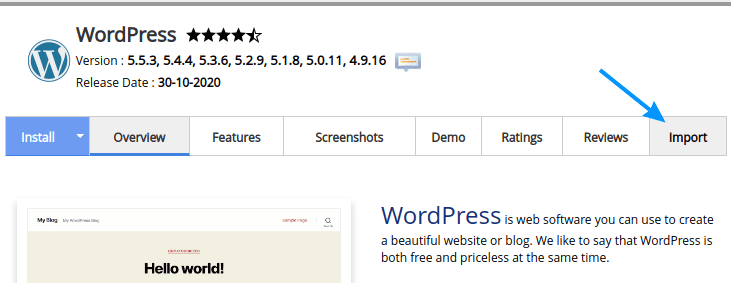
2.1. Starting Softaculous and installing WordPress
To start, click on the Softaculous’ WordPress icon, in the main menu of either cPanel, or DirectAdmin:
Picture 2
Next, if you wish to install WordPress, go with the “Custom Install” (my recommendation):
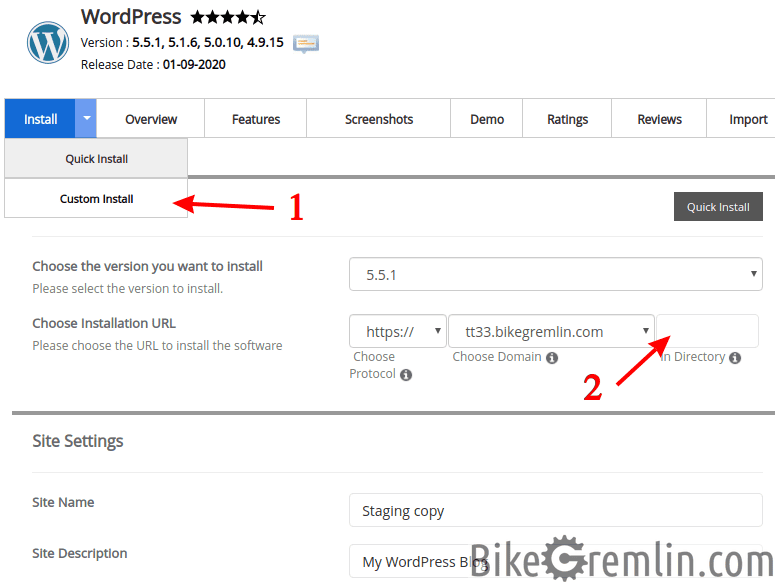
Enter a subdirectory, if you don’t wish to install at the server root of your (sub)domain (2)
Picture 3
Most of the options are self-explanatory. They don’t differ a lot from the classic WordPress install procedure – only simpler and faster. I won’t go further into that now. The main “catch” is you aren’t asked to set database user password. There are ways to determine this, though not 100% reliable (more on that later), hence a brief digression:
Digression – the “manual” way: I already explained how to create a database and user in cPanel, and in DirectAdmin. To change a password, just choose “Change password” option from the menus shown in the given links – for working with databases and users.
To just see what the current password is, open “wp-config.php” file in your WordPress installation directory, and look for something like this:
/** MySQL database username */
define('DB_USER', 'dgb_ddsg');

/** MySQL database password */
define('DB_PASSWORD', 'OIwrjklsjf942asdaIOq');Code language: PHP (php)
Stuff written after ‘DB_USER’ is the user name, while stuff after ‘DB_PASSWORD’ is the password.
2.2. Connecting Softaculous with an existing WordPress installation
This is a neat option, since it can then enable easy staging site copy creation, even if WordPress was manually installed (i.e. not using Softaculous installation tool).
To do this, click on the “Import” option (shown in the top right corner of picture 3), then:
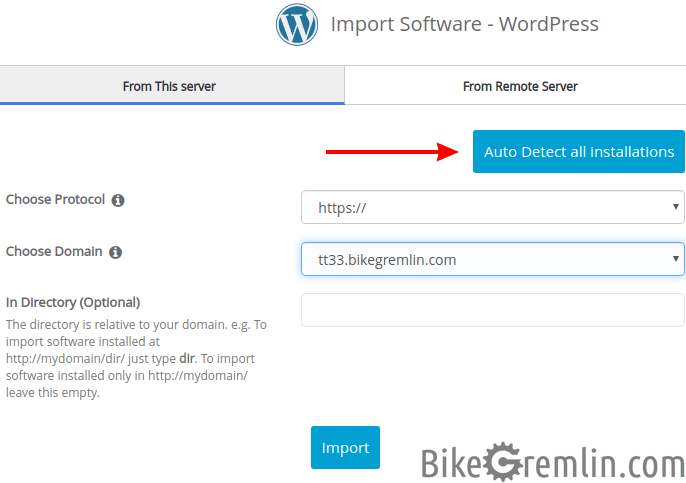
Picture 4
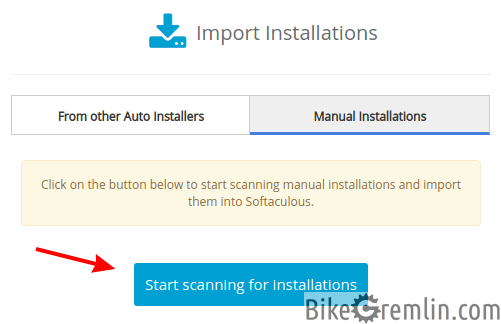
In this case, I had already manually installed WordPress on tt33.bikegremlin.com, and configured it to work using https protocol (SSL/TLS encryption). Now you just need to click on “Start scanning for installations” on the next screen.
Softaculous also enables website migration, from another server – which is done by clicking on “From Remote Server” (top right corner in picture 4). Here is their explanation (on their website): Softaculous remote WordPress website import. Uber-cool option!
– note to self: tested from DirectAdmin to cPanel as well, but not yet in the “opposite direction” – test that too, you lazy bag… – done!
.htaccess should be deleted after the import.
Picture 5
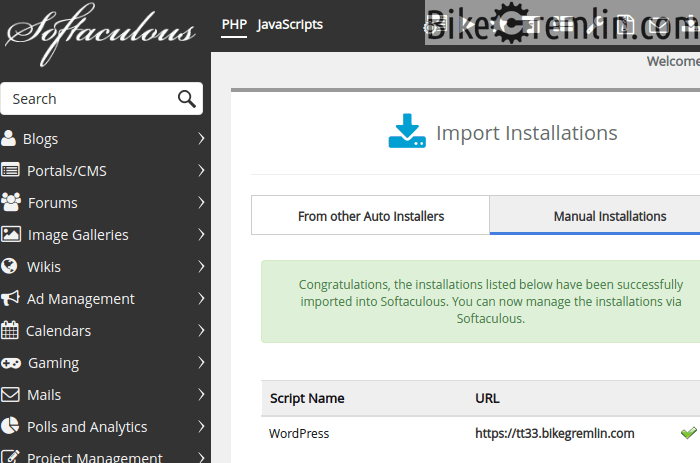
If all goes well, you’ll get a message like this:
Picture 6
Now the user interface is a bit messed up – you need to click on the Softaculous icon (top left corner in picture 6), then click on a WordPress icon. Then you’ll be able to manage the installation using this cool tool (it rhymes 🙂 ).
2.3. Softaculous WordPress installation management
Softaculous main WordPress menu gives several installation management options:
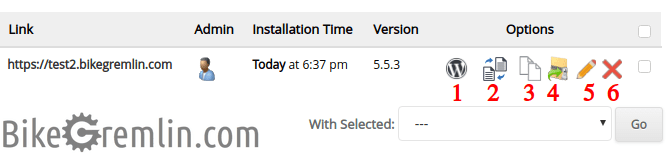
Picture 7
I’ll explain the options briefly, as I have numerated them in picture 7:
- Manage the installation using Softaculous WordPress Manager – enable/disable auto updates etc.
- Create a staging website copy (more on this in chapter 2.4.).
- Clone a website – to a sub-directory of an existing installation, or a domain/sub-domain created within the cPanel/DirectAdmin account.
- Create a backup – on the hosting server.
- Edit details (such as database user, password etc.) – very useful option and easy to use, only it doesn’t always work.
- Delete the WordPress installation (website).
2.4. Creating a staging WordPress website copy
Handy option (marked with number 2 in picture 7). When clicked upon, you get something like this:
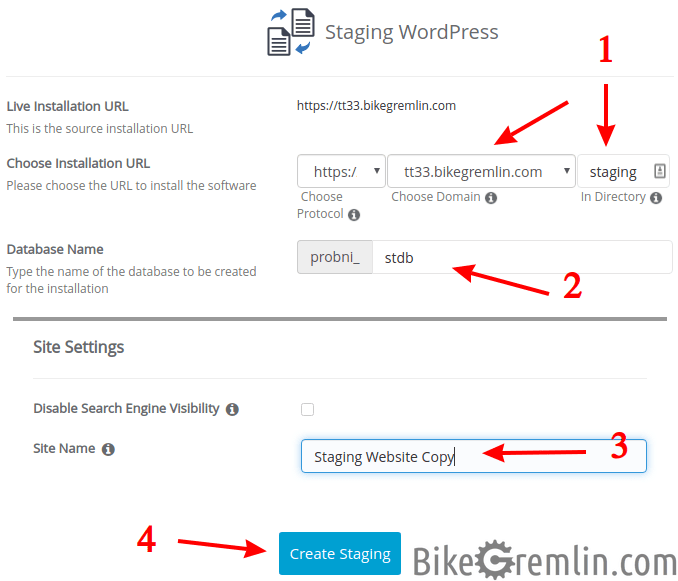
Picture 8
For this example, I chose to create staging in a sub-directory called “staging” (1), though I would advise setting it as a (sub)domain. I also chose the database name (2), website name (3), and clicked on “Create Staging” (4). Then waited for a few minutes…
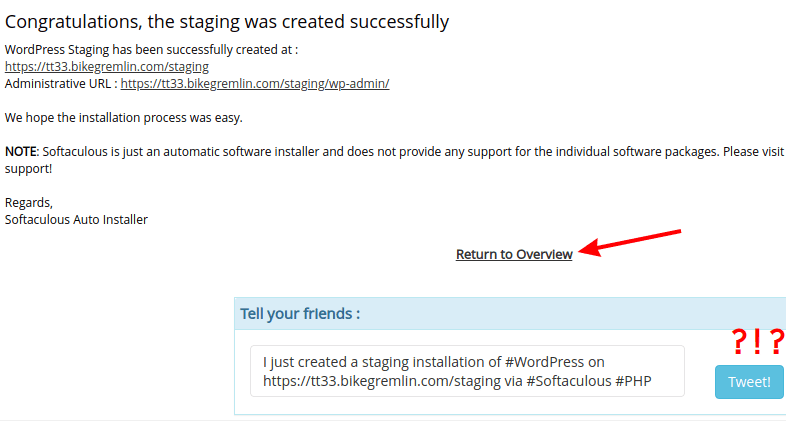
Picture 9
Now you can conveniently test everything on the staging website copy, then, using one click, “push” it to the production (live) website:
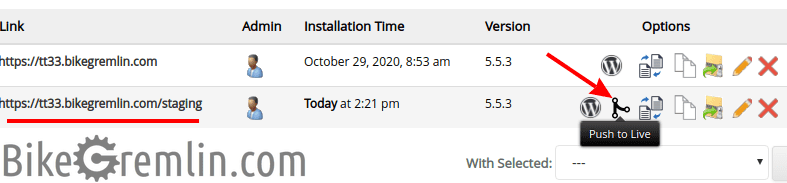
Picture 10
Note (just in case): before creating a clone, or a staging copy, make sure you have enough storage space on the cPanel/DirectAdmin account.
3. Conclusion
This is a very helpful and well made software. With surprisingly few bugs, compared to the number of options and platforms it supports.
I always recommend testing any changes, or plugin/theme updates on a staging copy before implementing them on production websites. Softaculous allows even novices to easily, practically with just a few clicks, create a staging website copy, and to later push any changes from the copy to their production site. Some hosting providers, like SiteGround, charge a lot of money for hosting that allows this to be done in a similarly simple and easy fashion.
Most other options are less useful than the staging one (in my opinion). This goes especially for backups – there are better options for creating automated website backups.
Either way – give Softaculous a try. I hope you have found this article at least as interesting, as I have found it interesting to play with these tools and write about it. And I hope it will help someone else, in addition to serving me as a reminder/reference. 🙂
4. Example 1 – cloning / migrating a website from using Softaculous
An example of website cloning from dev10.bikegremlin.com (source website) to https://www.askaandwolf.com (destination website), from DirectAdmin to cPanel shared hosting (though the procedure is practically identical for all the other combinations of the two).
First you should configure the hosting server you are cloning the site to. When you open the link from the previous sentence, skip the .htaccess file editing for now – that should be done after the cloning has been completed.
If you have made any nameserver, or DNS changes, wait for at least 24 hours before doing any cloning (unless, before the cloning procedure, you have been using Cloudflare DNS for the target domain for at least 24 hours, or longer – Cloudflare propagates DNS changes within an hour).
Next: sheck if it exists, and if it does, then delete, or rename “.htaccess” file in the public_html directory (how to configure cPanel’s file manager to show hidden files).
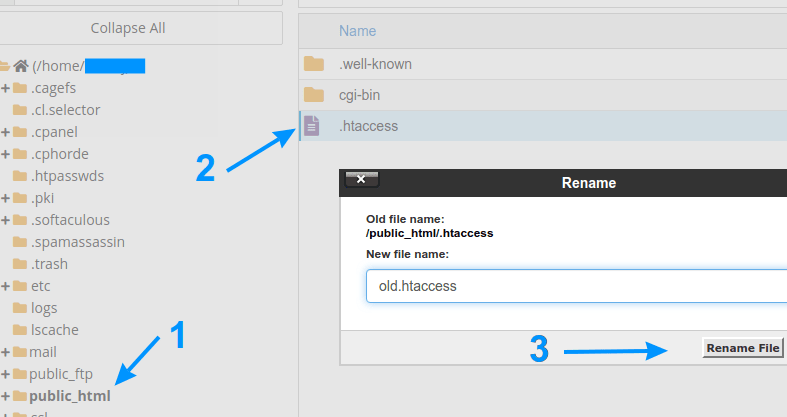
Picture 11
After you’ve prepared all that, start Softaculous, as shown in chapter 2.1. Then choose the “Import” option:
Picture 12
Now choose “Frome Remote Server” option, and configure the website cloning options:
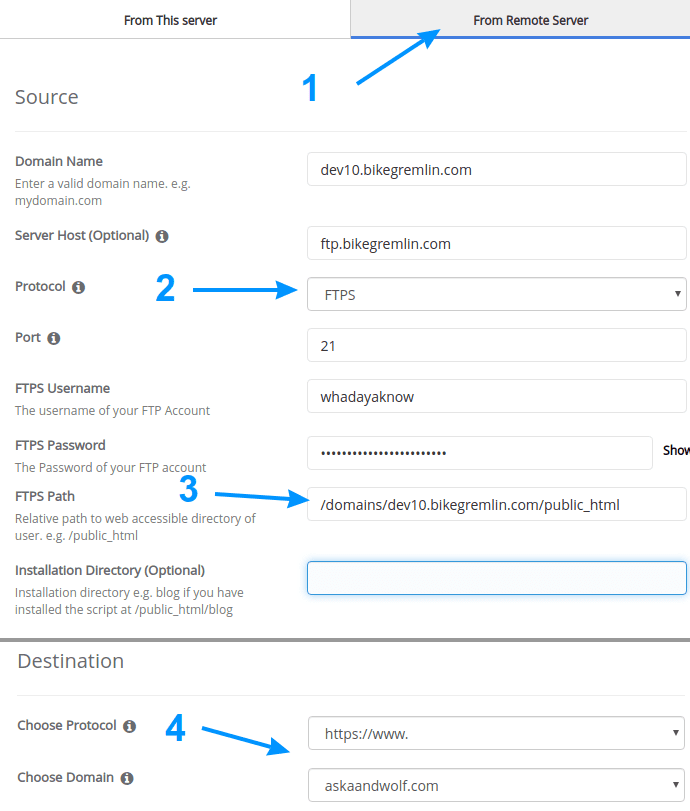
Picture 13
You should prepare (know) the following info:
- Domain you are cloning the website from (dev10.bikegremlin.com in this case).
- Protocol used to copy all the files – FTP, FTPS (more secure), or SFTP (most secure) – and login data, for the server you are cloning the website FROM – (2) in picture 13.
In this case that is ftp.bikegremlin.com, and we are using FTPS protocol via port 21, and our username is whadayaknow (and the password for that user is entered in the field below the username). - Path where the files are stored at the server you are cloning FROM – (3) in picture 13.
In this case, the server where dev10.bikegremlin.com is hosted, and the path is:
/domains/dev10.bikegremlin.com/public_html
See the usual DirectAdmin and cPanel file paths. - Where you want the website to be cloned to.
In this case to https://www.askaandwolf.com – (4) in picture 13.
After you have entered all the data (check… twice… seriously), click on the blue “Import” button at the very bottom of this screen (not shown in picture 13 to save a lot of screen space).
If you have skipped a step above and left “.htaccess” (or other files) in the “public_html” directory, you might see an error like this:
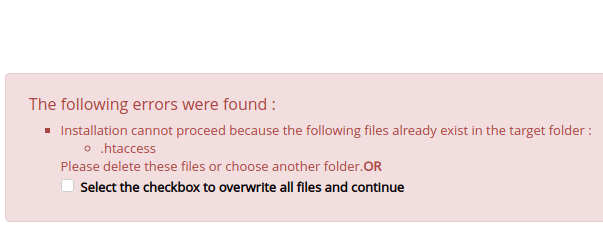
Picture 14
If that is the case, start from the beginning of this chapter (4), and don’t skip any steps. Slowly, patiently.
After all has been done properly, you’ll get a notification that the cloning has started. In 99% of the cases, it will get stuck at 95%. 🙂

Picture 15
Don’t panic. In 30 minutes, or an hour (depending on the website size, and hosting servers speed and Internat connection quality), it will be done.
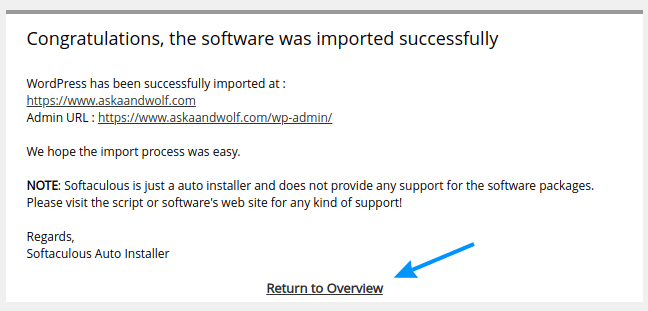
Picture 16
In case a message like shown in picture 16 doesn’t appear even after some 30 minutes, just close cPanel and give it another 30 minutes. Then log into cPanel, and check if database size has grown to the database size of your original website (at least aproximately), the one you are cloning (in this case dev10.bikegremlin.com).
Database size checking:
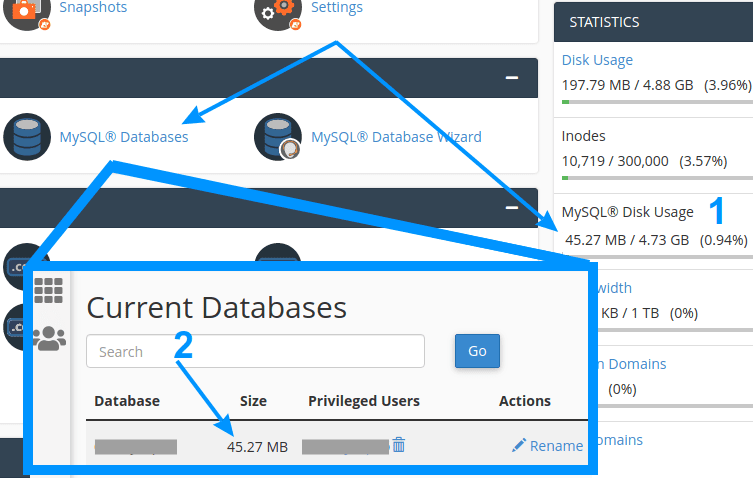
Picture 17
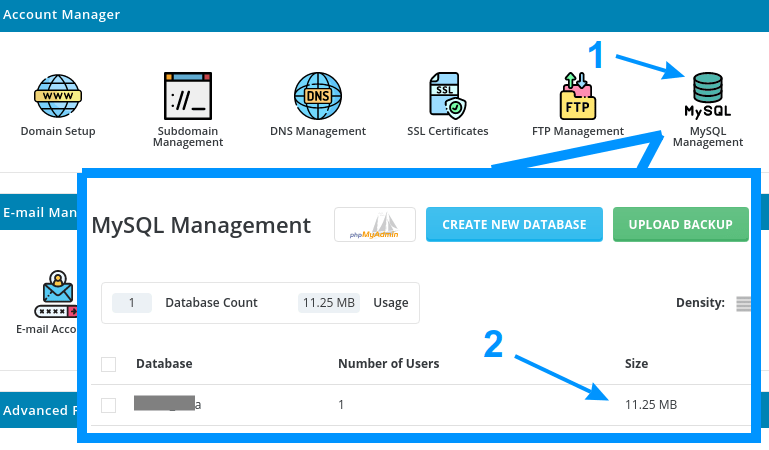
In case you are cloning a website to DirectAdmin hosting, or your source site is on hosting with that control panel, here is how to check database size in DirectAdmin:
Picture 18
As you can see, pictures 17, and 18 show two databases of a different size. If this were the source and destination database sizes, it would mean we still have to wait, for the destination database size to grow at least to 30+ MB (sometimes, after cloning, database size might be a bit smaller, or a tad larger, there are database optimization tools to manage these, but that’s a topic for a separate post).
After destination database has reached the approximate size of the source one, you can try opening the destination website, in this case at www.askaandwolf.com. If it doesn’t work, don’t worry.
Note: after cloning, at the destination, your WordPress administrator and other users will remain the same. Website address will change, of course. And all the internal links. In this case, from dev10.bikegremlin.com to www.askaandwolf.com.
Now, to fix the problem if it still doesn’t work: just delete/rename “.htaccess” file, within the “public_html” directory – as explained in the beginning of this chapter. Then open the website, login to backend (as admin), then go to “Settings”, “Permalinks”, and click “Save Changes” (you don’t have to change anything). New .htaccess will be promptly created.

Picture 19
4.1. Troubleshooting
It often happens that, even in case of some problems, Softaculous reports that everything went well. Logs that are available in shared, and reseller hosting environment, usually don’t report any errors, much less give any clues to potential problem causes. I don’t know if it reports any errors elsewhere, so that at least the server administrators can see them (feedback is welcome).
The first thing I do is to check and compare source and destination database size (explanation of that procedure in chapter 4).
I encountered one such problem in the example shown in chapter 4. Cloning a website to askaandwolf.com cPanel just wouldn’t go properly. How did I solve this?
In my experience, if a cPanel account is created for the root domain (askaandwolf.com), and www. version is added as an alias domain (CNAME), cloning to .www site version (www.askaandwolf.com) won’t work! Solution?
- Make a subdomain on the same cPanel account (like: clone01.askaandwolf.com). And install SSL/TLS certificates for that subdomain, as well as configure DNS for it (cPanel and DirectAdmin will configure DNS automatically, when you add a sudomain, and here is how to configure Cloudflare DNS – if you are using that).
- Clone the website to that sudbomain (using the source domain from chapter 4, that would be: from dev01.bikegremlin.com to clone01.askaandwolf.com). Procedure is virtually the same as explained in chapter 4, only destination is https://clone01.askaandwolf.com.
- Then, clone the site again, this time within the same cPanel account, from clone01.askaandwolf.com to https://www.askaandwolf.com (see: naked domain vs www – what’s better?). This should go smoothly now. You can later use Softaculous to create a staging copy, once the cloning (migration) has been done.

Picture 20
Now, similar to what we did in the chapter 4:

Picture 21
After a successful cloning, we could choose to create a staging copy of the main site (www.askaandwolf.com in this case). So it looks like this when it’s all done:
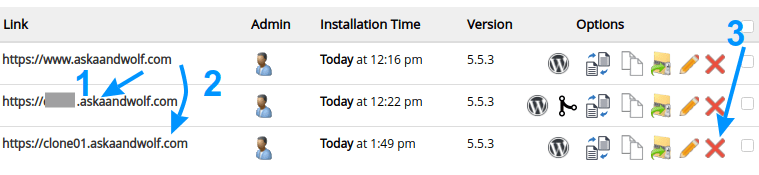
(1) staging copy of www.askaandwolf.com website
(2) clone – from which we copied to www.askaandwolf.com
(3) clone can now be deleted
Picture 22
4.1.1. Provider (firewall?) protection problems
I still haven’t got this figured out, but adding these notes as a personal reminder. What’s it about? Over the last 30 days, I’ve been having problems importing websites from servers of reseller hosting providers who’s services I’m using. The providers in question are HostMantis, and MyW.pt. So far they’ve been quite good, with tech. support that goes out of their way to figure things out and sort them, even if it’s beyond their scope of work (my article on hosting provider technical support – in general).
These are the problems I faced:
- Importing a site from HostMantis UK server to HostMantis US server – won’t work (same goes for the opposite “direction” imports).
- Importing from any HostMantis server to MyW.pt server – wont’ work.
- Importing from MyW.pt server to any HostMantis server – won’t work.
After trying various things, in coordination with both HostMantis and MyW.pt technical support, this is the last info I got (from HostMantis) – bolded formatting is mine:
We have tested this feature to find the issue and have found that the issue is due to the amount of simultaneous connections Softaculous tries to make when performing the import causes the remote server to temporarily block the connection and therefore not all the files successfully transfer, ending in a broken installation on the destination server.
Unfortunately this is not something we can change because of the way our servers are setup to block FTP brute force attacks, so using this feature will be disabled to avoid any confusion.
Suggesting I use a plugin for migrations/cloning, that is tested to work fine on their hosting environment (All-in-One WP Migration). Which I find a lot less convenient, even with paid versions of such plugins. Besides, I don’t have much trust in WordPress plugins for doing backups, or migrations. Because in that case an application practically backs itself up. It is a lot safer to do that on the server level, using another application (like Softaculous). If done right, this should also reduce load on the hosting server when doing backups/migrations. At least that’s my opinion, and the reason why I’ve forwarded provider’s feedback to Softaculous support – to do whatever is up to me to get this fixed (even though I’m a pessimist – this is a classic Catch-22 scenario).
Last updated:
Originally published: