
A quick & easy guide on how to add or edit WordPress image (media) alt descriptions.
1. Adding an alt description upon image upload
The simplest and safest way (so you don’t forget) is to do it right after upload, from the “Media -> Add New” options:
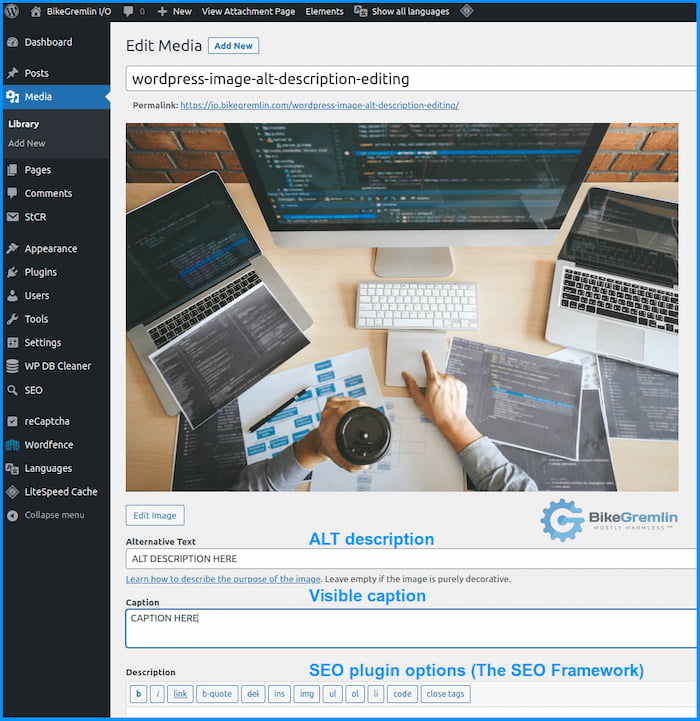
Picture 1
That’s it, nothing more to it. 🙂
2. Editing an in-article image alt description
OK, so you’ve already added an image to an article (perhaps even published the article already), and you wish to add or edit its alt description. How do you do that? It’s easy.
Just open the article (edit), click on the image you wish to “play” with, and find the “Alt text (alternative text)” in the block editor. Picture 3 below shows how I edited the alt description of picture 2:

Picture 2
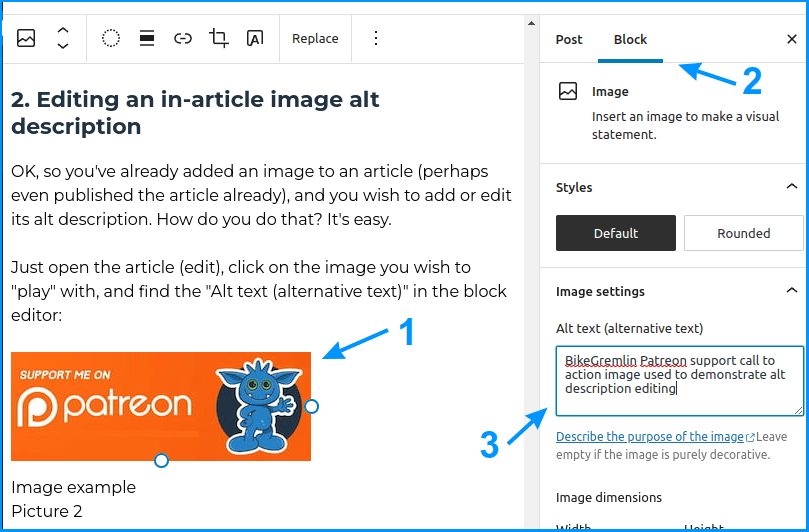
Picture 3
See how easy it’s done using WordPress’ block editor (Gutenberg)? 🙂
3. Why are image alt descriptions important?
There are several reasons why it’s a good idea to use high-quality alt descriptions:
- Sometimes various technical problems may prevent an image from being loaded and shown to visitors. An alt description (in addition to the image caption) is all they have.
- Visually impaired people may rely on auto-readers to “view” your content. Good alt descriptions will help them understand your content (what the images depict).
- SEO (see what SEO is?) improvement. Well-optimized images load faster, and good alt descriptions help both your visitors and search engines understand what your content is all about. Combine those two to help your visitors, and rest assured that modern search engines will also value it.
4. Testing if it works on the frontend
It is always important to test and confirm you did everything properly. Here’s how to check your image alt descriptions:
- Clear the WordPress cache.
- Open the page/post/article using Chrome (or your favourite browser).
- Press CTRL + U.
- See the page code opened in a separate tab.
- Find your alt description by pressing CTRL + F and typing the alt description you are looking for.
Here is what that code may look like (I used the picture 2 code as an example) – the alt description is bolded:
<figure class="wp-block-image size-full" id="p2">
<a href="https://www.patreon.com/bikegremlin" target="_blank" rel="noreferrer noopener">
<img width="300" height="109" src="https://io.bikegremlin.com/wp-content/uploads/2022/09/become-a-bikegremlin-patron.jpg"
 <strong>alt="BikeGremlin Patreon support call to action image used to demonstrate alt description editing"</strong> class="wp-image-29583" />
</a><figcaption>Image example
<br>Picture 2</figcaption></figure>Code language: JavaScript (javascript)
Hope this helps. 🙂
Use the comment section below if you have any corrections, additions, questions, or comments.
Last updated:
Originally published: