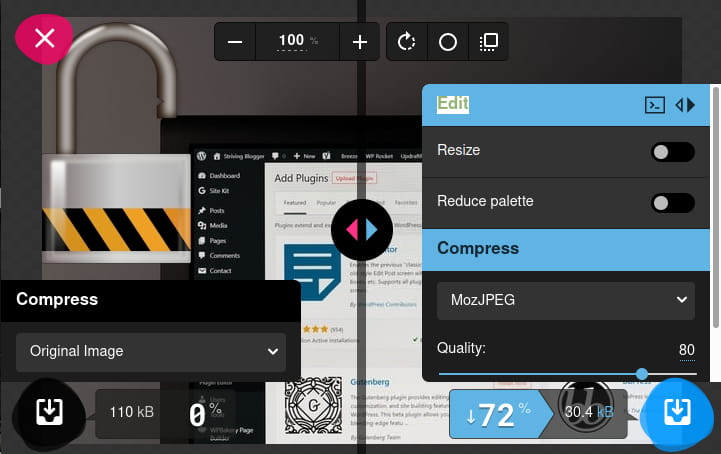
In a series of posts explaining website optimization, this one deals with website image optimization. First I’ll explain what “website image optimization” is, why it is important, followed by an explanation of how to do it (technically, step-by-step). Let us begin…
1. What is image optimization?
Simple analogy would be clothes/shoes. If they are too small, they will be very uncomfortable. If they are too big, it will be harder to move/run. It’s best when it is “just right”, that is optimal size.
It is the same with images. Make images too small, or compress them too much (later on that), it will be hard to see whatever it is that needs to be seen in the images/pictures. If they are too big, they will make page download slower and (depending on the way they are displayed) can also make the rest of the page harder to read.
1.1. Image size
Image size is defined by:
- Resolution – which is the number of pixels horizontally and vertically, usually expressed in a “A x B” format (1024×768, 60×80, 25×25 etc.).
- The colour “depth” – how many colours and shades of each colour does an image show.
Without going into details about bits, bytes and compression: a small image with 100×100 pixels has a total number of 10,000 pixels. If it is a black and white picture, there is a need to save only two possible colour values for each pixel (2 x 10,000). If the image is not just using black and white colour, but many shades of gray, it is roughly 256 x 10,000 pixel “information” that need to be saved. True colour image, with over million colours – you get the idea.
Of course, there are image saving formats that perform a very good compression, reducing the file size. There will be more on that in the image optimization chapter. For now it just suffices to realize why image size is important. That is to not save an image in a format larger than is needed.
Hence, image optimization is nothing more than making images just the right size for the application, with choosing an optimal compression method. This is better explained in the next chapter, about the importance of optimization.
2. The importance of image optimization
Images are types of files that a server can’t compress “on the fly”. That is, you can’t upload a big image, link to it, then expect the server to make it smaller and show it as such to visitors. No, visitors will have to download the whole, large image, then their browser will (if the page is formatted that way) show it in a reduced size. This way page download time is increased and the visitor’s computer is put under more load to re-format the image before it is shown (can be a problem with slow computers – especially if there are too many big images).
Using an example of log-in/log-out icons for a website: they are shown in a certain size, say 25×25 pixel size. They could be uploaded in 250×250 format, then defined so that visitor’s browser shows them as 25×25 (so they don’t take half of the right hand side vertical navigation bar), but that would cause them to be about 100 times larger in (download) size, plus put load on the visitor’s browser to show them in the (“instructed”) 25×25 size.
Same goes for the colour palette – these images can be saved in an 8-bit colour palette, that is 256 different colours. No need to save them in true colour, since they practically have only two different colours used.
Opposite example is the background image. It is a big size one, to cover the whole screen. If it were saved in a smaller size (with fewer pixels), the display would be uglier – small “squares” would show, just like when zooming in too much on an image. Example of what an image of a low resolution looks like when “stretched” is given below (stretched from 25×25 to 80×80 pixels):

This is the “native” size, without stretching, or reducing a bigger image:

Simply put – images larger than needed slow down page load, while images smaller than needed look ugly (if “stretched”), or too small on a page.
Tool for testing page load speed, GTmetrix, gives this warning when testing a page with not-optimized images:
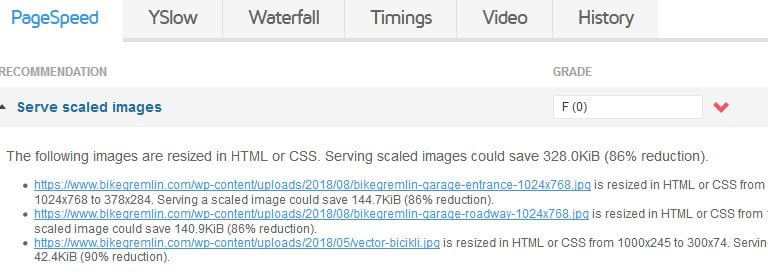
Picture 1
Here’s what it looks like after optimization:

Picture 2
How to achieve this? That is explained in the following chapter, it’s relatively simple.
3. Image optimization
First thing explained will be the various file formats and types of compression, then what tools are used, finally explaining how to do it.
3.1. Types of image compression – image saving formats
There are two basic types of image compression: lossless and lossy and a lot of different image saving formats using either type of the two compressions. Short, simple and “rough explanation” (not 100% accurate, more in terms to explain the principles):
- Lossless compression uses data about geometrical shapes used in the image, so that not every pixel data is saved. Also, it can make an index of the colours used, in order to reduce the amount of colour data used for each separate pixel, noting just the data from the indexed palette. The bottom line is that lossless compression leaves the image identical to the original, while still reducing the image size. The most popular lossless image format is .png (Portable Network Graphics). More detailed .png compression algorithm explanation. Another popular lossless format that doesn’t compress as good as .png, but allows animated images, is .gif.
- Lossy compression uses a different approach. It looks for image parts (areas) that have similar enough pixels that can be replaced with just one colour/shade definition for the whole area. This, of course, is approximation and fine details are lost. The result is an image with a much lower file size, without noticeable reduction in quality. The most renowned lossy image format is .jpg, or .jpeg (Joint Photographic Experts Group). Detailed explanation of .jpg compression.
There are many more different image formats, but the above listed are the best for website use – 99% of computers can display them and they provide god compression (each for its use).
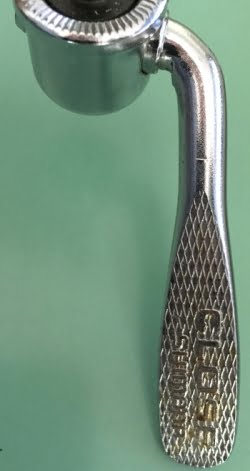
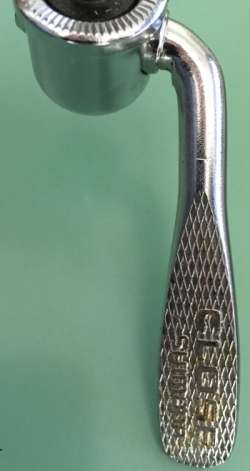
Lossless compression has a limited amount of achievable compression level. With lossy compression it is possible to choose compression level. More compression results in a smaller file, but after a certain point, there is an obvious loss in image quality – images get noticeably “uglier”. Example is shown in picture 3:
Picture 3b

Picture 3c
- 3a: jpeg with minimal compression (“100% quality”). File size 83 KB.
- 3b: jpeg with moderate compression (60% quality). File size 19 KB.
- 3c: jpeg with high compression (20% quality). File size 13 KB.
Picture 3 shows that there is a point past which file size reduction is small, compared to the degradation of image quality. Also, it shows there is a point past which image quality becomes unacceptably poor.
Finding this point depends on image type and the desired quality. Some images allow more compression before quality degradation becomes visible. For most images on this website, acceptable level of compression is “85% quality”. But you can find what works for you, and for each particular image (type).
3.2. Which compression (image format) to use and when?
Each compression type and image file format has its pros and cons. Without going into details, a short instruction:
- If the image is made of geometric shapes and not many different colours/shades (like BikeGremlin logo picture in the top left corner of this page, log-in and log-out buttons etc), use .png. File size for the noted image types can often be smaller than even using .jpg (lossy compression) image format. This format also allows setting of a transparent image background, which is useful sometimes.
- If the image has more colours and not just simple lines and curves, like a picture of a man, or some scenery etc – use .jpg. In my opinion quality level of “85%” gives no visible loss in quality, with a decent file size reduction (to about 1/3 of the original file size).
- For animations – .gif format.
With very little practise, this becomes intuitive and easy – you will know up front which format is best (i.e. optimal) for each image.
3.3. Image size – cropping and resizing
By image size I don’t mean file size, but the size of the image itself – how many pixels horizontally and vertically it has. Before applying any kind of compression, it is best to cut the image to the desired (needed) size. When doing that, there are two separate functions: cropping and resizing.
This is best explained using an example:
I want to place a picture of Shimano Biopace cranks on the website. Ideally, I’d take a picture of the cranks, then resize it and compress to the desired (acceptable) level and upload it. However, if I only have a picture of a whole bicycle with Biopace cranks, I’d first have to crop the cranks from the picture, then resize and compress the cropped image.
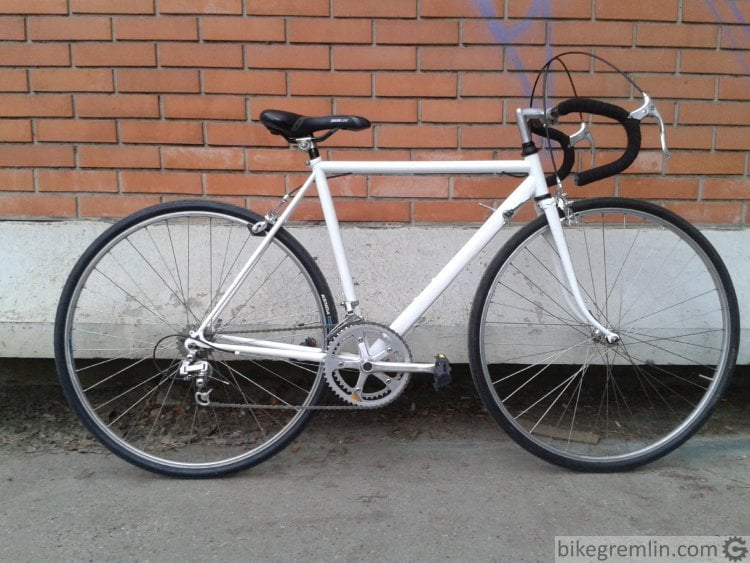
Picture 4
Imagine the image above in 4000×3000 pixel size, and not yet uploaded (shown) on the website.
If my goal was to show the whole bicycle, that would be it. However, since I need a picture of Biopace cranks, cropping is needed.
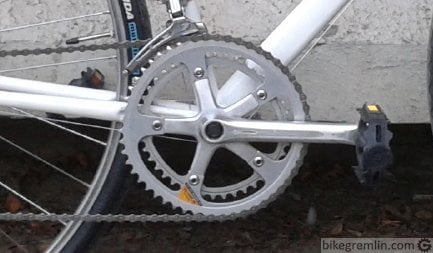
Picture 5
Picture 5 takes less size on the screen than picture 4 and shows the needed part larger than picture 4. This was done by first cropping the needed part, then resizing it to 433×253 pixels. Note – if no resizing was done from the original image, just cropping, the resulting Biopace picture would have been over 1000 pixels wide and over 500 pixels high, taking a lot of screen area. Additional advantage, of course, is a smaller file size – no need to save a larger image than necessary.
For better quality, it is best to take a photo of what needs to be shown, so there’s minimum cropping required.
3.4. How to technically perform image optimization
3.4.1. WordPress-related image optimization quirks
First thing, not directly related to image optimization and more related to WordPress. It is about WordPress making several different (needless) size formats of each uploaded image. Picture 6 shows how to disable that. Some extra image formats made by the used WordPress theme won’t be disabled (not without more hassle), but the number of extra-images on server will still be minimized.
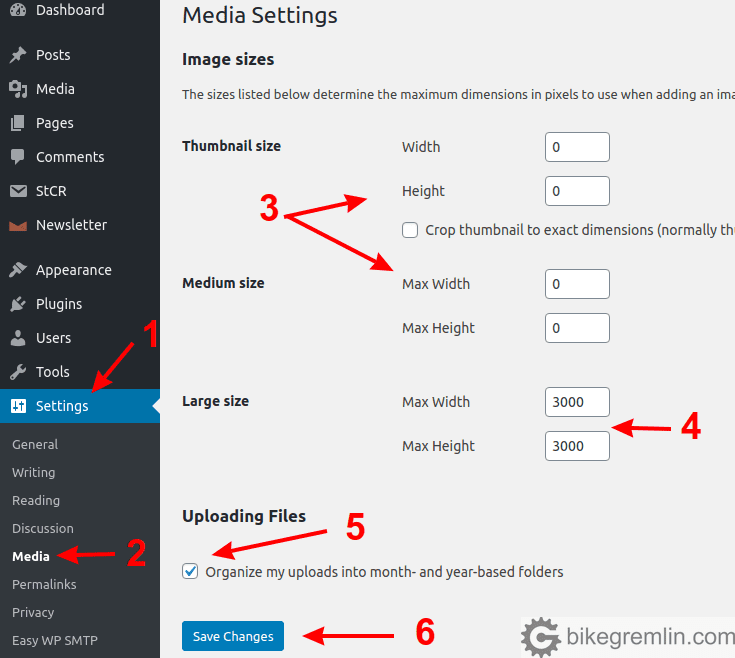
Picture 6
If you configure everything as in picture 6, WordPress will create an extra image copy only if the uploaded image is larger than 3000 pixels vertically, or horizontally.
Update, August 2022:
When you upload an image wider than 768 pixels (horizontal resolution), WordPress now automatically creates its copy that is 768 pixels wide. It shows that version to any visitors on mobile (you can confirm this by viewing page with the F12 pressed in Chrome browser, then go to the “network” tab and see the image files being loaded have “-768xSomething” added to the end of their file names, just before the image file extension).
The problem is these files are often a lot heavier in KB size (4-5 times often). WordPress does an awful job of image compression. Especially with .png format (an 800px wide .png will often end up with a 3 to 5 times “heavier” 768px wide copy). I’ve solved this by generally not uploading very big images (so the same size should work on both desktop and mobile), and disabling the display of these poorly optimized images.

Picture 6b
That can be done by adding the following code to the child theme:
// BEGIN disable auto 768px image display on mobile

add_filter( 'wp_calculate_image_srcset', '__return_false' );

// END disable auto 768px image display on mobile
This code will prevent WordPress from creating any extra image sizes upon uploading new images (code by DarthVader on stackoverflow):
// BEGIN Disable image format auto creation by WordPress
function add_image_insert_override( $sizes ){
    unset( $sizes[ 'thumbnail' ]);
    unset( $sizes[ 'medium' ]);
    unset( $sizes[ 'medium_large' ] );
    unset( $sizes[ 'large' ]);
    unset( $sizes[ 'full' ] );
    return $sizes;
}
add_filter( 'intermediate_image_sizes_advanced', 'add_image_insert_override' );
// END Disable image format auto creation by WordPress
Here is a command (run in Terminal or using SSH) to list all the extra image sizes (the example is for a 768px size .jpg and .png images):
find /home/*/public_html/wp-content/uploads/* -type f \( -name "*-768x???.jpg" -o -name "*-768x???.png" \) -exec ls -lh {} \;This is a command to remove images using the same “pattern”:
find /home/*/public_html/wp-content/uploads/* -type f \( -name "*-768x???.jpg" -o -name "*-768x???.png" \) -exec rm -rf {} \;Thanks for the commands, Mike (Mike’s blog link). 🙂
NOTE:
If you remove the images, you may save a lot of storage space, but should you ever “un-disable” showing different image formats on mobile (the first custom-code listed above), WordPress will not show the images on mobile (it will try to show the 768px version, but you’ve deleted it).
On the other hand, the second listed code will prevent WordPress from creating any extra image formats, and that will work on both mobile and desktop for any new uploads.
For websites with a lot of large images (2000 pixels and similar), I can only recommend leaving these options enabled, but sticking with .jpg format, and configuring LiteSpeed image optimization.
Oh, and expect more of this mess with WordPress 6.1. default WebP image format creation. Be prepared to figure out how to disable those too.
Now, let’s get to image resizing and optimization:
3.4.2. Image optimization in general
Then use an image editing software. A good, free one I use is paint.net. Open an image you wish to edit in the program. There is also a very good free online software for this I often use, called Squoosh.
Choose a rectangle, or ellipse select tool, and mark the area to be cropped.
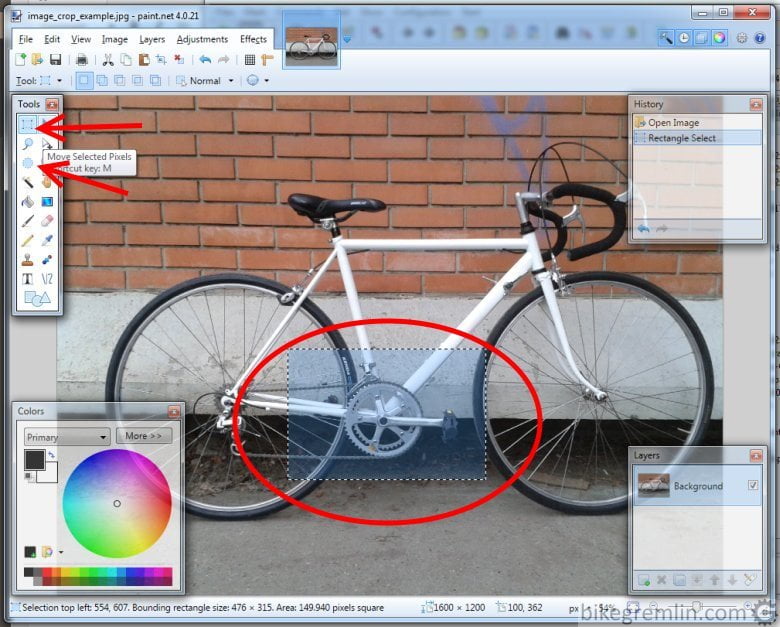
Picture 7
Then, from the main menu, choose “Crop to Selection”. You’ll be left with an image consisting only of the previously marked part.
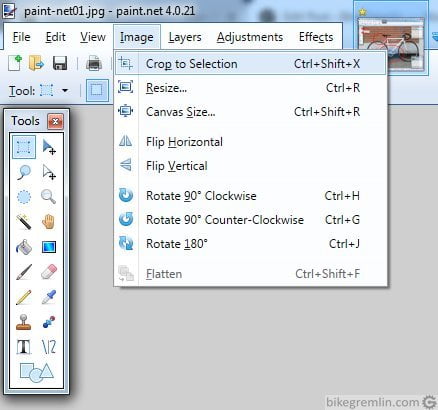
Picture 8
Option for resizing, after cropping, is right below the “Crop to Selection” in the same menu (picture 8). Click it and enter the desired image size.
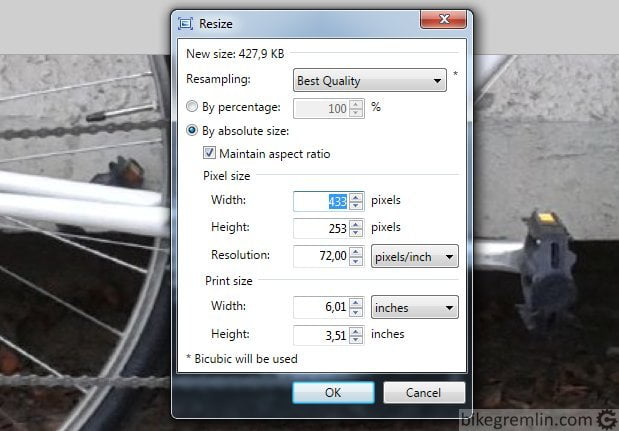
If “Maintain aspect ratio” is checked, it suffices to change just the width, or the height – the other dimension will be automatically proportionally changed.
All that’s left now is to choose a saving format and compression level (File -> Save As… from the main menu). When choosing the file name, make it so that you (and Google) can know what the image is about from the image file name – it will later be easier for all.

Picture 10
Depending on the chosen image format, options differ. For .jpg it is needed to select the desired “quality level” (the more quality, the greater file size).
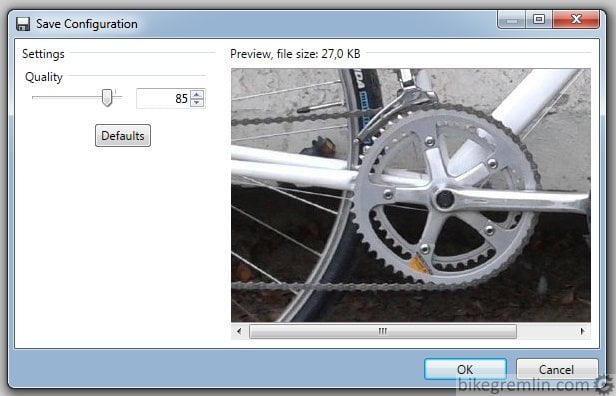
Picture 11
When choosing .png format, there are a bit more options (picture 12).
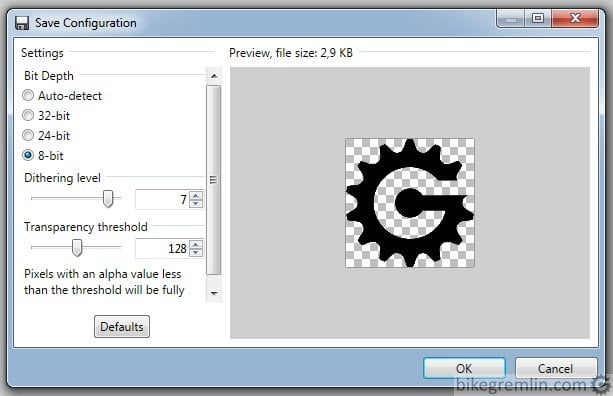
Picture 12
- Bit Depth – the size of colour palette. Png makes most sense with 8-bit coloured images. If more colours are needed, it is usually better to use .jpg format.
- Dithering level – leave it at default (7). Moving the slider left-right shows results in the preview pane on the right, so you can choose which value looks best to you.
- Transparency threshold – at which point are semi-transparent pixels considered transparent. Default value of 128 gives OK results, but you can experiment by moving the slider and see in the preview window which value’s result you like best.
4. Image naming (file names)
I wrote about this in the SE Optimization (SEO) article, but I see many people making mistakes when naming images, so wanted to stress it here as well.
- Don’t use any spaces in image file names. Use a minus sign (“-“) instead.
“city bike.jpg” is bad, “city-bike.jpg” is good. - Don’t use any special characters. Use English alphabet only.
“Njörðr.jpg” is bad, “njordr.jpg” is good. - Use only lower-case letters.
“BikeGremlin.jpg” is bad, “bikegremlin.jpg” is good. - Avoid long image file names.
“bike-gremlin-website-header-image-with-a-bicycle-on-a-motorway.jpg” is bad, “bicycle-header-bikegremlin.jpg” is good.
And that’s it for image optimization. I hope you now know what and how to do. 🙂 You can leave any questions, additions, or corrections in the comments section below.
Other posts in the series:
- Website optimization [01] Measuring “performance”
- Website optimization [02] DNS and redirects
- Website optimization [03] Caching and compressing
- Website optimization [04] WordPress plugins – speed and stability
- Website optimization [05] Images – pictures
- Website optimization [06] SEO
- Website optimization [07] Permalink change
- Caching a WordPress website
- Hosting server location impact on website speed
Last updated:
Originally published:

