In this article, I’ll explain how I’ve configured Cloudflare for my WordPress websites so that they are as fast and as secure as possible, while working properly. For this example I’ll use a free Cloudflare account, that is available to everyone without any extra costs. In separate articles, I explained what Cloudflare is, and how to configure Cloudflare DNS.
Most of the settings shown here will work for a vast majority of websites, not just for WordPress.
In a separate article, I made a detailed guide on how to install and configure Cloudflare WordPress APO, and Cloudflare Pro.
Note:
See my forum’s discussion thread about “Cloudflare being shady” – and consider that before deciding whether to go with Cloudflare.
Table Of Contents (T.O.C.):
- Introduction
- Overview
- Analytics
- DNS
- SSL/TLS
- Firewall – now called “Security”
- Access
- Speed
- Caching
- Workers
- Rules
- Network
- Traffic
- Stream
- Custom Pages
- Apps
- Scrape Shield
0. Introduction
Cloudflare is an excellent service that provides a lot of speed, security and ease of use (when migrating websites etc.) even 100% free of any cost (in more details: what is Cloudflare?).
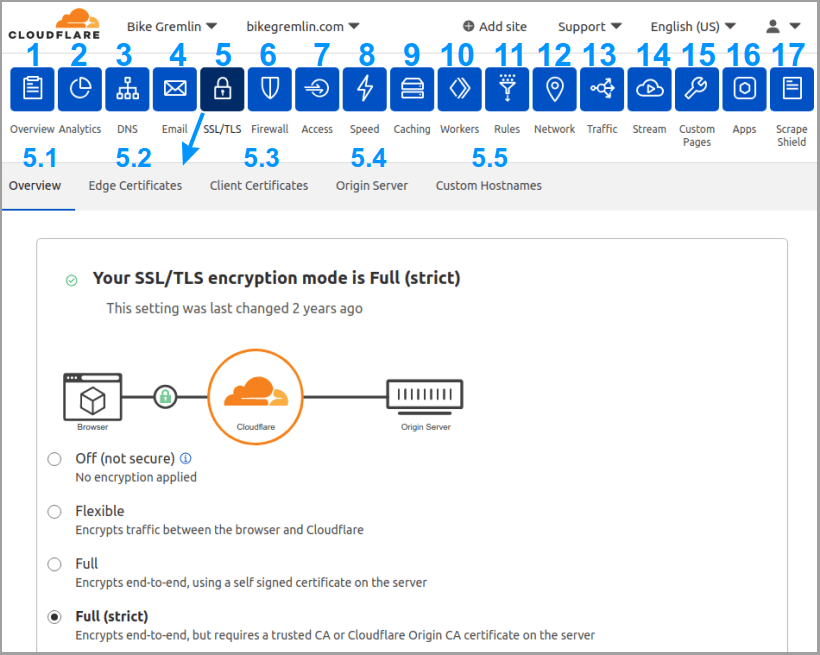
At the time of writing this, Cloudflare has 17 main menu options, with each of those often having several sub-options. I’ll use that structure to show and explain all the settings I use and recommend. The options where nothing needs configuring will be just skipped.
The current Cloudflare menu has two more options: “Zaraz” and “Web3“” – I don’t use them, so for now they aren’t included in this article. The current dashboard is basically the same, just visually different, and it is shown in my article about Cloudflare Pro and WordPress APO services.
Everything written here is based on my knowledge and experience with several WordPress websites over the past years (I’ve been using Cloudflare with WordPress since 2018). This is how I configure Cloudflare and what works for me, but you are following all the advice at your own risk (responsibility). I.e. use reasonable caution and common sense, and don’t blame me if something goes wrong. 🙂
1. – 4. Options 1 (Overview) through 4 (Email)
Overview and Analytics menus are informative. They contain basic info about your account but have no configuration options, so we won’t be going into those – they are quite clear and intuitive (self-explanatory as the Americans say).
DNS options are all nicely explained in the article on how to configure Cloudflare DNS. I suggest you read it and configure your DNS properly – without it, none of the options shown here will work.
Email – a new service from Cloudflare. I prefer using MXroute and have dedicated a separate article to configuring MXroute email service.
5. SSL/TLS
5.1. Overview
- Set the first option to “Full (strict)“
If your server hasn’t got a configured SSL/TLS certificate, it won’t work with this setting. Separate articles explain how to install SSL/TLS in cPanel, and DirectAdmin SSL/TLS installation. - SSL/TLS Recommender – ON
Doesn’t hurt to activate this, so Cloudflare can notify you via an email if your current encryption method can be improved.
5.2. Edge Certificates
- Edge Certificates – Cloudflare takes care of this automatically, for free. No need to touch anything. For my domain it says (and your domain should show the same pattern):
*.bikegremlin.com, bikegremlin.com, and “Status Active”. - Always Use HTTPS – OFF
I like keeping this turned off, then checking if my website and server are configured to serve everything using HTPPS. Turning it on does no harm, but I like being sure my websites can work properly even without Cloudflare (in case they start charging an arm and a leg, or their service quality becomes poor). - HTTP Strict Transport Security (HSTS) – OFF
Don’t enable this. I explained here why I think HSTS can make your life more complicated. - Minimum TLS Version – 1.1
This defines the lowest TLS version your website will allow connections with. Don’t go with a lower version (1.0). Modern browsers and computers will of course use the latest. Version 1.0 (SSL) is considered insecure now and should not be allowed. - Opportunistic Encryption – ON
This isn’t a HTTPS replacement, but it provides encryption even for other protocols, such as HTTP/2. - TLS 1.3 – ON
- Automatic HTTPS Rewrites – OFF
If this is enabled, Cloudflare will try to serve all the links, including the non-HTTPS ones, using the HTPPS protocol (if it’s available for the link/resource). Similar to the “Always Use HTTPS” option: it doesn’t hurt to turn this ON, but I think it’s better to see if some of your links or images aren’t set to HTTPS, and fix that. - Certificate Transparency MonitoringBeta – ON
Cloudflare will scan the public lists of issued TLS/SSL certificates, and notify you if a certificate for your domain has been issued. Unless you (or your hosting server) have renewed the certificate, it’s good to know that someone else has managed to get a certificate for your domain. - Disable Universal SSL – Don’t click on this option, unless you wish to manually configure SSL/TLS certificates for Cloudflare.
5.3. Client Certificates
Don’t touch anything here.
5.4. Origin Server
If you can’t install certificates on your hosting server (this usually requires admin access), don’t touch anything here. That is:
- Origin Certificates – Don’t click on this.
- Authenticated Origin Pulls – OFF
We’ll also skip the next sub-menu, “Custom Hostnames.”
6. Firewall – now called “Security”
We’ll skip the sub-menus “Overview,” “Page Shield,” and “DDoS.” Those are for special use cases and are beyond the scope of this article. For most websites, it’s perfectly fine to not touch anything there.
6.2. WAF
Click on the Create firewall rule option and define the following rule (pay attention to the leading and trailing slashes “/” – they’re important):
6.2.1
In a separate article I explained how to use Cloudflare WAF to block WordPress comment, contact form and search option SPAM.
6.2.2.
Rule name (required)
cpanel-whm-and-xmlrpc-BLOCK
When incoming requests match…
Click on the “Edit expression” and copy/paste this:
(http.request.uri.path eq "/cpanel") or (http.request.uri.path eq "/whm") or (cf.edge.server_port in {2083 2087}) or (http.request.uri.path eq "/xmlrpc.php")Then…
Block
6.2.3
Rule name (required)
WP-admin-protection
When incoming requests match…
- URI Path | contains | /wp-login.php
OR - URI Path | contains | /wp-admin/
OR - URI Path | contains | /cart/
OR - URI Path | contains | /checkout/
OR - URI Path | contains | /my-account/
OR
URI Query String | contains | unapproved
Then…
Managed Challenge (Recommended)
6.4. Bots
- Bot Fight Mode – OFF
If you enable this, WordPress REST API and Loopback requests won’t work properly.
This is fine left on default. Even moderate-scale bot attacks can be solved using the following sub-menu options, as I’ll explain.
We’ll skip the “DDoS” sub-menu.
6.6. Settings
- Security Level – Low
Set this to “High” or “I’m Under Attack!” if you are having bot attack problems. Try “High” first – it often does the job, without bothering legit visitors with reCAPTCHA. - Challenge Passage – 1 hour
- Browser Integrity Check – ON
- Privacy Pass Support – ON
8. Speed
As you can see, we’ve skipped the “Access” menu (nothing to touch there) and moved up to “Speed” (pun intended). 🙂
8.1. Overview
The important thing here is the button for buying Cloudflare service for caching WordPress websites from Cloudflare edge servers, by using Cloudflare WordPress APO (CF website link).
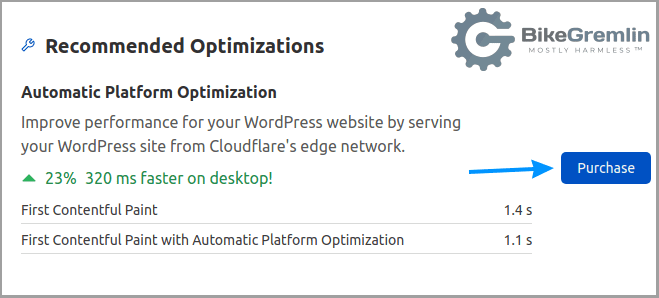
This costs $5 per month. Yes, you can make your website run fast without it (my series of articles on website optimization). And yes, you can use various tricks to achieve something similar. The main problem when going free, is to “bypass cache on a browser cookie,” i.e. to avoid showing cached admin pages to visitors and vice-versa.
The speed boost is excellent when pages are pre-created (cached) and served from Cloudflare’s servers directly to visitors. Again, websites can be pretty fast even without this, so you can save $5. If you have a web-shop, especially if you are selling the stuff people don’t really need, so giving them half a second more to think is detrimental for the sales, pay the $5, it’s well worth it. For non-profit websites, it makes no sense to pay for this (I should ask Cloudflare to sponsor me, so I could make a comparison test/review and publish the results 🙂 ).
8.2. Optimization
Update October 2024:
Under the Optimization -> Content Optimization tab, there is the “Speed Brain” option (now in beta). It is enabled by default!?! For your WordPress to work and update normally, it is best to disable that option.
The same goes for the “Cloudflare Fonts” option (best left disabled).
- Image Resizing – Pro option (for paid Cloudflare plans)
- Polish – Pro option
- Auto Minify – UNcheck all the boxes (JavaScript, CSS i HTML) and rely on your LiteSpeed caching plugin.
- Brotli – ON
- Early Hints – still in the beta test phase. I’d be happy to test and provide feedback for a reasonable compensation. 🙂 UPDATE: best turned OFF.
- Automatic Platform Optimization for WordPress – You can buy Cloudflare WordPress APO from this menu as well, very convenient.
- Enhanced HTTP/2 Prioritization – pro option (not for us poor guys 🙂 )
- TCP Turbo – Pro option
- Mirage – Pro option in beta test phase (you pay to test it 🙂 ). Works OK on most of my websites – for now. 🙂
- Rocket Loader™ – OFF* (*see the explanation right below)
This mostly works fine when enabled. I had to disable this so Google Programmable website search would work properly (update: see picture 12 on that link, I’ve managed to make it work for now 🙂 ). At least until I figure out what scripts exactly does the search use, so I could “bridge” only those – Cloudflare documentation on Rocket Loader specific JavaScript ignoring.
If using the WordPress APO plugin, Cloudflare recommends setting this to OFF nonetheless. Railgun™ – if your hosting server supports it, you’ll be able to activate this option (how to activate and test Cloudflare Railgun). However, if you are using the WordPress APO plugin, Railgun will be automatically disabled. That’s good, since it’s not needed in that case – all the contents are served cached, from the Edge servers.
Update, October 2023: Cloudflare Railgun is being retired and this point is no longer relevant.- Automatic Signed Exchanges (SXGs) – Pro option in beta-test phase
- Prefetch URLs – Enterprise option
- AMP Real URL – OFF
Activating this shows real website URLs for AMP website version. I want the AMP website version to be clearly noticeable. - Mobile Redirect – OFF
Those with a separate website (sub)domain for the mobile website versions could wish to enable this.
Skipping the “Browser Insights” – nothing to see, and moving on.
9. Caching
Skipping the “Overview” and going straight to:
9.2. Tiered Cache
- Argo Tiered Cache – ON
9.3. Configuration
- Purge Cache – clicking the “Purge Everything” button deletes all the Cloudflare cache, which is handy sometimes (minor CSS changes for example). “Custom Purge” gives you a box to enter a list of URLs for which you wish to delete cache (so you don’t delete the entire cache).
- Caching Level – Standard
- Browser Cache TTL – Respect Existing Headers
Works best with LiteSpeed Cache plugin.
If using the WordPress APO plugin, set this to “4 hours”. - CSAM Scanning Tool – it will search your site for “inappropriate child images” and notify you. On a well secured server you don’t really need this (you know what you upload). But for websites that let community members upload stuff, it could be a good idea.
- Crawler Hints – OFF
It sends all kinds of backend pages that should not be visible nor indexed to search engines. Best kept disabled. - Always Online™ – ON, just don’t click on “Update,” that’s still in a beta test phase.
- Development Mode – OFF
Enable this if you wish to bypass Cloudflare service and use it as a DNS only. Usefull during development or troubleshooting, though I prefer to do development in a staging environment, and to “manually” disable one option at a time during troubleshooting. - Enable Query String Sort – Enterprise option
10. Workers
Workers options let you do magical stuff, even for free. However, that is a topic for a separate article, or a series of articles, depending on the use case.
11. Rules
11.1. Page Rules
Order of rules is important! For every page visit, the rules list is read from the first to the last. As soon as the first condition of a rule is matched, that rule is executed, and all the following rules (below) are disregarded. Here’s the list of BikeGremlin rules:
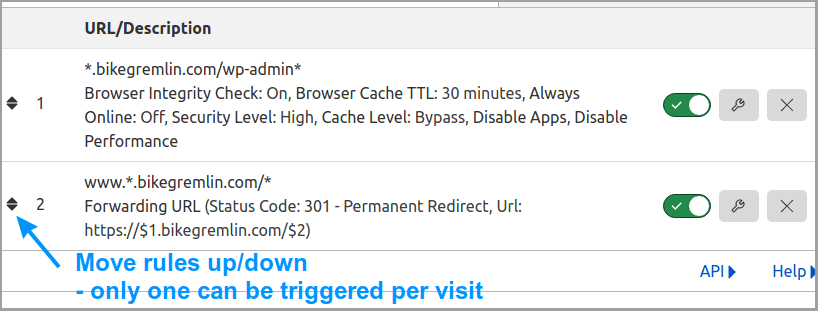
The second rule is for redirecting sub-domains that have a www. added (I used to think that’s a good idea 🙂 ) to naked sub-domains.
The first rule is a good idea for any WordPress website, and I’ll show it in detail. If you are using a naked domain (no www.), then remove the dot after the first asterisk, before your domain name.
I think that naked domains are a bad idea (I’m using www.bikegremlin.com, or subdomains, like this one – io.bikegremlin.com).
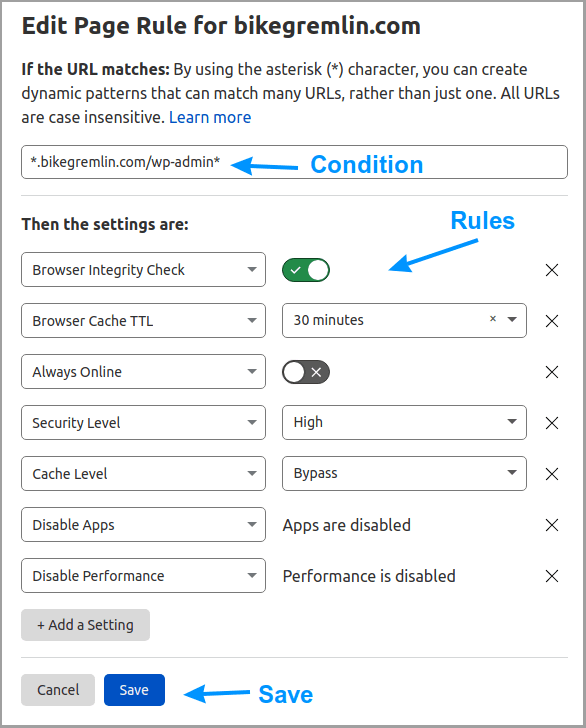
You could make a similar rule for *yourdomain.com/wp-login*
You could also set the “Security Level” to “I’m Under Attack!”
We’ll skip the “Transform Rules” and move on.
11.3. Settings
- Normalize incoming URLs – ON
- Normalize URLs to origin – OFF
12. Network
- HTTP/2 – ON
- HTTP/3 (with QUIC) – ON
- 0-RTT Connection Resumption – ON
- IPv6 Compatibility – ON
- gRPC – OFF
- WebSockets – ON
- Onion Routing – ON
- Pseudo IPv4 – OFF
- IP Geolocation – ON
- Maximum Upload Size – 100MB
- Response Buffering – Enterprise option
- True-Client-IP Header – Enterprise option
13. Options 13 (Traffic) through 16 (Apps)
Options under “Traffic,” “Stream,” “Custom Pages,” and “Apps” are mostly paid (Pro and Enterprise options) or for special use cases.
No need to touch anything here. Moving on.
17. Scrape Shield
- Email Address Obfuscation – ON
- Server-side Excludes – ON
This option enables you to use “special” HTML comment tags to hide some content (like a phone number) from “disreputable visitors,” for example: “<!–sse–>my phone here<!–/sse–>“ - Hotlink Protection – ON
You can switch this of, then use your hosting server (.htaccess file) to configure for which subdomains you wish to allow image embedding to other sites.
You could also create a directory on your root domain called “hotlink-ok” (like “https://bikegremlin.com/hotlink-ok/”). Any images placed there will be allowed to be embedded, even if you enable hotlink protection.
If using the WordPress APO, set this to OFF.
Interesting fact
I posted this article on Reddit’s WordPress subreddit – and it was removed by the moderators with this note:
Sorry, this post has been removed by the moderators of r/Wordpress.
Moderators remove posts from feeds for a variety of reasons, including keeping communities safe, civil, and true to their purpose.
Unlike this “publishing policy,” members and moderators on LowEndSpirit forum actually encourage making articles like this, often providing constructive criticism, corrections, additions and positive feedback (when deserved). This helps make the articles even better – so they can better help more people. I think this is a great way of improving and sharing knowledge, and helping the community in general.
Last updated:
Originally published:

