This is more of a tutorial or a use case than a “normal” review. I’ve been using the OceanWP theme for years, it’s one of my favourites, and I consider it to be among the best WordPress themes. For (a lot) more details, read this article.
Status: Active
Free version from Jan, 2016 – ongoing,
Pro (paid) version from May, 2023 – ongoing
I’m currently using this theme with several websites. There’s no more honest recommendation than that.
Table Of Contents (T.O.C.):
- Introduction
- OceanWP plugins/add-ons
- OceanWP Pro custom headers and elements
- Custom code
- Other changes
- Performance
- Conclusion
1. Introduction
I built practically every website using either OceanWP or GeneratePress. They are both awesome themes, but they both offer a different “default design” or layout if you like. So, depending on the design (look, UI & UX) that I’m aiming for, it’s sometimes easier to start with one, sometimes with the other (I look for doing less “manual” customizations when possible).
With most themes, the paid (Pro, Premium etc.) version gives you a lot more options “out of the box,” saving a lot of time in coding and customization. As I already have a lifetime GeneratePress licence (I bought it a few years ago), I was seriously considering investing in a lifetime OceanWP Pro licence while it’s still available (I was looking at the Agency Pro licence, as it is a one-time purchase for 50 websites, so it looked like a decent offer for ~ $500 at the time of writing). However, while I was looking to buy, I got a free one from the OceanWP company – with no strings attached (so no, this is not a sponsored or paid-for article – take my word for it or not).
If you’ve been following my work, you already know that most of my content is educational and intended to help other people. Many like-minded people recognize that, so this is not the first time that someone (either as a private individual or as a company representative) has gone out of their way to help and support my work while asking for nothing in return apart from “to keep doing what I’m doing.”
So, to keep the good vibes rolling (my philosophy), I’ve decided to do some pro bono website redesign for a local educational website from my country (fascija.com) which is aimed at helping medicine students (my country lacks good doctors). While doing that, I also wanted to make a tutorial (and sort of a review) for the OceanWP Pro theme. Both as my own reference & reminder and to help others. I hope this will also help the hard-working people from the OceanWP company. There are not many awesome WordPress themes out there, even fewer that have been great for years, without (m)any problems or hiccups and with good customer support.
2. OceanWP plugins/add-ons
Let’s get down to business. After a brief discussion of how the new website design should look and function, I started implementing it.
One of the first plugins I installed was Ocean Extra (WordPress.org link). With that free plugin, you get a lot of features (even with the free OceanWP version) without much crappy code that slows down the page load speed (as is the case with some page builders).
Every OceanWP Pro add-on is installed and listed as a separate plugin.
The code seems well-written and optimized, so the extra plugins don’t cause any problems, nor do they make the site perform slower. Quite the contrary – by the time the redesign was finished, website performance had increased, and the database size was cut in half, literally.
Here’s a list of all the add-ons I’ve used and why:
- Ocean Extra (Free)
Host Google Fonts locally (performance and the GDPR nonsense covered), Individual page/post control (so I can set sidebars or full-width display for particular pages on a case-by-case basis when needed), Mega Menu (replaced a different, slower plugin used for that before), and all the options for installing other premium theme add-ons (among several other cool options). - Ocean Hooks (Pro)
Provides easy customizations using WordPress hooks without much coding. Read on to see how I’ve used it. - Ocean Stick Anything (Free)
Let’s you make stuff sticky – so they remain on the screen even when you scroll down while reading a page/article. Neat – as you practically need no coding to achieve this. - Ocean White Label (Pro)
The Pro version lets you remove the “OceanWP” label without any custom code. Neat.
3. OceanWP Pro custom headers and elements
This is where it gets very fun and interesting.
Custom elements are configured using the “My Library” section (under the main OceanWP menu – see picture 2 below). When you click on the “Add-ons” option, you get a list of various plugins for download. So you can download and install the ones you need (for details, see how to install a paid WordPress plugin – with The SEO Framework plugin used as an example).
To make my life easier, I installed the “Ocean Hooks” add-on.
While in the “My Library” menu, in order to add PHP code where you wish, you need to select “PHP Code” from the dropdown menu first, and then click on the “Add New” button.
After that, you will get to edit it and see the PHP code entry window instead of the standard WordPress Gutenberg window with WordPress blocks.
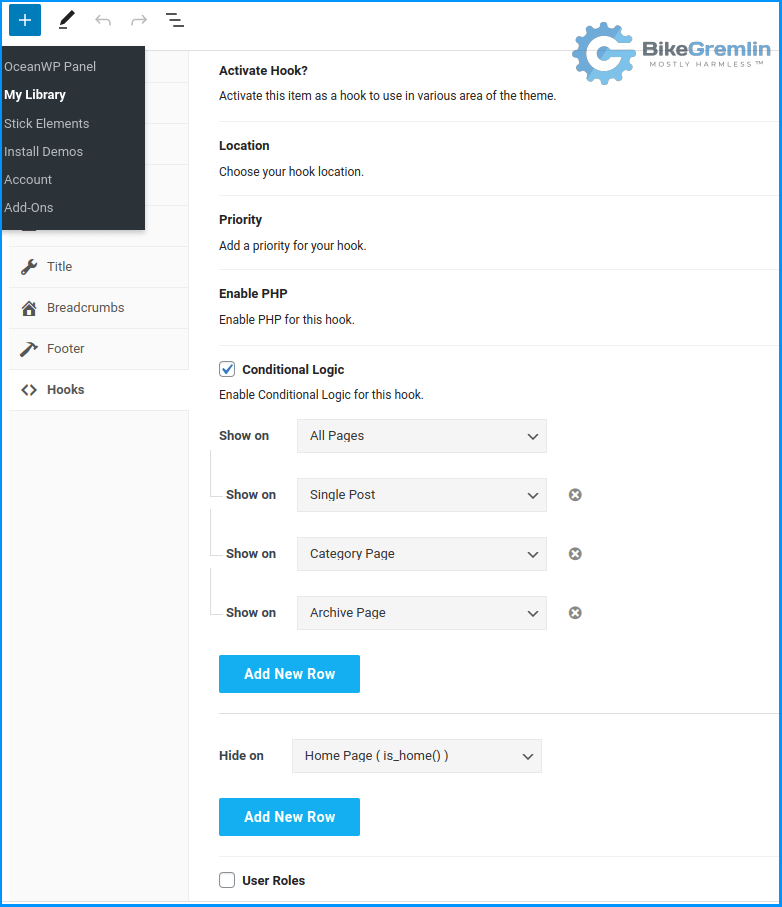
In the “Hooks” menu (“Location Choose your hook location”), I set my code to be used on “After Blog Entry Content.”

Picture 1
This is the custom code I added to show “Čitaj dalje” (in my native) instead of “Read more” for post lists:
<?php

    global $post;
    //echo ' <a class="moretag btn btn-primary" href="'. get_permalink($post->ID) . '">Čitaj dalje »</a>'; //Change to suit
echo '  <div class="blog-entry-readmore clr"> <a href="'. get_permalink($post->ID) . '">Čitaj dalje »</a></div>'; //Change to suit


?>
You can further fine-tune the behaviour using the conditional logic options (in this case, that was not needed, but it’s nice knowing that there is an option). An example is shown in picture 2 below:

Picture 2
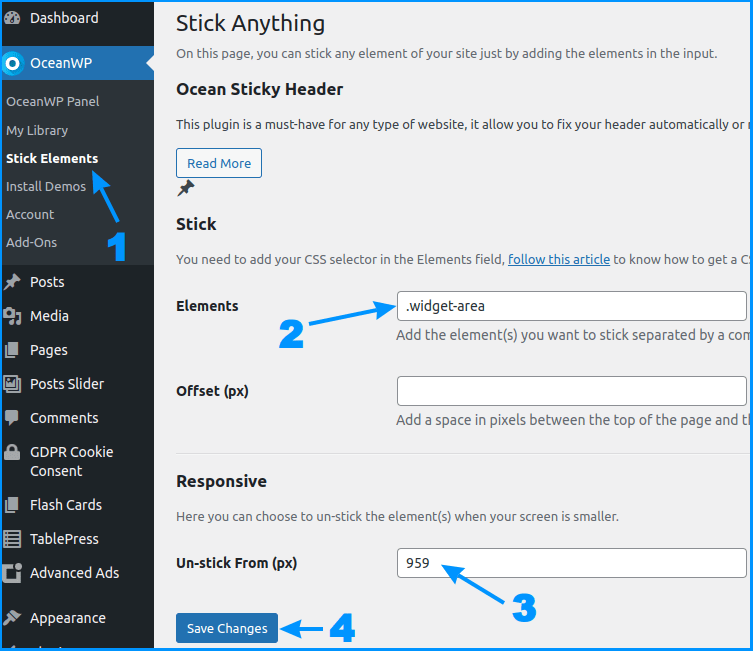
To make the widget section remain on screen when scrolling, I used the Ocean Stick Anything add-on. Getting the widgets to be sticky required adding their CSS class to the list in the add-on’s options:

Picture 3
As you can see, I set the breaking point at 959 pixels – so that on screens (or in browser windows) narrower than 959 pixels, the widgets would not remain sticky.
I suggested to the OceanWP team to make a CSS class (and hooks) “cheat sheet” for the stuff people often wish to make sticky (such as the top menu and similar). Here is an example of a GeneratePress cheat sheet.
Finally, since the idea was to make the front page show a list of posts but without any sidebars (widgets), I had to do the following:
Made a new blank page and used the Ocean Extra option to set it to full width, as shown in picture 4 below.

Picture 4
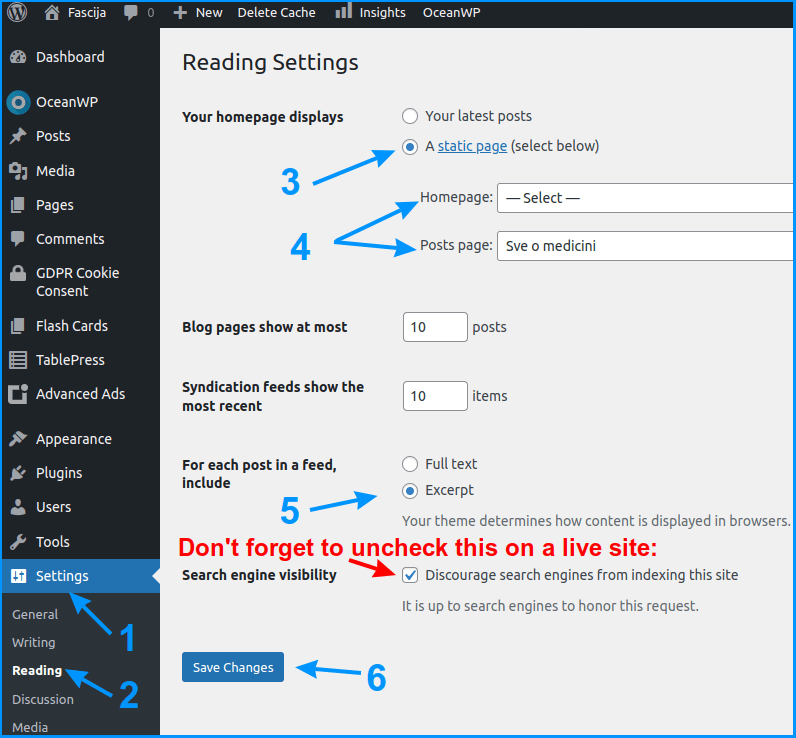
Now, all I had to do was choose that page to be the “front” for the post list layout in WordPress Settings:

Picture 5
Kudos to Marko Stolibojković from the awesome OceanWP support for help with getting this to work. 🙂
4. Custom code
Here is all the custom code I used – with brief explanations. I do suggest you create a child theme and put your custom code there.
Firstly, there was some CLS (Content Layout Shift) while the header section was loading. This code was used in the style.css child theme file to “reserve” the needed vertical space so the contents below don’t shift downwards as the top elements are loading (a great CLS testing tool):
/* BEGIN solving CLS on mobile when the top-menu and logo are loaded */

#site-header.medium-header #site-logo #site-logo-inner {

    height: 100px !important;
}

/* END solving CLS on mobile when the top-menu and logo are loaded */
Then, to make nice mobile-friendly galleries, I opted for the plugin with a very long name 🙂 Photo Gallery by 10Web – Mobile-Friendly Image Gallery (WordPress.org link). A downside of that plugin is a very small button for closing the image when it is clicked on to show over the full screen, and this code should fix that:
/* BEGIN Photo Gallery Lightbox close button large  */

@media only screen {
	.bwg-icon-times-sm.bwg_close_btn {
		font-size: 30px !important;
	}
}

/* END Photo Gallery Lightbox close button large  */
For showing “Čitaj dalje” (in my native) for a post-list WordPress block (inside pages and posts), I used this code in the child theme’s functions.php file:
// BEGIN čitaj dalje inside a page/post when a post-list block is used

function new_excerpt_more($more) {
    global $post;
    return ' <a class="moretag btn btn-primary" href="'. get_permalink($post->ID) . '">...  Čitaj dalje »</a>'; //Change to suit your needs
}

add_filter( 'excerpt_more', 'new_excerpt_more' );

// END čitaj dalje inside a page/post when a post-list block is used
I also wanted to edit the related post title (related posts are listed at the end of each article) from “YOU MIGHT ALSO LIKE” to “MOGLO BI VAS I OVO ZANIMATI:” and for that, I used the following code (provided by the OceanWP documentation – awesome 🙂 ):
// BEGIN  Change the Related Posts title "You Might Also Like" by "Moglo bi vas i ovo zanimati:"

function myprefix_related_posts_title() {
	$my_txt = esc_html__( 'Moglo bi vas i ovo zanimati:', 'oceanwp');
	return $my_txt;
}
add_filter( 'ocean_single_related_posts', 'myprefix_related_posts_title' );

// END  Change the Related Posts title "You Might Also Like" by "Moglo bi vas i ovo zanimati:"
A local saying goes: “Speak Serbian, so the whole world can understand you” – LOL 🙂
5. Other changes
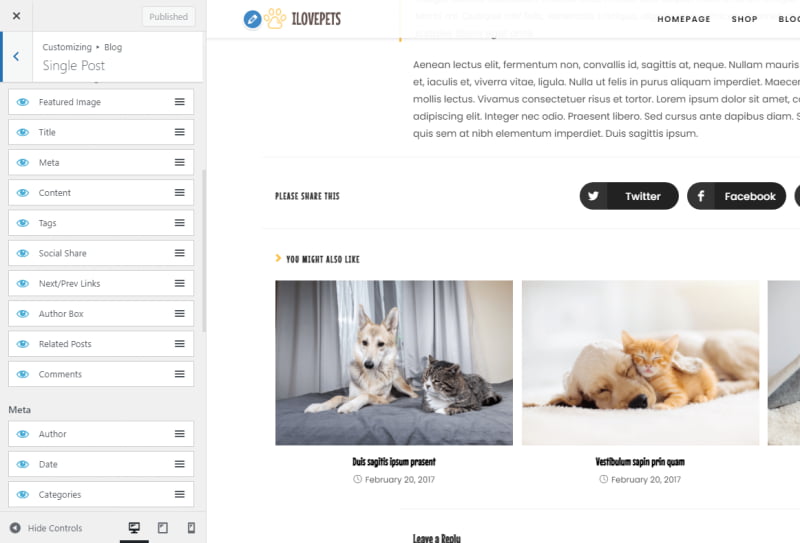
The rest of the changes were simple. OceanWP Pro, like most other pro themes, lets you customize the layout, fonts, icons and other stuff easily, using the customizer options and showing the results right away (it goes without saying that you should do all the changes in a staging environment).
The principle is called WYSWYG (What You See Is What You Get; pronounced as “wiz-ee-wig”) – and that was revolutionary back in the ’90s (now we’re taking it for granted 🙂 – and yes, I am that old – LOL 🙂 ).

Picture 6
I also removed the Max Mega Menu and the Max Mega Menu – Pro Addon plugins and used OceanWP’s menu customization options (faster, sleeker, better 🙂 ). Along with a few other plugins that could be replaced with the cool features that came with the theme and with a minimum amount of custom code.
Another plugin that had to go was one used to place Google AdSense ads on the site – I used some code for that – as explained in the article called “Google AdSense to WordPress how-to?“
As my main goal was (as always when building sites) to make the site owner independent, I kept a few plugins that make their life simpler, even though I don’t use plugins for those features (analytics and similar).
6. Performance
The site relies on some plugins for making tests for users (a sort of test exams). Those plugins do not play very well with my favourite LiteSpeed caching plugin. Since the owner is already considering switching to a different (better) plugin for making tests, I did not spend much time bashing my head about how to disable LiteSpeed caching for the exams but instead went with the WP Super Cache plugin, and it worked nicely.
I have also cleaned the database of the leftovers from previously used themes and plugins.
To be fair, I had done a decent job with the original site’s optimization already, and most of the improvements were done in terms of design (UI/UX). However, my main concern and curiosity were to see if the OceanWP Pro would make the site run slow(er), as is often the case with pro themes that provide loads of customization options.
These are the results – not perfect, but not bad (I did test with an ad blocker enabled, as I can’t control the Google ads loading speed and performance, so it would randomize the results too much):

Picture 7
7. Conclusion
Overall, I am happy with the OceanWP Pro, and it’s awesome to have that “tool” available now that I’ve learned its ropes, so to speak.
In its free version, OceanWP gives a lot of options and is pretty awesome. However, the paid (pro) version gives a lot more, and I would argue that it can replace a decent page builder to a great degree (without hampering the performance and stability).
It’s a very good WordPress theme.
Many thanks to Gox for doing all the needed coding; and to the fascia.com website owner for having the patience to wait until Gox and I cleared up our schedule before finally getting down to the website redesign. Of course, also, thanks to OceanWP for providing us with a chance to give their Pro theme a test.

