In this post, I’ll explain what needs to be done in order to make a WordPress website work with AMP post versions. I made a separate post that explains what AMP is. I’ll try to do it concisely, with step-by-step instructions. Let’s begin.
In the article about my AMP case study, I’ve also explained how to remove AMP from a WordPress website.
Table Of Contents (T.O.C.):
- Install and setup AMP plugin
1.1. Installation of AMP plugin
1.2. Connecting AMP with Google Analytics
1.3. Setting up AMP options Install and setup Glue for Yoast SEO & AMP plugin
2.1. AMP for GeneratePress- Adding Google AdSense ads
3.1. Setup on AdSense control panel
3.2. Adding code to the website - Testing – validation
4.1. Testing Google Analytics tracking for AMP - Note: caching plugins
- Sources
- Google Analytics V4 (new) and AMP
1. Install and setup AMP plugin
1.1. Installation of AMP plugin
Install this AMP plugin:
Picture 1
There are several plugins, this one is practically made by AMP authors and, so far, has worked fine for me.
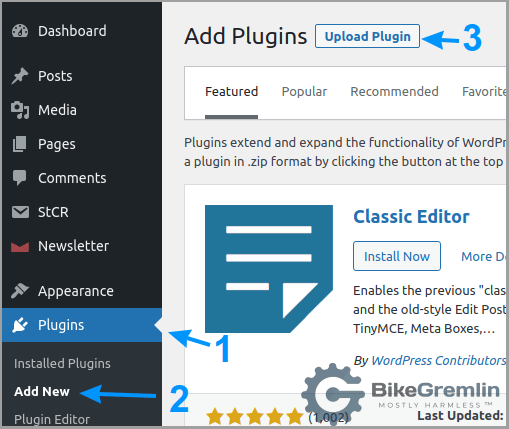
- How to install a plugin directly from WordPress.
- How to install a WordPress plugin “manually” (using an FTP).
1.2. Connecting AMP with Google Analytics
This step is not necessary, but it’s good to have data on visit numbers etc. I use Google Analytics.
It is understood that you already have a Google Analytics account connected with your website. For more details see:
How to create a Google Analytics account and connect it with your website?
See on Google Analytics what your website Tracking-ID is.
Picture 2
If you aren’t using Google Analytics, you should. Lots of articles on the Internet about how to set it up and use it, won’t go into that in this post.
Go to AMP plugin options, enter all the data as shown in picture 3, but change XXXXXXXX-Y with your Tracking ID.
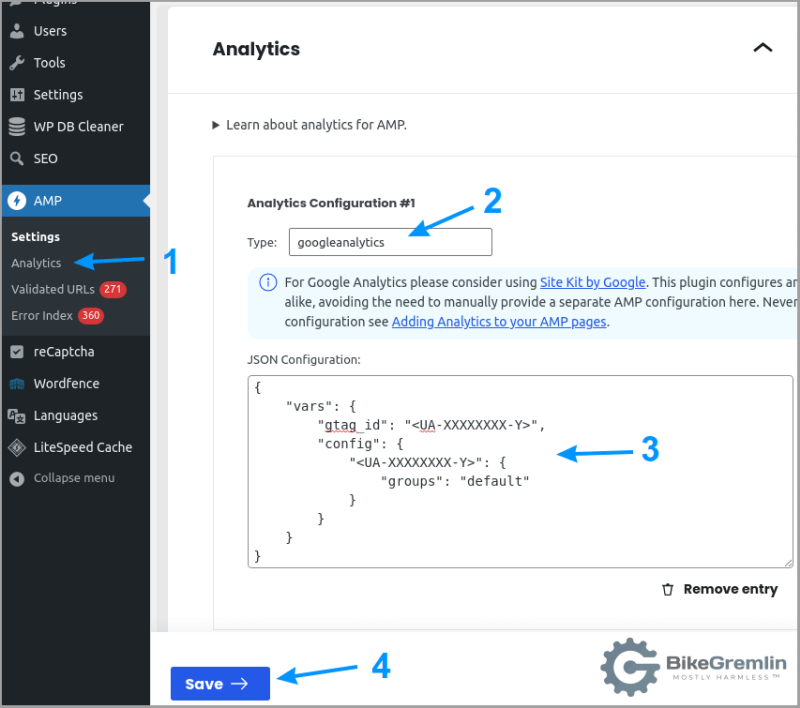
Picture 3
For easier editing, copy-paste the code below, just replacing XXXXXXXX-Y with your Tracking ID:
The code uses spaces, not tabs for indentation. You can copy/paste it. When I used tabs, the code wouldn’t work when added to the AMP plugin.
{
    "vars": {
        "account": "UA-XXXXXXXX-Y"
    },
        "triggers": {
        "trackPageview": {
            "on": "visible",
            "request": "pageview"
        }
    }
}
Codes that have worked on some setups and older AMP plugin versions – keeping them for my own reference:
{
    "vars": {
        "gtag_id": "<UA-XXXXXXXX-Y>",
        "config": {
            "<UA-XXXXXXXX-Y>": {
                "groups": "default"
            }
        }
    }
}


IF THE CODE IS ENTERED MANUALLY - not using the plugin menu,
but by editing theme files, this is the full code version:

<script async custom-element="amp-analytics" src="https://cdn.ampproject.org/v0/amp-analytics-0.1.js"></script>
<amp-analytics type="gtag" data-credentials="include">
<script type="application/json">
{
  "vars" : {
    "gtag_id": "<UA-XXXXXXXX-Y>",
    "config" : {
      "<UA-XXXXXXXX-Y>": { "groups": "default" }
    }
  }
}
</script>
</amp-analytics>
If you are using some other analytics tool, amp-analytics documentation might help.
1.3. Setting up AMP options
A separate post is required to explain why it is done the way it is, for now, picture 4 shows how to set up the AMP plugin:
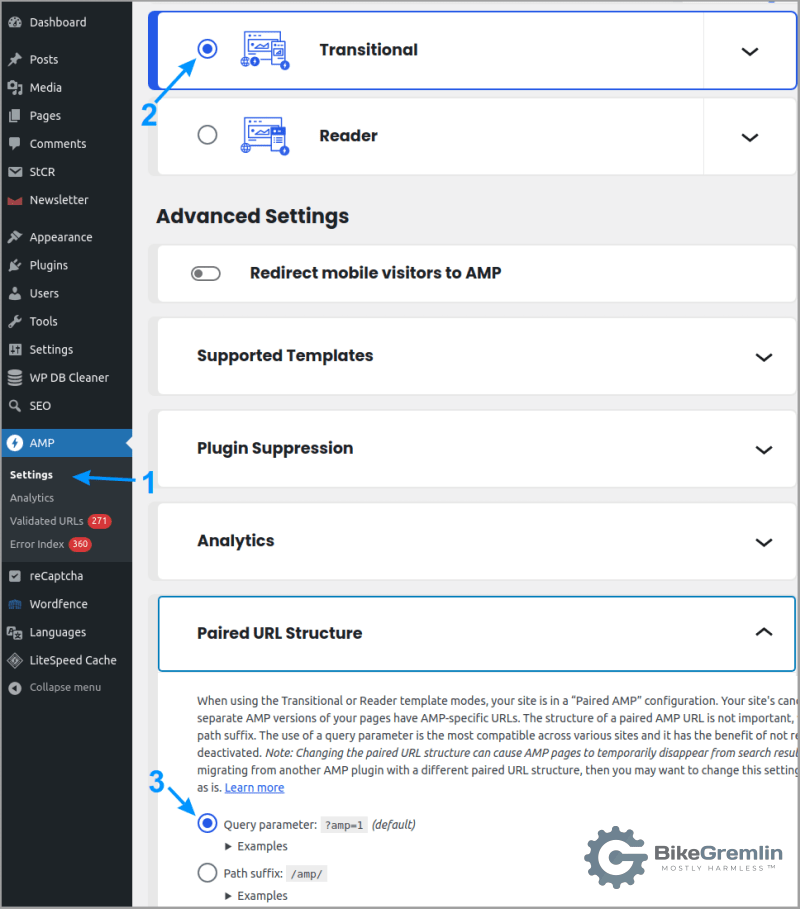
Picture 4
A setup like this, using a query parameter (3 in the picture above) enables all the links to AMP pages to work, even if there’s a problem with the AMP plugin, or if it gets completely uninstalled.
2. Install and setup Glue for Yoast SEO & AMP plugin
2021 update: this step is no longer needed! See step 2.1.
This plugin is an addition for Yoast SEO plugin (which I recommend not anymore – The SEO Framework is much better).
If you don’t want to use Yoast SEO, then you don’t need this plugin either (won’t even work). If you do, then by all means install Glue for Yoast SEO & AMP.

Picture 5
Key functionality setup is shown in picture 6. For design/look options, “play” and choose what you like. 🙂
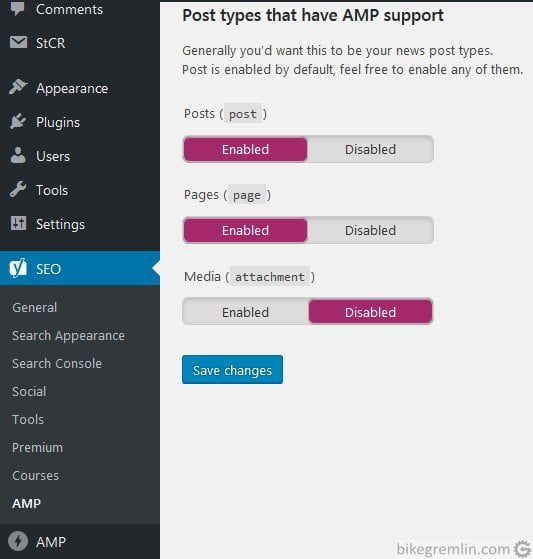
Picture 6
2.1. AMP for GeneratePress
If you are using the GeneratePress theme (I think it’s among the best WordPress themes and this site uses it), you’ll need the “AMP for GeneratePress” plugin if you want menus to work correctly on the AMP versions of your website’s pages.
Download AMP for GeneratePress from GitHub.
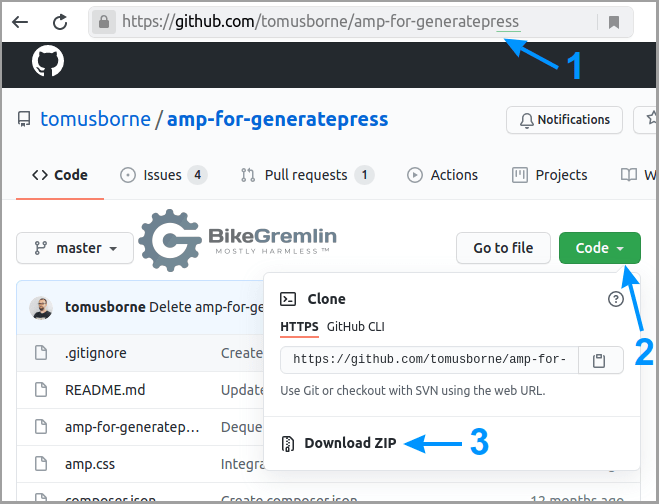
Picture 7
Picture 8
3. Adding Google AdSense ads
…With two easy steps… 🙂 If you want ads on your site. If not, skip this step.
Update: I wrote a separate article about showing Google AdSense ads on a WordPress site.
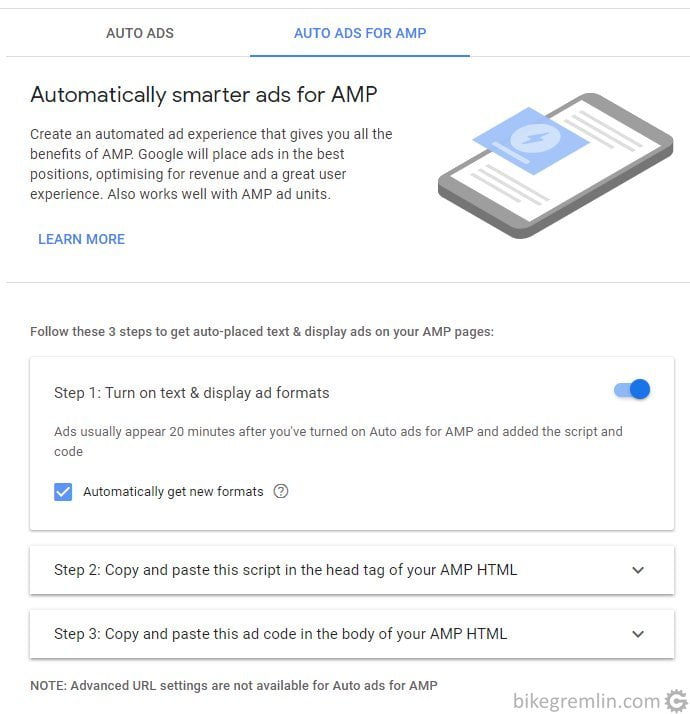
3.1. Setup on AdSense control panel
Choose Ads – Auto ads option, then select AUTO ADS FOR AMP tab, enabling auto ads there. Pictures 9 and 10 show it.
Update: this step, and picture 10, are no longer relevant – AMP ads will work separately from the auto ads.

Picture 9
Picture 10
Now just go to:
Account – Settings – Account information
and note “Publisher-ID” number – it’s needed for the next step.
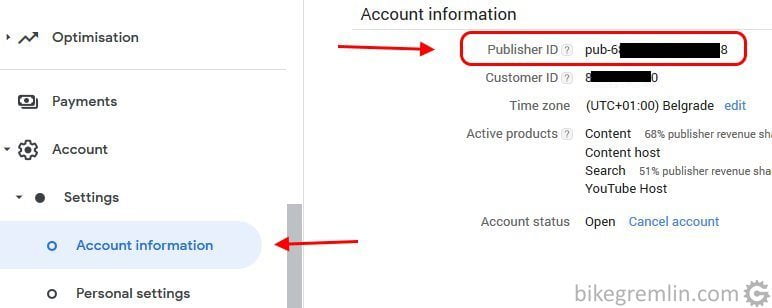
Picture 11
3.2. Adding code to the website
I found many various code versions on the Internet (including AMP and Google documentation). The thing that worked for me is shown below, I added that to functions.php of the child theme:
// ads for amp - will be loaded into header

$print_amp_auto_ads = function() {
	$ad_client = 'ca-pub-xxxxxxxxxxxxxxxx'; // YOUR Publisher ID goes here
	if ( function_exists( 'is_amp_endpoint' ) && is_amp_endpoint() ) {
		?>
		<amp-auto-ads type="adsense" data-ad-client="<?php echo esc_attr( $ad_client ); ?>"></amp-auto-ads>
		<?php
	}
};
// For Paired/Native mode.
add_action( 'wp_footer', $print_amp_auto_ads );

// ads for amp end
Google recommends this be done adding code to AMP page head tag and body, but it didn’t work for me. Here’s Google’s code:
//  Head tag part:

<script async custom-element="amp-auto-ads"
        src="https://cdn.ampproject.org/v0/amp-auto-ads-0.1.js">
</script>


// Body tag part:

<amp-auto-ads type="adsense"
              data-ad-client="ca-pub-xxxxxxxxxxxxxxxx">
</amp-auto-ads>
4. Testing – validation
Use some of the testing tools and see if AMP page version passes the test. Some available tools:
A page that isn’t AMP valid shows errors like these when tested:
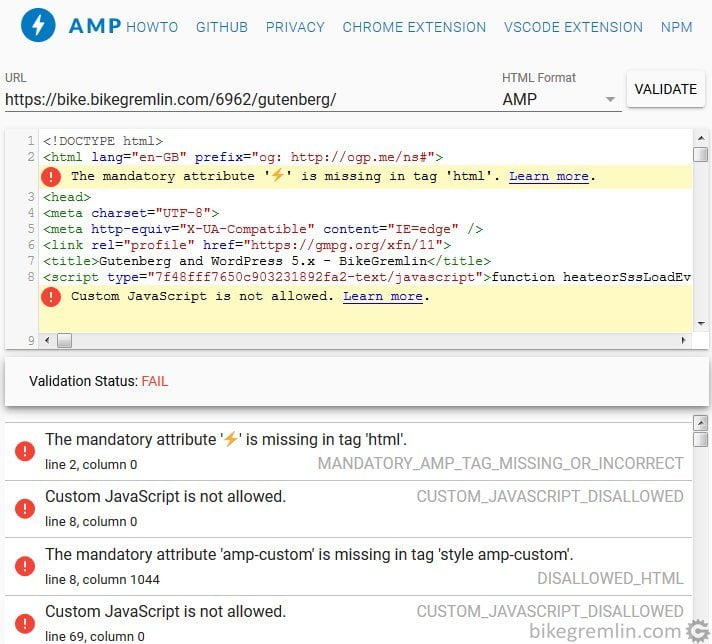
Picture 12
A page that passes the test looks like this:
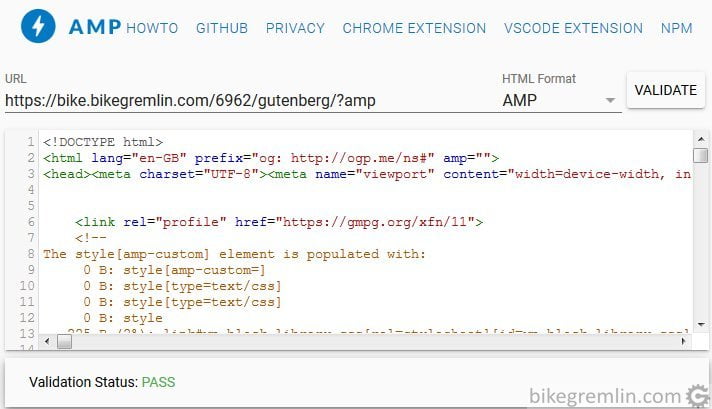
Picture 13
4.1. Testing Google Analytics tracking for AMP
Testing is simple and straightforward:
- Log into your Google Analytics account and see the real-time visitor report page.
Reports -> Real-time -> Overview - Open an AMP page of your website with a browser (without using an AdBlocker).
- See if your visit is displayed in Analytics.
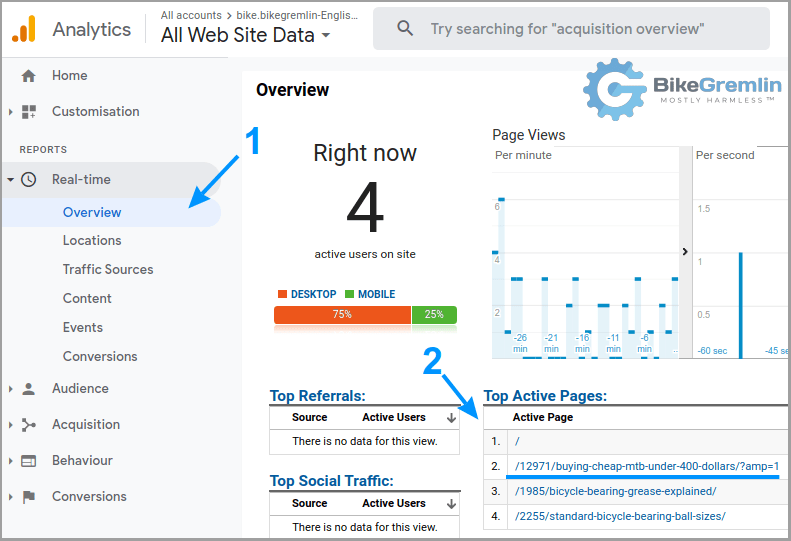
Picture 14
5. Note: caching plugins
There are numerous plugins for caching WordPress websites. Some of the optimizations that those plugins do can cause problems with AMP page validation. If you have problems validating your pages, try first disabling the caching plugin and, if that helps, try to figure which options cause problems (trial and error method).
List of problematic optimizations for LiteSpeed caching plugin:
(5) Optimize
- Load CSS Asynchronously
(7) Media
Lazy Load Images– solved with the current LiteSpeed plugin version.- Lazy Load Iframes
I asked at the plugin’s support forum if it’s possible to add options for disabling these optimizations for AMP pages only.
6. Sources
7. Google Analytics V4 (new) and AMP
At the time of writing this (the Spring of 2022), Google has announced shutdown of the old analytics and complete transfer to the new analytics (V4) within about a year.
However, there is still no support for AMP with Google Analytics V4.
Relevant links on AMP’s GitHub page:
Thanks for the post, it helped somewhat though i still am struggling with the AMP menu for wordpress on a basic theme. I will run through this and see if it makes any difference. It seems that the AMP menu option is missing when i add a new menu?