In this post, I’ll explain how to do a website migration. Instructions are given for a website that uses a CMS and a database (WordPress in this case), but the principle is the same for a majority of websites (sites without a database just don’t need the steps explaining database migration). I will try to explain briefly, clearly, step by step (for just backing up see: WordPress website backup). Let us begin.
For a more automated WordPress website migration solution, see my article: All-in-One WP Migration – website migration.
1. Starting notes
In order to call a website Yours, you must fulfill the following three criteria:
- Have control over domain’s registrar.
- Have current website and database backups.
- Be able to migrate the website to a different hosting server.
If you don’t have backups, can’t migrate the website, or don’t control the nameservers through domain registrar, You won’t be able to make the site work in case anything goes wrong – either with hosting provider, their server, or the website itself.
Main purpose of this text is to serve as my personal reminder, so I don’t have to bang my head on each website migration: “how was that best done?” This has worked for me for the past two migrations of about a dozen websites, I don’t see why it shouldn’t work universally. Tested this for shared and reseller hosting. Still, do take all the advice at your own risk, I’m not taking responsibility if anything goes wrong.
Choose hard to guess user names and passwords! In this text everything is given as an example – easy to remember and understand.
Exact screen and panel designs of your hosting providers may differ, but principle is the same.
Recommendation: read the entire manual just to see all it explains. Then read it again, trying to see if there’s anything you don’t quite understand (and google to get it all, if the links from this website aren’t sufficient). Only from the third go should you proceed with following step by step instructions for migrating your website.
Some of the links in this article are affiliate. That means: if you go and buy something using the link(s), the price is the same for you (if not cheaper), while I get a small commission. I recommend only the stuff I like and use (many companies offer affiliate commissions – the worse a product, the higher the commission 🙂 ).
My experience with the previous hosting provider and how I looked for a new one is explained here: Justhost review.
NOTE: if migrating a WordPress website to a different domain (like www.bikegremlin.com to bike.bikegremlin.com), before doing a backup/database export, make sure to go into Settings -> General, then enter the new domain address (WordPress and Site address URL), click “Save Changes”. After that, you won’t be able to log into WordPress, nor to see any pages, but it will help make sure that even text widgets get migrated properly, without needing to re-set them manually. You’ll still need to edit all the links, as is explained below.
The way to revert this change (if you abort migration, or have some other reason) is to open the database (using phpMyAdmin for example), open wp_options table, and edit “siteurl” and “home” back to the old address.
2. Terms used
To avoid any confusion, I’ll define what I mean by certain terms, used in the remainder of this text:
- example.com – domain used for example – change it with the domain You are moving.
- working.com – domain used as “main” if reseller hosting is used.
- newdomain.com – if a domain is changed as well during the migration.
- old-host – hosting (provider) where website is currently placed and from which it is moving – “old hosting”.
- new-host – hosting that website is moved to – “new hosting”.
- oldusername – username on the old-host for accessing cPanel, FTP, etc.
- old-password – password for oldusername.
- newusername – username (that will be created) on the new-host.
- new-password – password for the newusername.
- old_database – database name on the old-host.
- new_database – database name (that will be) created on the new-host.
- old_db_user – database user for the old_database – on the old-host.
- old_db_password – password for the old_db_user.
- new_db_user – database user (that will be created) for the new_database on the new-host.
- new_db_password – password for the new_db_user.
- old_root_dir – directory where the website is located at old-host.
- new_root_dir – directory where the website is located at new-host. For example: /home/newusername/public_html/
Now for the explanation of the website migration procedure, step by step:
3. Backup
Entire procedure for backing up a website, with different methods explained with screen-shots is given in a separate post: website backup. I won’t double that explanation here – read the linked page and back up Your website.
Backups made will be used for the website migration, as will be explained in the remainder of this post.
4. Writing down all the old-host info
Now You should take time to write down all the info of the website installation on the current hosting (old-host), that is:
- Username (for this manual we’ll say this is: “oldusername”).
- Password (old-password).
- Database name (old_database).
- Database user (old_db_user).
- Database user password (old_db_password).
- Old directory where the website is located with old-host (old_root_dir).
Directory example (chapter 6 explains how to get this information for directory):
/home1/oldusername/example-website/
This is usual in case your website was setup as an added domain. In case your website was the main (or the only) domain with your old-host, then it will look like this (unless you had made a conscious effort to make it different):
/home1/oldusername/public_html/
That is, website files will be stored directly “under” public_html directory. For this manual, we’ll say that is: /old_root/. Mind the slashes ( ” / ” ). If I write only:
- old_root – that is the equivalent of:
- home1/oldusername/example-website
Leading and trailing slashes will always be expressly shown if they are needed!
Whatever the situation is, make a .txt file and write down all the data. Better yet, store it all encrypted using KeePass for example, since this is sensitive, confidential information.
5. Setting up new-host
On the new hosting (new-host) You should get some username and password for logging in, or create them yourself when registering with the host.
The newusername for accessing cPanel and using FTP (and/or WHM if using a reseller hosting account) is usually generated by the host, most often to match the domain you provided when registering.
A separate post explains in great detail how to configure a hosting account in cPanel and DirectAdmin.
Password is one you made when registering with the host, it certainly helps to make it strong, long and known only to you. In this manual I’ll be using made up: newusername and new-password.
New hosting provider should provide you with nameservers for your hosting. For example (with, or without the IP addresses):
ns1.new-host.com 162.169.222.49
ns2.new-host.com 162.169.225.50
You should also get the IP address of your (new) hosting server. For example:
“Shared IP address: 191.71.40.135”
If You are using Cloudflare, You will need this IP address – explained later.
5.1. “Working” domain
Whether You use shared, or reseller hosting, you could register the “main” account with a “working” domain. By this I mean a domain that doesn’t have anything to do with your website. You could register a domain like: dddfffggg123.com with a domain registrar (as Namecheap for example – affiliate link) as the “main” domain when signing up with the hosting company – my experience with Namecheap and Porkbun domain registrars. Then start a hosting account with that domain (dddfffggg123.com). Let’s call call this domain: working.com.
What does this enable? It will allow you to use:
- cpanel.working.com and
- ftp.working.com – or just working.com in FTP client (this depends on hosting provider setup).
Even before You move Your website(s). You just need to make the working.com nameservers use the nameservers of the new hosting provider (nameserver change is explained later, in chapter 10). Then be sure to set up SSL for the working domain (chapter 11 deals with SSL). It makes things a bit more convenient, but it’s not necessary. You can always use your host’s website to login to your account.
5.2. Creating a user for reseller
This part goes only if you are using reseller hosting and want to set up the site You are moving to have its own cPanel (smart option). Shared hosting users can jump to chapter 5.3.
This post deals with cPanel (and WHM), while a separate post explains how to create packages and users with DirectAdmin.
Log into your WHM (either through the new host’s website, or through whm.working.com if you are using a working domain).
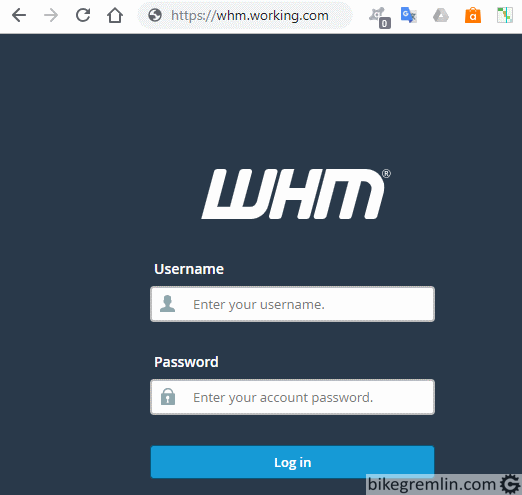
Picture 1
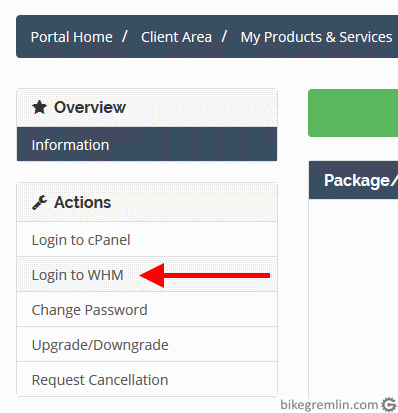
Picture 2
5.2.1. Creating a user package
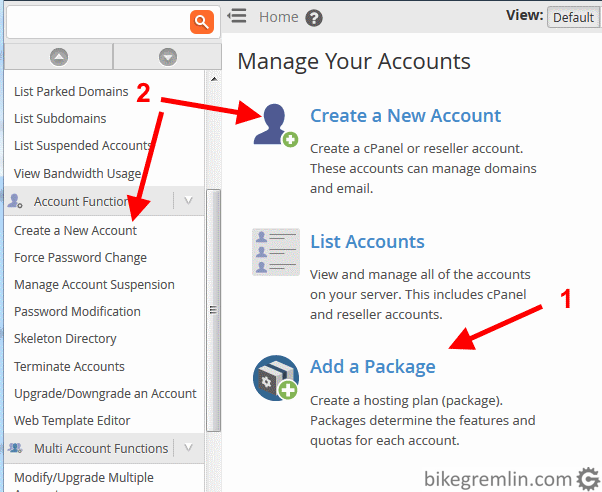
Click on “Add a Package” – (1) in picture 3:
Picture 3
You will get a window for choosing the package name and setting up all the limits. Leave limits as default if you’re not sure what you’re doing.

Picture 4
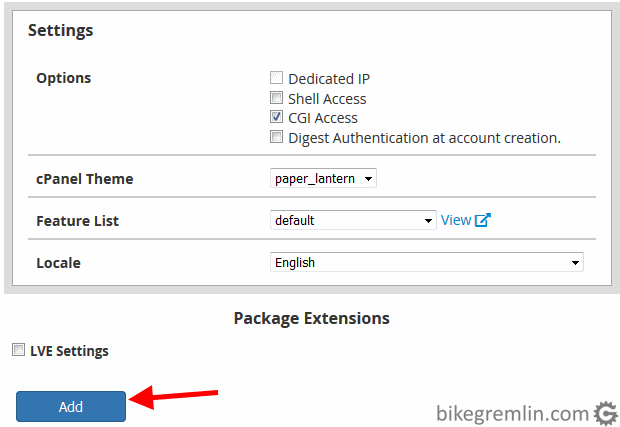
Scroll down to set up all the options (leave at default if you’re not sure) and click “Add”:
Picture 5
One package can be used for all the created users. Or, You can make several packages, so not all the users get the same limitations and options.
5.2.2. Creating a new user
Click “Create a New Account” – (2) in picture 3.
Now fill in domain name (example.com in our example), choose a package (working_example-package in our example) and all the other fields, example is shown in picture 6:
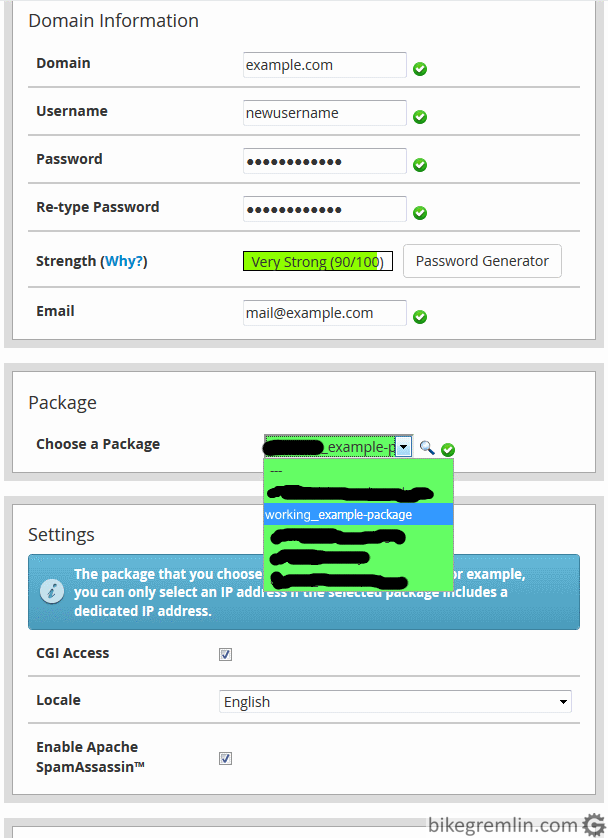
Picture 6
Now we have a user “newusername” with a password “new-password” on the example.com domain.
5.3. Creating a new database and user
Set the PHP version of your choice. The option is usually within cPanel, saying something like “Select PHP Version” (yes 🙂 ). Once you choose the desired PHP version, leave all the other settings at default , if You’re not certain what exactly should be changed and how.
A separate post explains how to create a database in DirectAdmin, for those using that control panel.
If the website isn’t using a database, You can jump directly to chapter 6.
If you are using reseller hosting, chapter 5.2. explains how to create a user with username “newusername” and password “new-password”. If You are using shared hosting, hosting provider would have provided you a username, but for this example, we will pretend that you are given “newusername” and You’ve set the password to “new-password“.
Log into the cPanel. Do this using cpanel.working.com if you are using a working domain (picture 7), or using your hosting provider’s user panel (picture 2, just click on cPanel, not WHM).
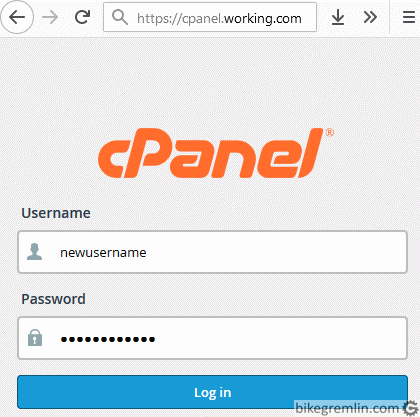
Picture 7
Once you are logged into the cPanel, click on “MySQL Databases”.
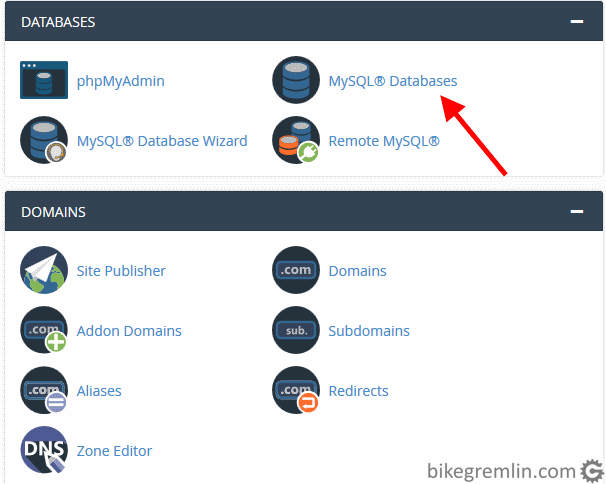
Picture 8
Next make a new database (or several if it’s needed):
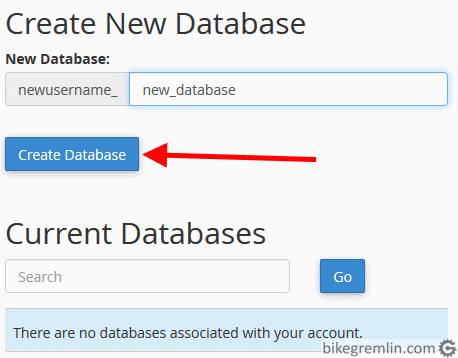
Picture 9
After clicking “Create Database” You will get notification that it is created and get to click “Back” to the previous screen, or be redirected to it. Now create a new user (with “new_db_password”):
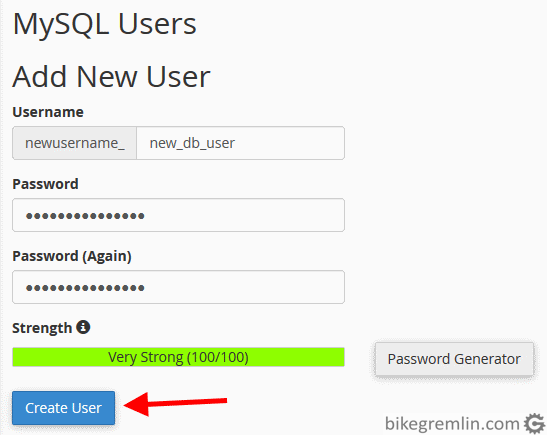
Picture 10
All that’s left now is to add the created user to the created database and add privileges (access rights) – pictures 11 and 12:
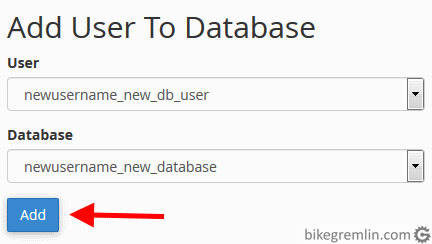
Picture 11
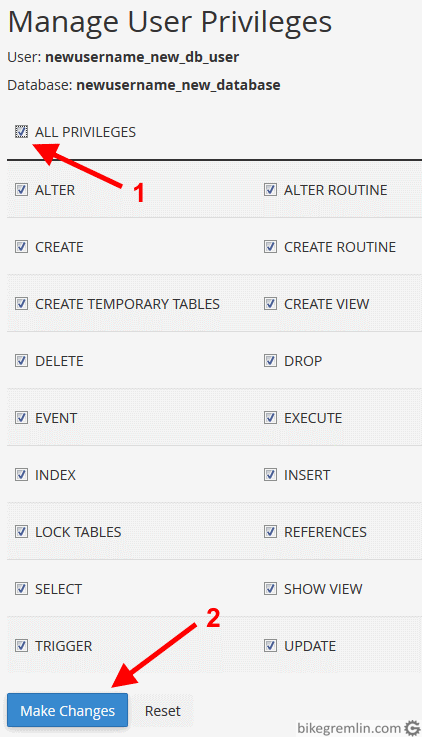
Click “all privileges” and then “Make Changes”:
Picture 12
Of course, user can only be given certain privileges, not all – if You know exactly what you are doing and why.
6. Figuring out the file paths
Login the new-host cPanel, click “Domains” and see the root directory of the domain, picture 13:

Picture 13
Domain is in the “public_html” directory, which is directly under the root directory ( ” / ” ) of the user account. In some instances (added domains etc.), it could be different. Like:
/my-websites/example-com/
Path directory differences between cPanel and DirectAdmin.
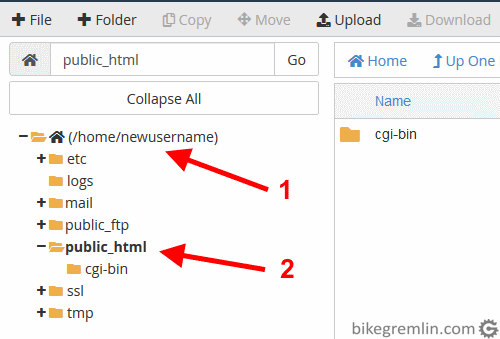
Now open cPanel’s “File Manager” and see the user’s home directory (sometimes the info is shown directly within the cPanel as “Home Directory”).
Picture 14
Now we know that the website directory is in fact:
home/newusername/public_html
But from now on, we will refer to this as ” new_root_dir “.
Do the same with the old-host cPanel to confirm what the “old_root_dir” is, if you haven’t already in the chapter 4 step.
7. Editing files and data base(s) from old-host
To recapitulate, now we should know the following:
- new_database name – created in chapter 5.3. as “newusername_new_database”.
- new_db_user created as “newusername_new_db_user” – chapter 5.3.
- new_db_password – password for the new_db_user, here we used “new_db_password” – not the best one, yes.
- new_root_dir – as explained in chapter 6. in this case it’s “home/newusername/public_html”.
- newdomain.com – if a domain is changed as well during the migration
We should also have the data of the old-host. These shortnames are all explained in chapter 2. Terms used.
Make a working copy of your old-host backup on which you will do all the editing. Make sure you have (at least one) reserve backup!
If both the database names, database user names and passwords, and directory paths are the same for the old and the new website location, then You can skip to chapter 8.
Open the exported database from the old-host (old_database in this example) in some text editor (i like Notepad++). Do a search-replace for the following terms (replacing them for the actual ones of your website).
NOTE for Linux users: Notepadqq is an application that works even with larger databases and does all the search/replace correctly (DirectCommander won’t work properly!). It can do a search/replace of an entire directory (with all the subdirectories included). Rather fast as well.
- old_root_dir replace with new_root_dir
- old_database replace with new_database
- example.com replace with newdomain.com – if domain is changed.
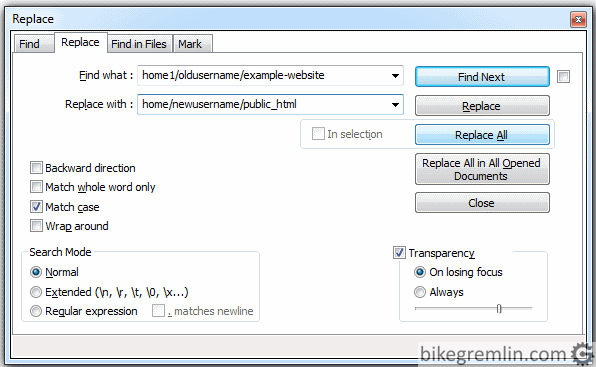
Picture 15
Then, unzip a copy of the old-site files backup to a local computer directory and do a search of all those files for the following text within them, replacing it (“search and replace”) as explained below.
It is easiest if username differs, while even needless to change anything if everything noted in the previous passage is exactly the same – username, database, path… Open the directory with a text editor and search&replace the following:
- old_root_dir should be replaced with new_root_dir. Within .json files, mind that directory paths aren’t divided with slashes ( ” / ” ) but like this ” \/ “, for example: home1\/oldusername\/example-website. So that’s another thing to search-replace (both / and \/ path versions).
- old_database replace with new_database (if they differ – same as we did with the exported database file – above picture 15).
- If changing domain, then example.com should be replaced with newdomain.com.
wp-config.php file needs this alteration (besides the above noted):
- old_db_user replace with new_db_user
- old_db_password replace with new_db_password
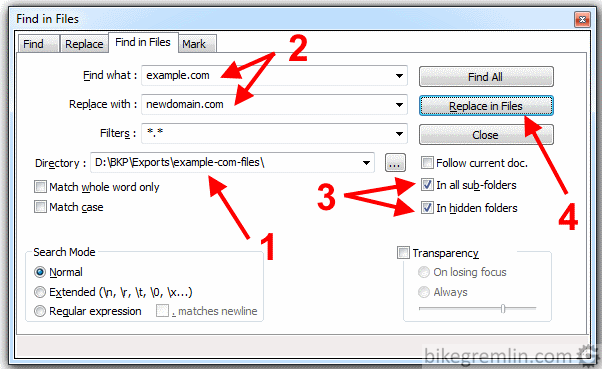
2. Enter the text for search and what to replace it with.
3. Make sure all the files and sub-directories are selected.
4. Start the search – replace process.
Picture 16
Of course, save all the changes and zip all these (changed) files together, so they are easily uploaded to the new-host.
8. Copying files
Copying files can be done using cPanel, or a FTP client (i like FileZilla). If you are using a working domain, FTP will work with the following setup (for this example):
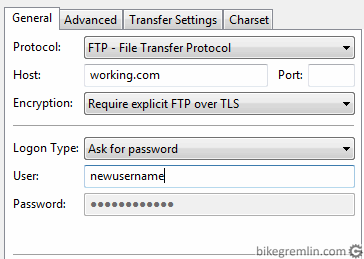
Picture 17
Depending on the hosting provider, some parameters may differ (ftp.working.com for example), but the principle is the same.
Upload zip file prepared as explained in chapter 7. to the new-host website new_root_dir (see chapter 6 for the paths). After the upload, the .zip file should be unpacked (and later it can be deleted, after it is confirmed that everything works).
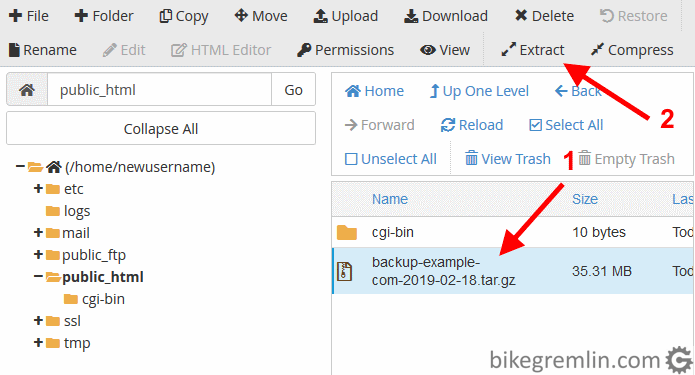
Picture 18
While You are within the cPanel, do the following, it will be important later:
Picture 19
9. Database import
If the website is not using a database, skip to chapter 10.
Database import is fairly simple. Post about website backup explains database export/backup. Difference from that procedure is that here You should choose “restore”, or “import”, depending on the tool.
You could start phpMyAdmin from cPanel. Click newusername_new_database to select it, then choose “import”. Select the edited file of the old_database from your computer. Leaving all options at default, just press “Go”.
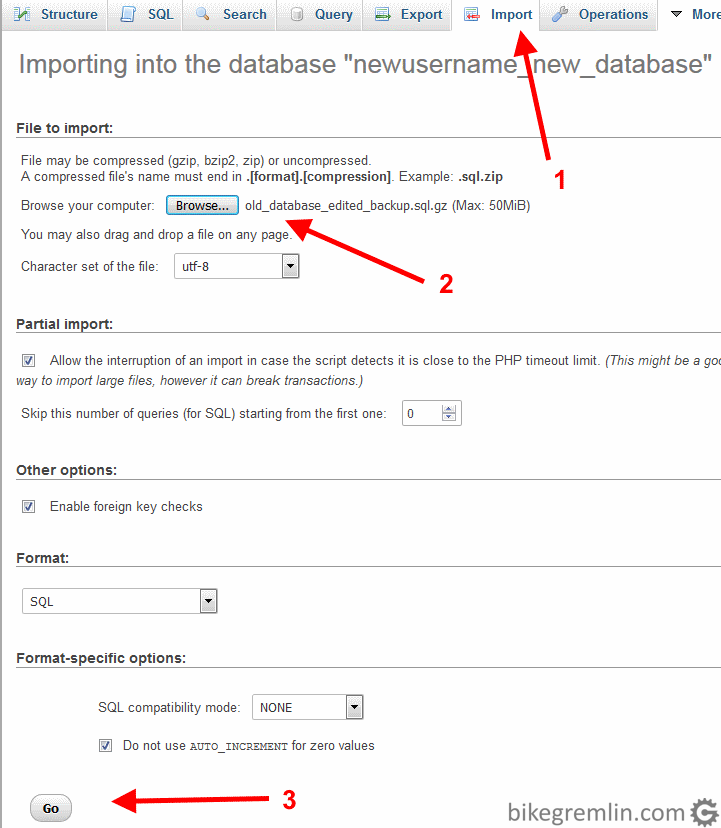
Picture 20
For very large database imports, one would have to use Terminal, or ask the hosting provider to import the database for them – after uploading database export file (via FTP) to the new server. Various methods for doing this are discussed in a WebHostingTalk forum thread: Large website database import.
Terminal commands:
Typical SSH connection login for shared/reseller hosting accounts:
ssh [email protected] -p 2222The default SSH port is 22. If you wish to connect to some other port, use the “-p” switch, as shown above using a “2222” port.
You will then be prompted for a password for your main reseller or shared hosting account (depending on what you are using). With reseller hosting, you can do it all from the main reseller account (for all the sub-accounts).
Exporting a mySQL database:
mysqldump -p -u old_db_user old_database > database_export.sql

 - you'll then be asked to type the old_db_password
With reseller hosting, the database export will be stored in the root directory of the main reseller hosting account.
Importing a mySQL database:
mysql -p -u new_db_user new_database < database_export.sql

- you'll then be asked to type new_db_password
Even if using the main reseller hosting account, the database will be imported in the account whose username you type in (new_db_user).
10. DNS and nameservers
Now all is set. Files and database(s) have been copied, so unless there’s been a mistake when copying, or editing the files (and database), after this step the website should start working from the new-host. We left this for last because we want minimum possible downtime of the website: telling “the World” to go to the new address only after everything else has been setup.
A separate post offers a detailed explanation of DNS and DNS records.
If the website is set to force https protocol (SSL/TLS encryption), then, right after making all the settings as explained in this chapter, You should set up SSL/TLS certificates, as explained in chapter 11, otherwise it might not work.
What I would do now is go to the website (as it is, still on the old-host) and edit/add a sentence so that I know exactly what was changed. Or add some test comment or something similar. So that I can confirm, after this final step, that these edits are gone and that the website version I’m visiting is the new-host one. There are other ways to test this (IP address for one), but I find this way the most convenient and it gives me the most confidence that everything went well.
For nameserver change I will first explain the procedure if using an “ordinary” one, then if using Cloudflare service, or othe “special DNS”.
10.1. Using the new hosting provider’s nameservers
For this example, we’ve already decided (chapter 5) that we’d say new hosting provider’s nameservers are:
ns1.new-host.com 162.169.222.49
ns2.new-host.com 162.169.225.50
Log into the control panel of the domain registrar that you are using. Find an option that says “manage”, or “edit/adjust nameserver” – something like that. Write down the current nameservers. Replace the old-host with the new-host nameservers.
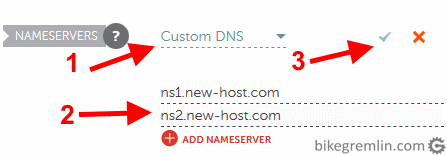
Picture 21
Exact look of this screen differs between domain registrars, but the principle is the same.
Once this is edited and saved, it sometimes takes 24 hours, or more, for the change to be propagated to all the DNS-s, and they all start pointing to the new address. If using Cloudflare, this can be instantaneous (one of the advantages).
Detailed explanation of domains and nameservers.
10.2. Address change using Cloudflare
If Your website is set up with Cloudflare protection (Cloudflare’s nameservers set up with domain registrar), then the migration will require editing Cloudflare DNS fields.
In chapter 5 we said that the new-host IP address would be, for example: 191.71.40.135
This address should be used with Cloudflare in DNS options. Write down the current IP used here, You might need it later for “reverting” . Picture 21 below shows what this looks like, while after the picture I’ll explain what’s what in it (using working.com domain for example):
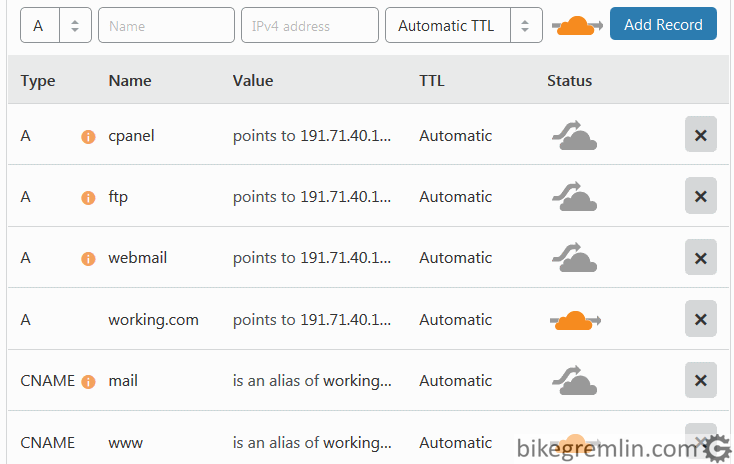
Picture 22
So, only domain (and the www alias) go through protection (orange cloud). All the other “stuff” is left to go directly to the set IP address. For the working domain, a field whm should be added, if you wish to log into WHM using: whm.working.com.
Now log into cPanel and click “Zone Editor”, then click “Manage” next to the name of the domain being moved. There You will see a list of DNS records and those that are missing, or differ in Cloudflare’s DNS should be altered (in Cloudflare) to match those from the cPanel. An example of records that need adding/editing:
MX bikegremlin.com mail handled by mx.spamexperts.com – priority 10
MX bikegremlin.com mail handled by fallbackmx.spamexperts.eu – priority 20
MX bikegremlin.com mail handled by lastmx.spamexperts.net – priority 30
TXT bikegremlin.com v=spf1 +a +mx +ip4:191.71.40.135 +a:out.webaccountserver.com ~all
TXT default._domainkey – copy/paste from cPanel, it’s quite long.
What can cause a problem – Crypto options, SSL:
- If the new server hasn’t got SSL certificates properly in place, “Full (strict)” mode will show errors when connecting to host server.
- If choosing flexible, sometimes a too many redirects error can appear, again not loading any pages (except maybe the front page).
- “Full” has been the “safest” option for me, until it is all set up, then switching to “Full (strict)”.
- For some providers / servers, it will only work with the Crypto set to “Off” (which makes sense).
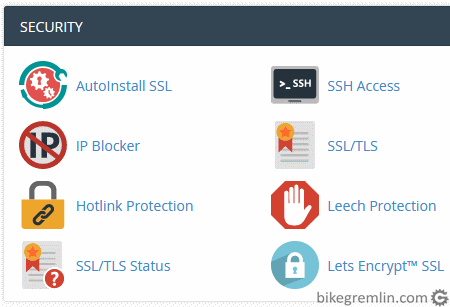
11. SSL – https setup
Make sure the steps from the previous chapter are all done correctly before doing this. Log into cPanel to update/set up SSL/TLS certificates/settings. Here I’ll explain the setup of Let’s Encrypt certificates. Your menus and procedure might differ (depending on the hosting provider and certificates used), but the principle is the same.
Picture 23

Picture 24
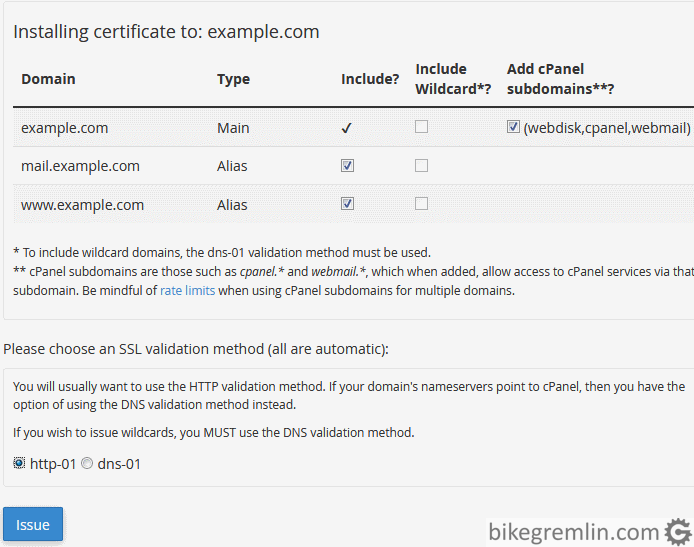
Picture 25
If you are not sure what to choose here, start with options as shown here, then experiment, until you get no error messages when certificates are issued. Writing in more details about this is beyond the scope of this post.
If using Cloudflare, there can be a problem when trying to issue a new certificate (for the first time, not when renewing it). If this happens, go to Cloudflare Crypto options and set SSL to “Flexible”. After the certificates have been issued properly, turn it back to “Full (strict)”, or your website won’t work properly.
In case this too fails, just make all the DNS records to be with a “gray cloud”, when Cloudflare works as an ordinary DNS. Just remember to put them back as they should be after certificates have been issued.
Once you have working certificates, you will no longer need to do this, they should be renewed with no problems.
12. Testing
Go to your website. If you did the changes before editing nameservers and DNS (as explained at the beginning of chapter 10), You should see right away if you are at the right addres.
If the old website version is shown: have some patience for the DNS changes to propagate – takes a whole day sometimes (if using Cloudflare the change is instant).
If the website doesn’t work, especially for WordPress:
- Within new_root_dir, find a file named “.htaccess” and make a backup copy of it, just in case. Delete it.
- Now You should be able to access the website. Log in to admin panel.
- Go to Settings/Permalinks.
- Click “Save Changes” (without changing anything).
It should work properly now. If not – revert the nameserver change (so the website would work form the old-host) and start over – see where you made a mistake, missed an edit, one letter, one extra space, if You forgot something. Slowly, patiently, writing it all down – one step at a time.
Check whether everything related to e-mails works (sending, receiving, confirmations, registrations etc.). In more details: problem with e-mails.
Check AMP validation (if AMP pages are active on the website).
Check whether search, add to shopping cart and all the other website functions are working properly.
13. Short recapitulation
- Backup all the files and databases from old-host. Make a working copy of the backup.
- Write down all the info from old-host: usernames, passwords, databases, paths…
- Create users, passwords, databases – all that’s needed on new-host.
- Select/change PHP version and do other server setups.
- Edit all the files exported from old-host so they fit/match the new-host pahts, usernames, passwords etc.
- Import the edited files to new-host.
- Change nameservers (and DNS).
- Set up SSL certificates.
- If there are problems, delete .htaccess from root.
- Test if everything works properly.
Last updated:
Originally published: