In this post I’ll explain e-mail setup on a hosting server (using cPanel, though principle is similar for other control panels), as well as the needed setup in DNS fields. Separate posts explain SMTP mail sending with WordPress and Gmail account setup for website SMTP mail. Understanding the contents of this post is required in order to understand the noted two posts. Apart from hosting providers mail server, one can also use a separate (paid for) solution, such as MXroute – instructions for setup. You can also see about the pros and cons of using a hosted email service.
Table Of Contents (T.O.C.):
- Introduction
- Creating an e-mail account within cPanel
- DNS setup for e-mail
- Testing
- Setting up external email services (if used)
- Video demonstration (MXroute + Cloudflare)
1. Introduction
Protocol for e-mail exchange is far from a reliable one. In my experience: whoever says they can “guarantee” (always ask: “with what – money, reputation, or something third?”) – is either consciously lying, or just not experienced enough.
Still, I think it is good and worth doing what is up to us to create the highest possible probability for the e-mails to:
- Arrive to the intended recipient, without getting blocked by spam filters.
- Once they arrive, to end up in the “inbox”, not the “spam” folder.
This all starts with setting up SMTP server and relevant DNS fields, as will be explained.
2. Creating an e-mail account within cPanel
I will assume that SSL/TLS certificates have been set up properly and will not be explaining their setup here. I don’t recommend sending e-mails without SSL/TLS connection, because then the e-mail contents can be more easily seen by third parties and they are more likely to be marked as potentially “insecure/spam/phishing”. Now, let’s get to the point:
Log in to cPanel. Go to e-mail options.
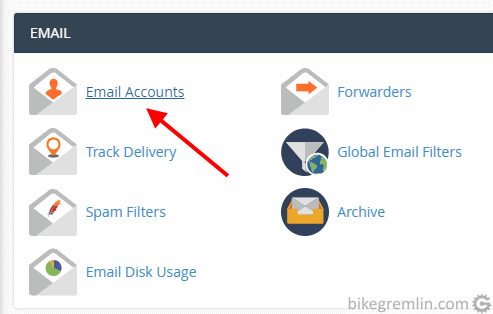
Picture 1
If the email has already been created, click “Connect Devices” to see the important setup information (it is understood that you know the password). If not, click “+ Create” in order to create it.
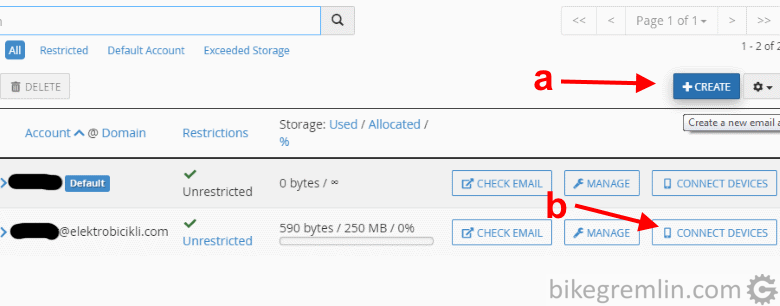
Or see the setup of an existing one (b)
Picture 2
When creating a new e-mail account, enter the desired name, password, limits and click “+ CREATE”.
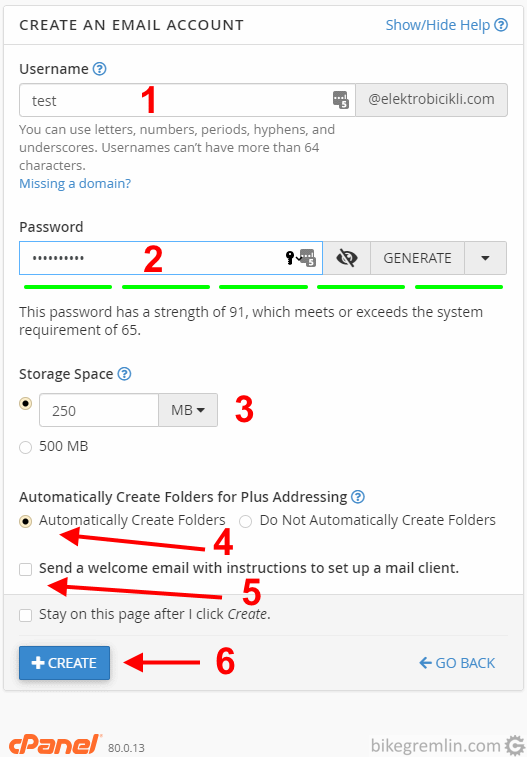
Izaberite ime (1) – “[email protected]” u ovom primeru
Unesite (jaku) lozinku (2)
Podesite limit za skladišni prostor (3)
Izaberite automatsko kreiranje direktorijuma za plus-adresiranje, osim ako imate dobar razlog da to ne uradite (4)
Slanje mejla sa podešavanjima nije potrebno, to ćemo uraditi iz cPanel-a (5)
Kliknite “+ CREATE” (6)
Slika 3
Now, [email protected] will be shown in the e-mail account list shown in picture 2. Click “Connect Devices” for that account.
You’ll get a list of SMTP client settings. Use the blue SSL/TLS options (shown in picture 4).
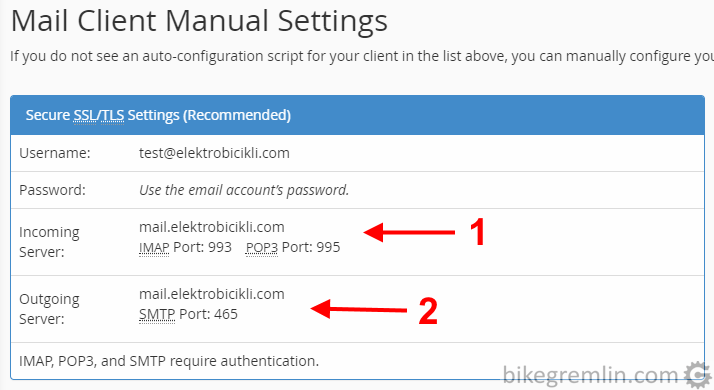
Incoming server name and ports (1)
Outgoing server name and ports (2)
Picture 4
If everything is set up properly (SSL/TLS certificates set up for mail.yourdomain.com), the mail server name is usually “mail.yourdomain.com” – in this case “mail.elektrobicikli.com”.
Information shown in picture 4 will be needed to setup mail clients, write it down.
3. DNS setup for e-mail
DNS records important for reliable e-mail delivery (and sender verification) are the following:
- a) MX records
- b) The following TXT records:
- SPF (Sender Policy Framework)
- DKIM (Domain Keys Identified Mail)
- DMARC (Domain-based Message Authentication, Reporting & Conformance)
- BIMI
MX records will be automatically created if you are using your hosting provider’s SMTP server for emails. If you are using a hosted email service, you’ll get the needed info from the service provider. This is what those records look like:

Picture 5 a
SPF and DKIM should also have been automatically created, unless you are using a hosted email service, in which case you will be given the SPF record by the email provider (you can see this explained in MXroute setup article).
I’ll explain how to check this with cPanel. If you are using Cloudflare (or a custom DNS), you should set them up there as well, within DNS options. In a separate post I gave an explanation of all the mail related DNS records (as well as most other DNS records). Here’s an example of what TXT DNS records look like:

Picture 5 b
To check and configure DNS records, go to cPanel’s Zone Editor:
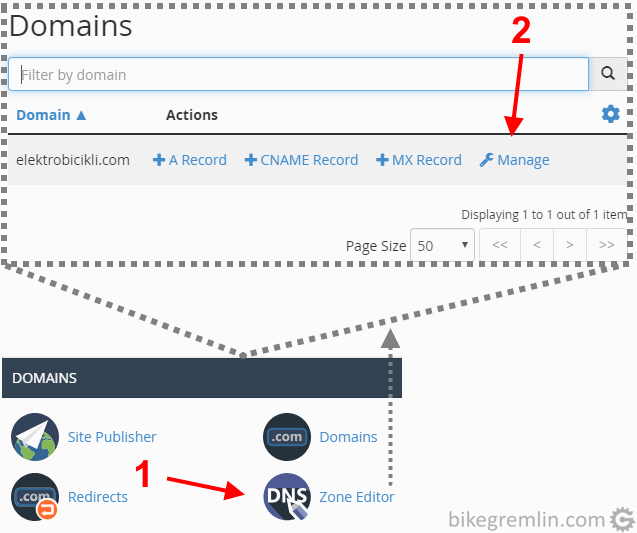
Click “Manage” for your domain
Picture 6
There you’ll see the SPF and DKIM records – both are “TXT” type. If a custom DNS is used, they should be created there, copy-pasting the values from the right hand column shown in picture 7. Though my recommendation for the SPF record would be the following, if using external email services:
v=spf1 include:mxlogin.com include:sendgrid.net -allIn this example, I’ve allowed mail sending from MXroute and SendGrid, but disallowed from all the others – that I’m not using, so aren’t legit (which would mean that someone is trying to send emails pretending to be bikegremlin.com).
SPF fields are nicely explained here: How to create an SPF record.
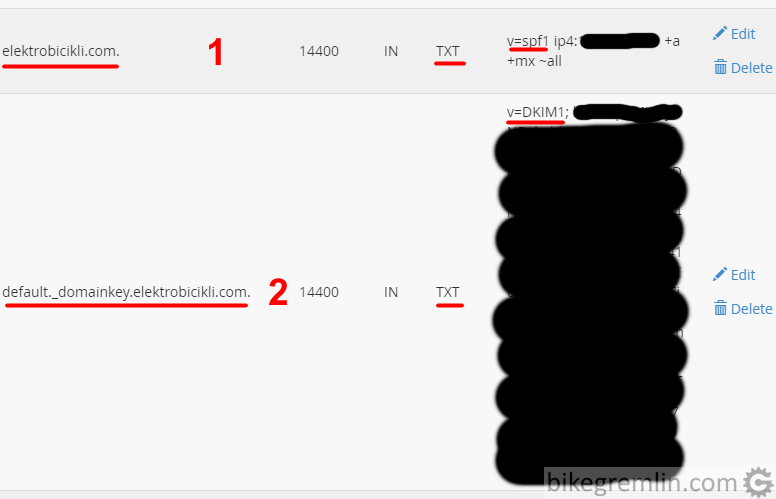
Picture 7
Separate post explains how to get your domain’s DKIM record, even if using an external email service.
DMARC record also needs to be added. DMARC connects SPF and DKIM records for domain validation (and preventing anyone from impersonating your domain when sending emails – phishing). How this is done in cPanel’s Zone Editor is shown in picture 8. Principle is the same for all the other DNS-s.
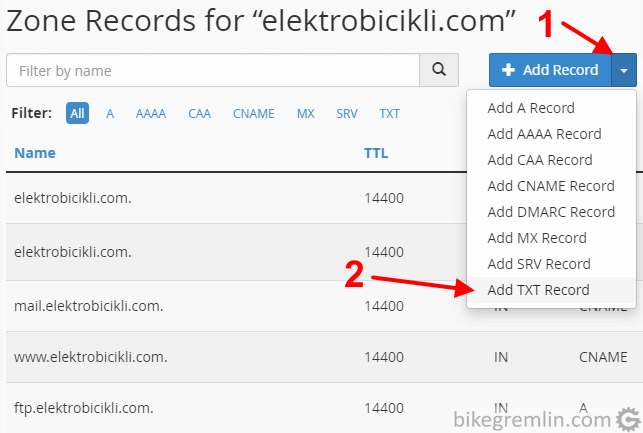
Choose “Add TXT Record” (2)
Picture 8
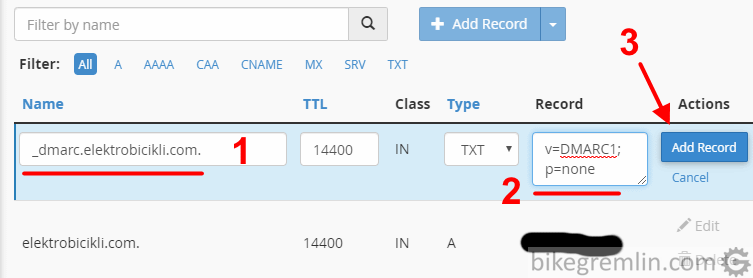
Add “_dmarc.yourdomain.com” (1)
Value: “v=DMARC1; p=none” (2)
Click “Add Record” (3)
Picture 9
An excellent article that thoroughly explains SPF, DKIM, DMARC and how it all combines for email verification and preventing email spoofing:
How to Implement DMARC/DKIM/SPF to Stop Email Spoofing/Phishing: The Definitive Guide
On that link you can find instruction on how to setup DKIM field to be a bit more complex, offer better spoofing protection and define an email address where reports of emails that fail SPF and DKIM verification will be sent. In short, an example of better DMARC setting for a start:
v=DMARC1; p=none; rua=mailto:[email protected]; ruf=mailto:[email protected]; sp=none; adkim=s; aspf=s; fo=1;Then, if no problems are reported on your report email ([email protected] in this example) and you confirm there are no problems with email delivery, you can set stricter options (on the report email you will get reports in case someone tries your domain mail address spoofing):
v=DMARC1; p=reject; rua=mailto:[email protected]; ruf=mailto:[email protected]; sp=reject; adkim=s; aspf=s; fo=1;For more details, see the above noted article. Also, you can register an account with a service that provides analysis of DMARC reports, so you don’t have to analyze report emails “manually” (either by deciphering contents, or by copy/pasting each to a DMARC analyzer). The free tool I like an use is Easydmarc. It offers basic reports for free. When using such tools, they will provide an email for the DMARC reports, so you will replace [email protected] with that email, in the DMARC field setting as shown above.
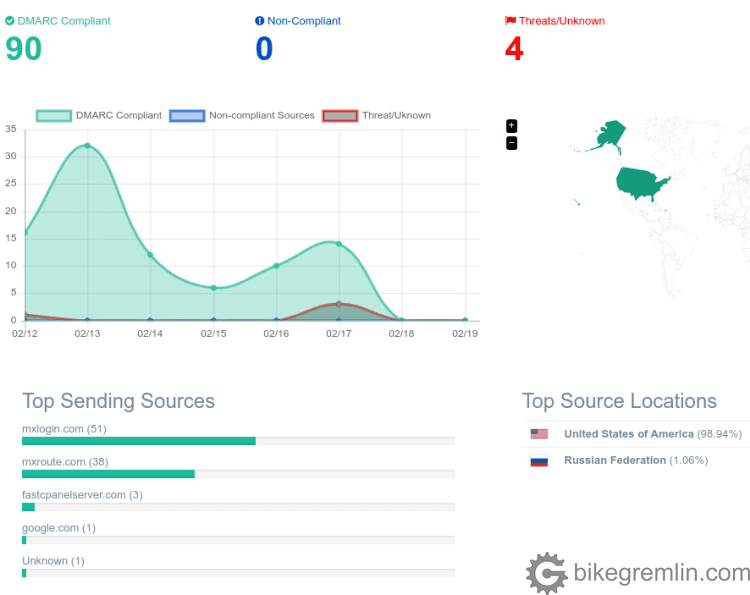
Picture 10
A relatively new email related TXT record is called BIMI (Brand Indicators for Message Identification). It contains a link to the (company) logo, saved in .svg format. It is added as “default._bimi.yourdomain.com”, similar to “default._domainkey.yourdomain.com” (shown in picture 7).
BIMI value should include a link towards a previously uploaded picture with your logo (uploaded to your domain). Template and example:
v=BIMI1; l=LINK TO YOUR .svg LOGO IMAGE

v=BIMI1; l=https://www.bikegremlin.com/hotlink-ok/BikeGremlin.svg
Unlike other email related DNS records, BIMI has more of a marketing purpose, enabling the display of your logo next to emails, with mail clients that support this. On the other hand: MX, SPF, DKIM, and DMARC are important for email validation and prevention of email spoofing.
After this all has been set, one should wait for the DNS propagation to finish. It takes up to 48 hours, though usually finishes within one hour. If using Cloudflare, it’s often done within 15 minutes.
Update: it doesn’t hurt verifyling your email using Google Postmaster. You will get a code to add to a DNS TXT record. It is added just like SPF, DKIM DMARC records are added.
4. Testing
For testing I use mail-tester.com. Open the mail-tester website and follow instructions. Basically, you are to send an e-mail to a designated address, using the account you wish to test.
A separate article explains how to setup SMTP e-mail sending for a WordPress website.
Picture 11 shows the test results and I’ll explain below it what it means.
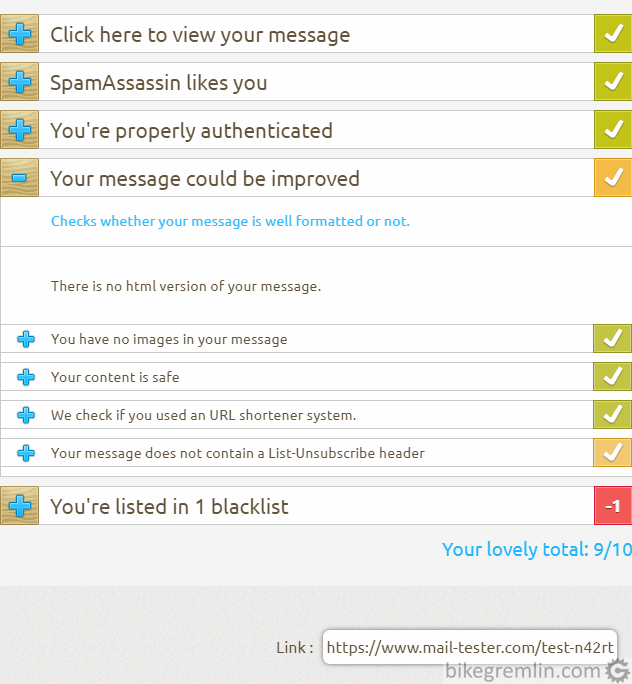
Picture 11
First yellow checker explains there is no “Unsubscribe” option for unsubscribing from e-mail lists. If you are sending mailing lists, this should be implemented. For “ordinary” e-mails, it is not necessary.
The red “-1” field says that the IP address of the SMTP server I’m sending the e-mail from is listed in at least one blacklist. Which means that someone has been sending spam from that address. If you are on a shared hosting server, then it’s the hosting provider’s job to prevent the sending of spam and to get the server’s IP address off the black lists. If you have your own, dedicated IP address, then it’s your fault and your job to fix it.
Various e-mail sending services, such as SendGrid, charge extra for a dedicated IP address. If using the free IP option, it will most likely be on at least a few blacklists, since many spamers use such services.
Likewise, some services, like MXroute, strictly “cut” spamers of their servers, so there aren’t any problems even with shared IPs.
For testing BIMI DNS records, you could use this BIMI tester.
5. Setting up external email services (if used)
After I’ve set it up all nicely, I noticed one problem: emails sent from websites hosted on the same hosting server were ending up on the local server’s email, not on MXroute. If the email account gets deleted from the hosting server, it’s even worse – emails don’t get delivered at all (bounce).
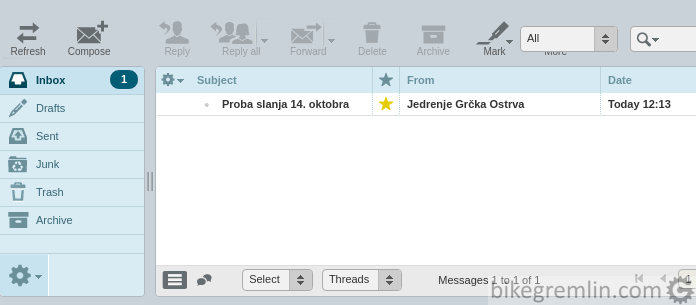
Picture 12
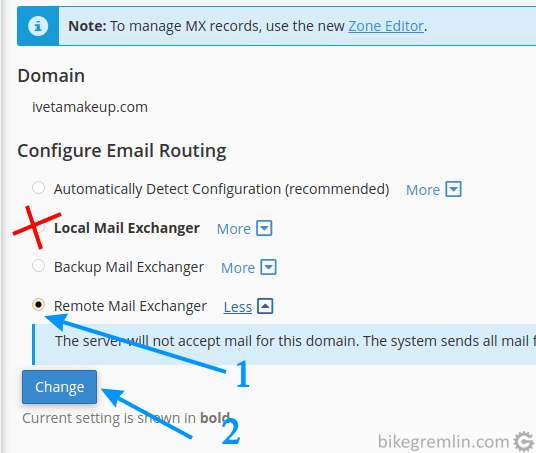
This example is given for MXroute, but the principle is the same for any other external email service (MS Exchange, Gsuite…). Within cPanel, it is done the following way:
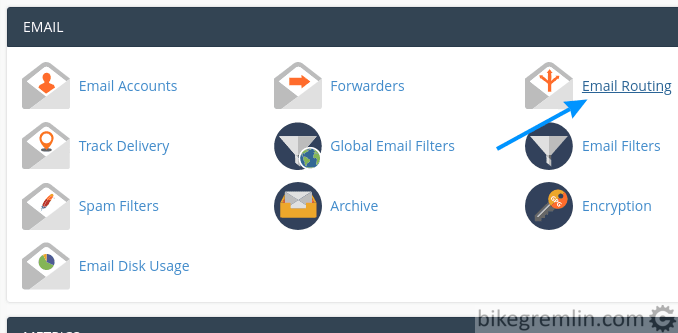
Picture 13
Picture 14
Only after this is a website properly set to use MXroute (or any other external email service – principle is the same).
DirectAdmin setup is a bit different than cPanel:
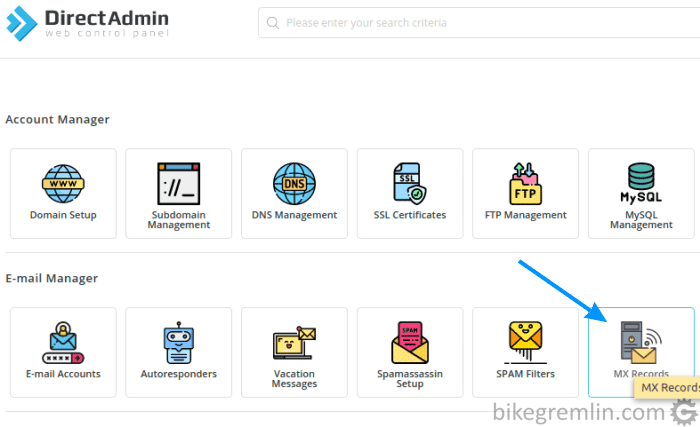
Picture 15
Then you need to change options, edit the MX record (if one exists) and add the second MXroute MX record:
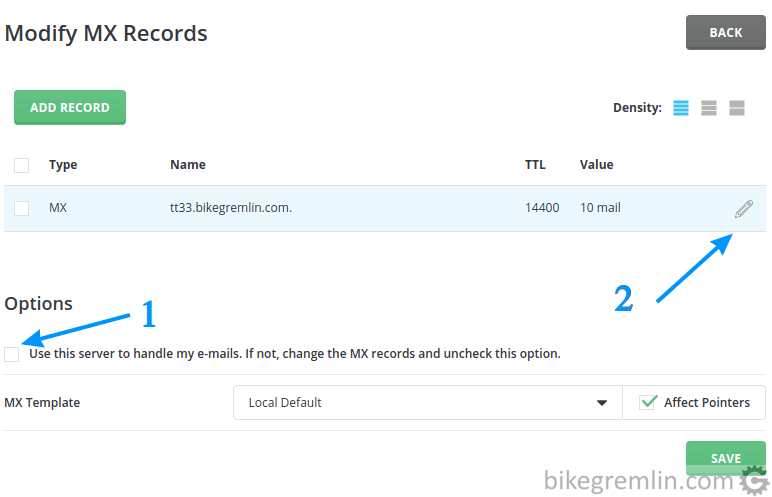
Picture 16
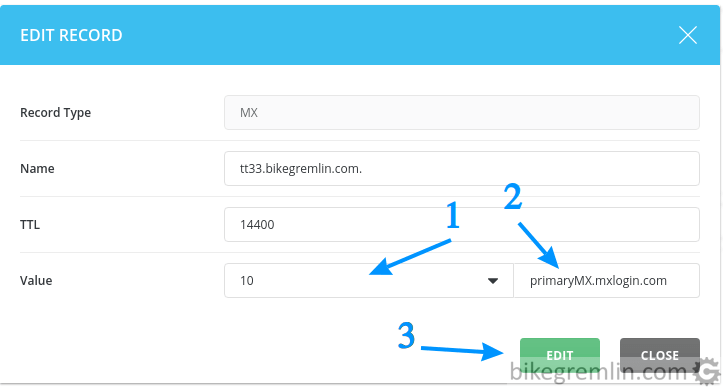
Picture 17
After this, click on “ADD RECORD” (shown in picture 16) and enter the values for secondary MX (it’s Value is 20 for MXroute).
6. Video demonstration (MXroute + Cloudflare)
Last updated:
Originally published:
