In the previous posts in the series we have prepared the grounds. Now, after having chosen a domain name and registered it, it is the time to put it all together, on a hosting account – by installing SSL/TLS certificates and doing other recommended hosting account settings, before installing WordPress.
- Making a WordPress site [01] Email
- Making a WordPress site [02] Domain registration and nameservers
- Making a WordPress site [03] Hosting
- Making a WordPress site [04] DNS
- Making a WordPress site [05] Hosting setup and SSL
- Making a WordPress site [06] Staging and development
- Making a WordPress site [07] Visual and functional design
Table Of Contents (T.O.C.):
- Registering a domain and opening a hosting account
- Setting up nameservers
- Installing SSL/TLS certificates
- Basic setup of the hosting account
4.1. Enabling the display of hidden files in file manager
4.2. PHP setup
4.3. Enabling basic file compression
4.4. Hotlink protection
4.5. Basic protection
4.6. Email setup
4.7. Creating database and user
4.8. Cloudflare Railgun integration (obsolete) - Website migration and backups
1. Registering a domain and opening a hosting account
We have chosen a domain for our project – 4roomsescape.com – and registered it with Porkbun (affiliate link). Second post in the series explains how to register a domain and protect the registrar account with 2FA.
Next thing is opening a hosting account for the website. For this I used one of my reseller hosting accounts with HostMantis.

Picture 1
The options are rather straight forward – asking you to enter a domain name, contact email, password, resoruce package etc. One post explains how to create users and packages in WHM (for cPanel), while another explains reseller account setup with DirectAdmin.
You can opt for shared hosting when you will get only one account (one website doesn’t need more than one anyway).
2. Setting up nameservers
Hosting provider should give you nameservers you should use with the account. Since I’m using reseller hosting with my custom nameservers, I could set up something like: ns1.bikegremlin.com and ns2.bikegremlin.com. Still, since for this project we’ll be using Cloudflare, we’ll use their nameservers. I explained in another post how to set up Cloudflare with a WordPress website.
3. Installing SSL/TLS certificates
Since we are using Cloudflare, before attempting to install SSL/TLS certificates, we will first set Cloudflare DNS to “DNS only” (grey cloud). Now on to installing certificates.
For this I also wrote two posts, one explaining how to install SSL/TLS certificates in cPanel and another explaining the SSL/TLS certificate installation in DirectAdmin.
Now we should set Cloudflare DNS back to “Proxied” (orange cloud).
4. Basic setup of the hosting account
I’ll explain the procedure using cPanel, though the principle is the same for DirectAdmin as well. First you should log in to cPanel. I wrote a review DirectAdmin vs cPanel, explaining differences, pros and cons.
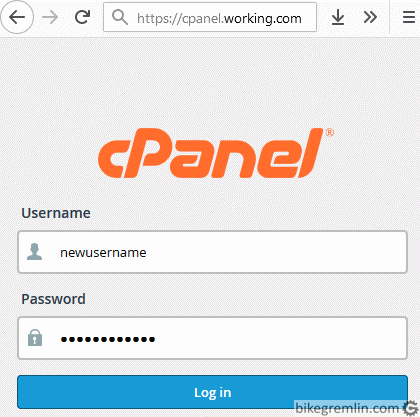
Picture 2
4.1. Enabling the display of hidden files in file manager
Next thing I always do first is enabling the display of hidden files in file manager.
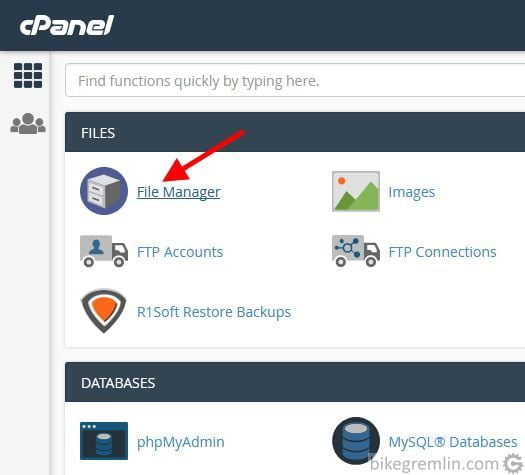
Picture 3
While DirectAdmin shows hidden files by default, with cPanel this needs to be set up:
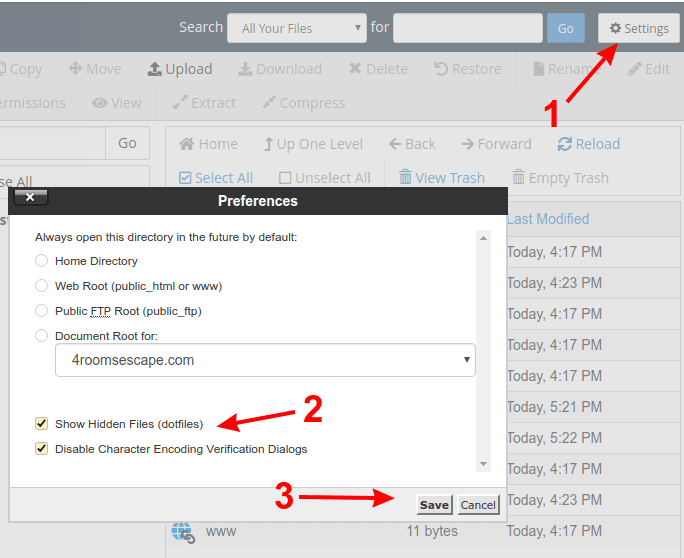
Picture 4
4.2. PHP setup
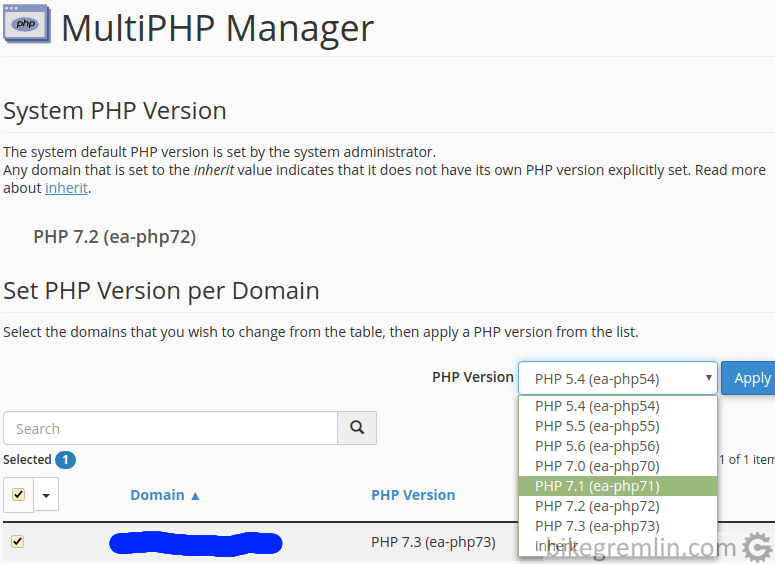
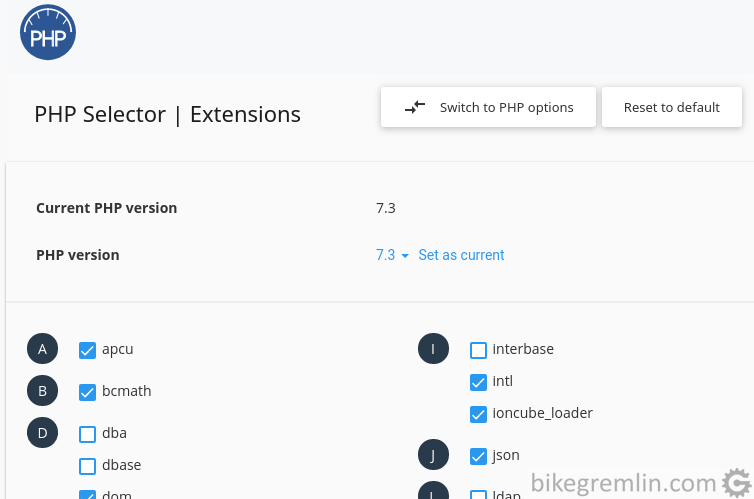
Depending on hosting provider’s setup, in the main menu you will choose either “MultiPHP Manager”, or “Select PHP Version”. The main difference is the first one allows you to choose PHP version for each domain and sub-domain, while the second one lets you choose which PHP extensions you wish to install.
Picture 5
Picture 6
For this project PHP 7.3 was chosen. PHP 7.4 is still not stable/tested enough, while there’s no need to go with a version below 7.3 in year 2020. Update November 2020: PHP 7.4. is tried and tested with WordPress now – I consider it a better option now (faster and more secure).
Update September 2021: I’ve switched to PHP 8.0.
Update 2024: at the time of writing, PHP 8.2 is a good choice for WordPress.
PHP extensions necessary for everything to work on my websites are the following:
bcmath, dom, fileinfo, gd, igbinary, imagick, imap, intl, ldap, mbstring, memcached, mysqlnd, nd_mysqli, opcache, pdo, pdo_mysql, pdo_sqlite, phar, posix, pspell, redis*, soap, sockets, tidy, timezonedb, xmlreader, xmlwriter, xsl, zip.
* See this regarding Redis
Basically, it’s best to exclude everything that isn’t needed.
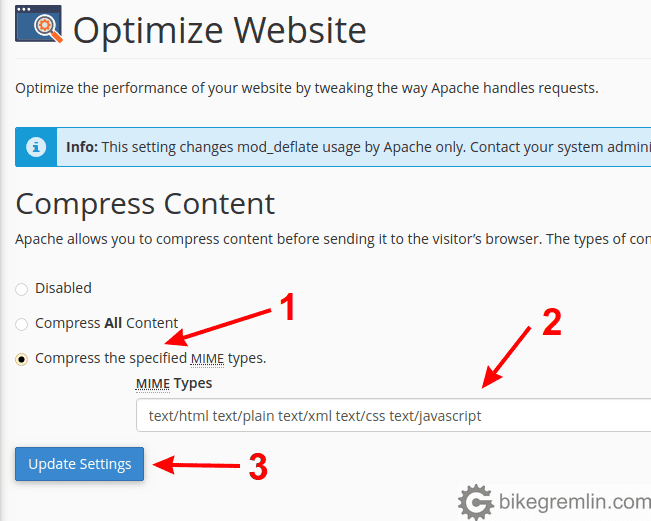
4.3. Enabling basic file compression
In cPanel main menu, click on “Optimize Website”.
Picture 7
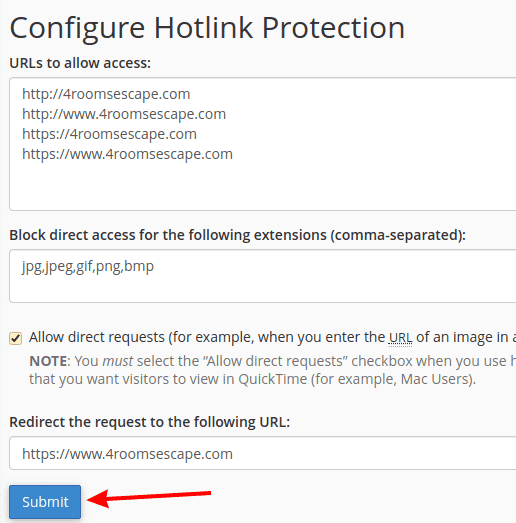
4.4. Hotlink protection
There are websites that will use your pictures. Not at least copying them to their server, but by inserting a link to your server within the HTML code of their pages. This causes extra load of your server, that practically serves another website in this case. It is called hotlinking.
This can be prevented. Though you should bear in mind that if you prevent hotlinking, you too won’t be able to insert images from your website on various forums, or within email HTML.
In cPanel, it is easily done using “Hotlink Protection” option from the main menu.
Picture 8
For those using DirectAdmin, open its file manager and go to:
home/user/domains/domain_name/public_html
There you should create a .htaccess file (unless one exists already) and add the following code in it (of course, 4roomsescape.com should be replaced with your domain name):
RewriteEngine on

RewriteCond %{HTTP_REFERER} !^$
RewriteCond %{HTTP_REFERER} !^http://4roomsescape.com/.*$      [NC]
RewriteCond %{HTTP_REFERER} !^http://4roomsescape.com$      [NC]
RewriteCond %{HTTP_REFERER} !^http://www.4roomsescape.com/.*$      [NC]
RewriteCond %{HTTP_REFERER} !^http://www.4roomsescape.com$      [NC]
RewriteCond %{HTTP_REFERER} !^https://4roomsescape.com/.*$      [NC]
RewriteCond %{HTTP_REFERER} !^https://4roomsescape.com$      [NC]
RewriteCond %{HTTP_REFERER} !^https://www.4roomsescape.com/.*$      [NC]
RewriteCond %{HTTP_REFERER} !^https://www.4roomsescape.com$      [NC]
RewriteRule .*\.(jpg|jpeg|gif|png|bmp)$ https://www.4roomsescape.com [R,NC]
Now we will do one more thing. To allow us to share images that we wish to, we will create a subdomain “sharing.4roomsescape.com”.
Create a directory where you will store the subdomain in file manager. Best done in the root directory of your hosting account. We created: “sharing_public_html”.
Choose “Subdomains” option in the main menu.
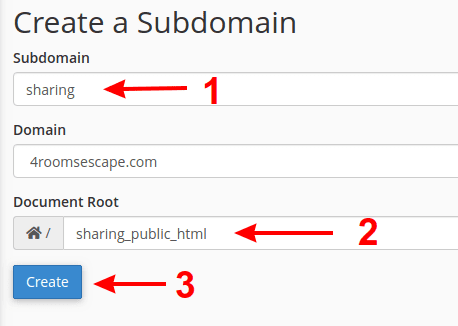
Picture 9
As picture 9 shows, one must choose subdomain name and directory where its files will be stored.
After you have finished setting up the subdomain, make sure to add it to Cloudflare’s DNS (if using it), “gray cloud” it, install SSL/TLS certificates, then switch it to “orange cloud”. Using the same principle as explained in chapter 3.
4.5. Basic protection
Add the following code in .htaccess files for domain (and subdomain if it’s used):
# GREMLIN (custom) CHANGES

# directory listing protection
Options -Indexes

# MIME sniffing protection
Header set X-Content-Type-Options nosniff

# XSS protection
Header set X-XSS-Protection "1; mode=block"

# END OF GREMLIN (custom) CHANGES
I wrote on this in more detail in the post: securing a WordPress website – we’ll deal more with this after we have built our website.
Also, we should add redirections to https, so the following code should also be added to .htaccess of the domain:
# GREMLIN CHANGES BEGIN
RewriteEngine on
RewriteCond %{HTTPS} !on [OR]
RewriteCond %{HTTP_HOST} !^www\.
RewriteRule (.*) https://www.4roomsescape.com%{REQUEST_URI} [L,R=301]
# GREMLIN CHANGES END
While subdomain’s .htaccess file should get this added:
# GREMLIN CHANGES BEGIN
RewriteEngine On
RewriteCond %{HTTPS} off [OR]
RewriteCond %{HTTP_HOST} ^www. [NC]
RewriteRule ^ https://sharing.4roomsescape.com%{REQUEST_URI} [L,NE,R=301]
# GREMLIN CHANGES END
This is explained in more detail in the post about website redirections.
4.6. Email setup
Of course, we should also setup email(s). Since I already wrote about this at great length, I will just give links to those posts:
- How to set up email in cPanel and DNS.
- How to set up external email service (Gsuite, MS Exchange, MXroute…).
- How to connect Gmail account with domain email.
4.7. Creating database and user
Again, so I don’t repeat myself:
4.8. Cloudflare Railgun integration
Update 2024: Cloudflare Railgun is now obsolete, so you can skip this chapter.
At the time of writing this, DirectAdmin still doesn’t support Cloudflare Railgun integration. If you are using cPanel hosting, with a provider that offers it, you will be able to activate Railgun.
What is this good for? The advantage of Railgun is that remote visitors have a faster connection to the hosting server. The downside is that most of Cloudflare’s CDN options are bypassed if using Railgun. Hence: the more a website has large images (and/or videos), the better it is without Railgun, while the more it needs database connection (order verification, comments etc.), the more Railgun helps. It’s a tradeoff, test and see what works better for your website.
If you wish to activate Cloudflare, choose that option from cPanel’s main menu.
Then you will be asked for your Cloudflare account’s username and password.
After that, click on a house icon “Home” and enable Railgun.
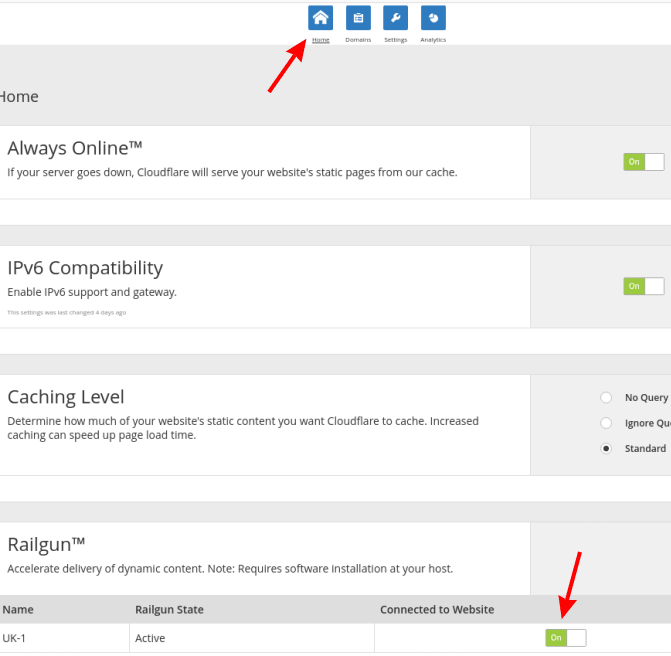
Picture 10
Now go to Cloudflare website, log into your account and test if Railgun works.
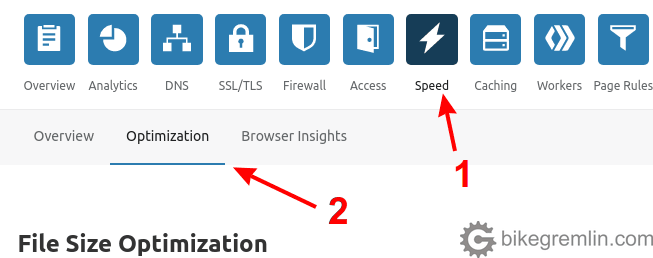
Picture 11
Scroll down until you see Railgun options, then click on “Test”.
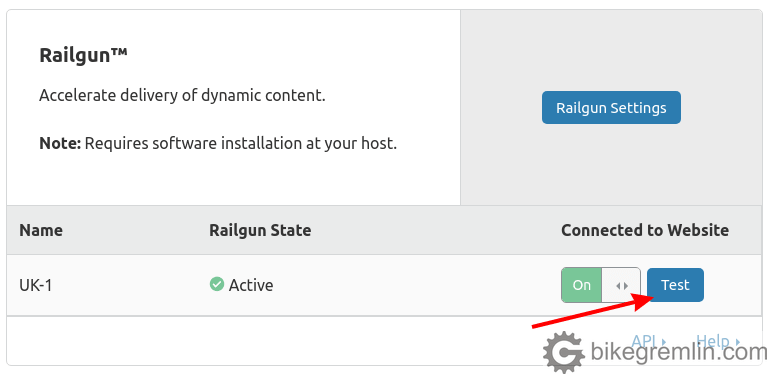
Picture 12
If all was properly set, you should see something like this:
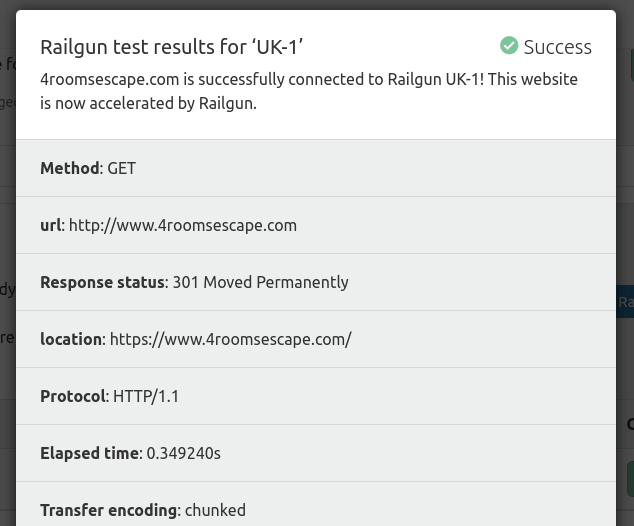
Picture 13
5. Website migration and backups
That’s about it. We are now ready to install WordPress. Of course, when developing, it’s best to do it locally and/or on a “working account”, then when it’s all done and tested, migrate the website to the domain.
Of course, don’t forget the most important thing – backups!
- cPanel reseller hosting backup automation.
- DirectAdmin backup setup.
- cPanel backup setup with JetBackup.
- “Manual” WordPress backup (basics explained).
Last updated:
Originally published: