
Fifth WordPress workshop by Davor Altman was devoted to HTML, CSS, WordPress themes and file structure hierarchy. In this post I’ll explain HTML and CSS basics and how they are “interlaced” to create a nice looking page that is also easy to edit and re-style later on.
This (WordPress workshop) series:
- [01] Introduction
- [02] WordPress.com
- [03] Advanced WordPress.COM tutorial
- [04] WordPress Local by Flywheel installation tutorial
- [05] HTML and CSS explained
This is written as I would have liked it to had been explained to me from the start – to more easily understand; and to be used as a quick reminder / reference. If you find it useful as well – great! If you don’t like the approach and how it is explained – also great; at the end I provided some links where it is all explained by others.
1. What are HTML and CSS (and JavaScript) all about?
Before explaining any of these terms individually, in more detail, I’ll first explain the essence. When it comes to their role in web design, if we imagine it to be similar to designing a classic automobile, the following two pictures speak more than words:
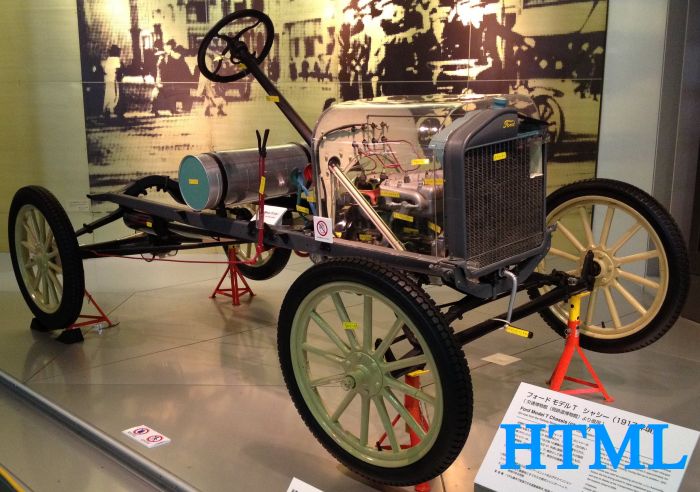
Picture 1
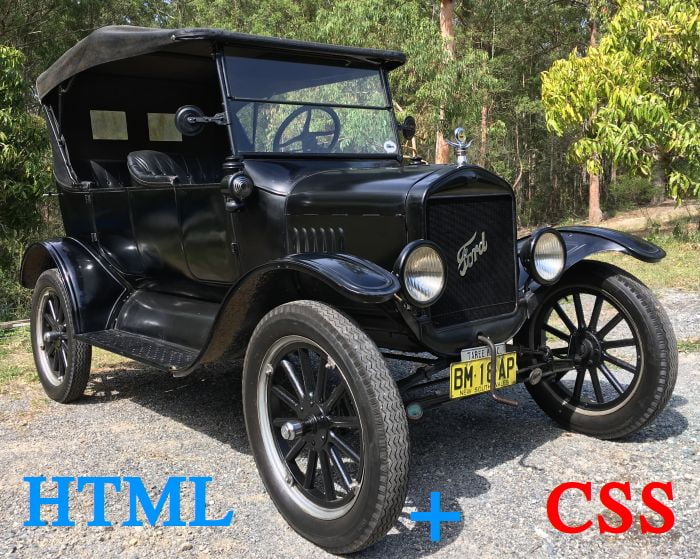
Picture 2
Too stay with the analogy: to add a spare wheel (and tyre) we’d use HTML, while for changing the colour to Ferrari red, we’d use CSS.
HTML also offers some (rudimentary) options for changing the design, but for easier maintenance and later re-styling of a website design, it is easier to have all the styling stored in a CSS file. Take this as it is for now, by the end of this article, you’ll have a better, full understanding of how both HTML and CSS work and how they interact to make a beautiful website.
I still haven’t mentioned the last item from this chapter’s heading: JavaScript. JavaScrip is a programming language that enables web pages to be interactive. For example: drop-down menus at the top of this page are created using JavaScript.
In this automobile example, JavaScript analogy would be an on-board computer that controls the ride, steering wheels, levers and pedals, plus has the power to change the bodywork colour, shape, change the engine and – on top of all that – load and unload luggage and passengers (if we visualise data using that analogy).
JavaScript is powerful – adding, removing and changing HTML and CSS code, importing/exporting data etc. It should be used wisely though – some things are best (fastest, both for creation and website performance) done using HTML, others using CSS and third ones using JavaScript. Each three have their place and use – and are combined.
JavaScript will not be further explained in this article, we’ll stick to HTML and CSS, for start.
2. HTML
At the end of ’80s in the 20th century, Mr Tim Berners-Lee thought of HTML (Hyper-Text Markup Language) as a way to help share documents at CERN. The basic idea being to easily link other documents from the current document. Those interested in HTML development and history can start from Wikipedia and Google, I won’t burden this text (and the readers) with it.
Today, HTML is standardized by World Wide Web Consortium (W3C). Its current version is HTML 5 and here I’ll explain the structure and functions it provides.
2.1. HTML structure
HTML consists of elements. Those elements describe (create) the entire web page content. HTML code example is given below – and how it looks like on a page:
<h2>Heading</h2>
<p>Text - in a paragraph.<br>New line.</p>
<p>Paragraph - <a href="https://www.bikegremlin.com/">hyperlink</a>!</p>Code language: HTML, XML (xml)
Heading
Text – in a paragraph.
New line.
Paragraph – hyperlink!
The example above has a <h2> element for the heading, two <p> elements for paragraphs and one <a> element for the link, as well as a standalone element <br> that marks a new line (line break) within the text. Basic structure of a HTML element is shown in picture 3:
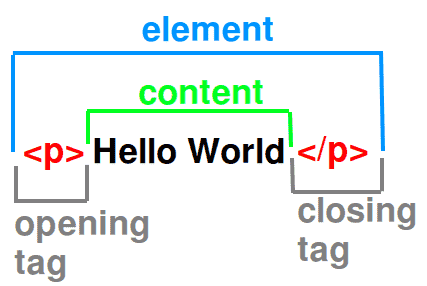
Picture 3
Picture shows opening of the element using a “<p>” tag, its contents “Hello World” and closing it (marking the element’s end) “</p>. Not all the elements have a closing tag. Like the <br> element used in the first code example.
So, there are paired elements – and stand-alone (or “empty”) elements.
For a web page to be readable to a browser, it must contain the following elements:
- <!DOCTYPE html> – a standalone element that tells the browser the page is written using HTML 5 (so it knows how to read it).
- <html> </html> – tag that is placed at the beginning of a page, right after <!DOCTYPE html> and at the very end – telling the browser from and to where the page is to be read. Inside this tag, all the page elements are placed.
- <head> </head> – tag that encloses the page header elements.
- <body> </body> – all the page contents are placed inside the <body> tag.
- Special element is HTML comment – used to make notes so that humans reading the code can understand it better (browsers simply disregard these elements as if they don’t exist). Syntax is:
<!– comment text –>
Now, let’s edit our first code example to be usable as a “real” web page:
<!DOCTYPE html>
<html>
  <head>
  <!-- beginning of the page heading - comment -->
    <title>Page Title - shown in the browser's tab</title>
  </head>
 <!-- another comment noting the page body beginning -->
  <body>
    <h2>Heading</h2>
    <p>Text - in a paragraph.<br>New line.</p>
    <p>Paragraph - <a href="https://www.bikegremlin.com/">hyperlink</a>!</p>
  </body>
</html>Code language: HTML, XML (xml)
If we copied this code into a text file, with an extension “.htm”, or “.html” (say “example.html), a browser could open it and show the page.
This code example also shows another important thing: HTML element nesting. See how <head> and <body> elements are nested within the <html> element? Likewise, <title> element is nested within the <head> element. The code is written with line indentations, so that the levels of nesting can easily be seen, hence making the code more easily readable to humans – for editing and understanding. Visually, if it helps you understand, it can be shown like this:
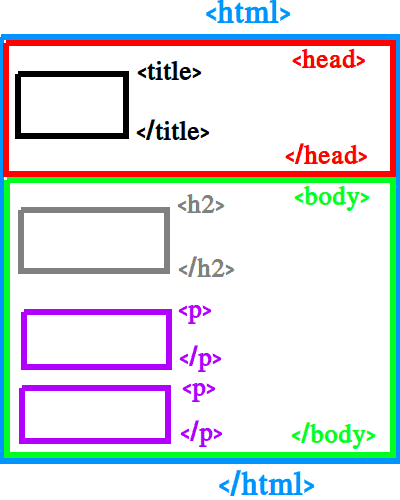
Picture 4
2.2. Types of HTML elements (tags) division
There are the following divisions of HTML elements:
- Paired and standalone
- Block and inline
- Semantic and non-semantic
Paired and standalone
The division is made based on whether the tags require a closing tag, or not.
Paired: “<p>Paragraph text</p>” and standalone: “<br>” (it is also correct to write this tag as <br /> – it’s the same, not the closing pair, but the current HTML 5 standard recommends <br>).
Block and inline
When a block tag is used, it will take the entire screen with, i.e. it will make a new line afterwards, simply put. For example, each “<p>” tag will, after it is closed, i.e. “</p>” make a new line.
Inline tags don’t make line brakes.
<p>If we add a <a href=”https://www.bikegremlin.com/”>hyperlink</a> within a text, it will remain in the same line.</p><p> But the remainder of this text will be in a new line, new paragraph.</p>
Semantic and non-semantic
HTML 5 has introduced a new type of tags: semantic tags. These tags tell the browser what the “meaning” of their enclosed (nested in) elements is. So there are tags that define navigation, header, footer of a page etc. This is a list of semantic tags:
<article>, <footer>, <header>, <main>, <nav>.
All the other tags are non-semantic. While, to add a bit more confusion, all the semantic tags are also paired (since they enclose other elements placed “inside” their opening and closing tag). They are also of block type.
2.3. HTML attributes and values
Many HTML tags allow adding attributes with values (to the tags). An example for this is <a> tag for adding hyperlinks (which is also a paired tag), or tags for adding images <img> (as a standalone tag example). Both of the noted tags are of inline type. An example of block-type tag with an attribute (and attribute’s value) is <p> tag. Let’s give some examples:
<a href="https://www.bikegremlin.com/">Hyperlink</a>
<!-- attribute is "href", with a value of "https://www.bikegremlin.com/" -->

<img src="catpicture.jpg">
<!-- attribute is "src", with a value of "catpicture.jpg" -->

<p class="landmark">Bla bla bla</p>
<!-- attribute is "class", with a value of "landmark" -->Code language: HTML, XML (xml)
With this last example (“class” attribute), we are coming to a connection between HTML and CSS. Before explaining that, I’ll first explain the basics of CSS.
In order to make this post shorter and clearer, I won’t be explaining HTML syntax and commands. I’ve (hopefully) explained the basics well, so that you can more easily learn the rest on your own. Useful links for (starting) learning HTML:
2.4. HTML element ID and Class
In addition to Tags, that define the types of HTML elements ( <p> for paragraphs, <h1> for heading etc.), each HTML element can be assigned a unique ID and one, or more Classes.
HTML ID
ID should be unique, in a well written HTML code. It is like a full name of one, particular HTML element. Examples:
<h2 id="heading-1">Heading</h2>
<p id="averel">Text - in a paragraph.</p>
<p>Paragraph-<a id="superlink" href="https://www.bikegremlin.com/">hyperlink</a>!</p>Code language: HTML, XML (xml)
<h2> got an ID “heading-1”, first paragraph <p> got an ID “averel”, while the link got ID-d “superlink”. This will be important when we start playing with CSS, but first let’s explain Classes.
HTML Class
Unlike ID-s, Classes are not unique. Several different (types of) HTML elements can have the same Class. Also, one element can have several Classes. Example:
<h2 id="heading-1" class="emphasized">Heading</h2>
<p id="averel">Text - in a paragraph.</p>
<p class="emphasized underlined">Paragraph 2</p>Code language: HTML, XML (xml)
<h2> got a class “emphasized”, while the second paragraph <p> got two classes: “emphasized” and “underlined”.
3. CSS
CSS is the acronym for “Cascading Style Sheets” – and that fact will mean absolutely nothing, until you understand “how the damn thing works”, after which it will all “fall into place” and be crystal clear. Another definition that you shouldn’t let scare you: “CSS is used to describe the presentation of a document written in HTML”.
Now in plain English: HTML is used to write (we could say “carry”) web page / website content. While CSS is used to design how it looks. Even though some design can be done using pure HTML code, it is a lot easier to put all that into one .css file – where it is easily readable and can be edited as one wishes.
The previous paragraph will be clearer after the last chapter, but first let’s explain CSS.
3.1. CSS structure
CSS code consists of a set of rule-sets. Structure of a rule-set is shown in picture 5:
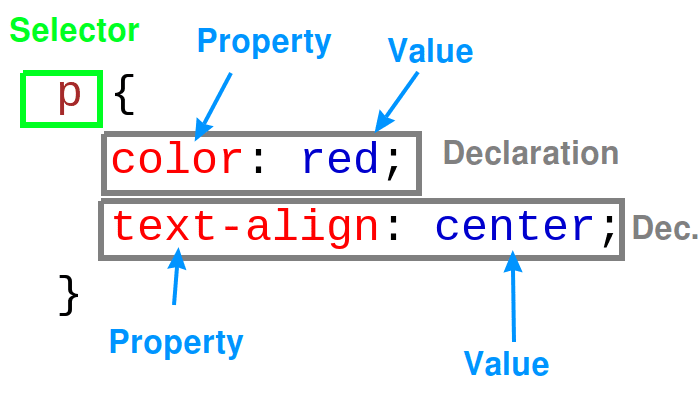
Picture 5
A rule-set consists of Selector and Declarations.
To repeat: the entire CSS code consists of a set of rule-sets, like the one in the picture. I’ll add another specific code “element”: comments. Like in HTML, comments are used to help people understand the code. Comments are open with characters ” /* ” and closed with ” */ “. Everything between those is ignored by the browsers, as if it didn’t exist. An example of CSS code with comments:
p {
  color: red;
  /* This is a single-line comment */
  text-align: center;
}

/* This is
a multi-line
comment */Code language: CSS (css)
Using this structure, CSS allows for (drastic) alteration of how the entire website looks, not just particular page(s). This will be clear by the end of this article. For now it suffices to know that one rule-set consists of a Selector and a Declaration.s
3.2. CSS declarations
All the CSS tutorials first explain Selectors, but I think it’s better to start with the logically easier part. Colour me excentric. 🙂
CSS declarations consist of Property and the assigned Value – as shown in picture 5. To keep this post brief and clear, I won’t explain what kinds of properties exist and what kinds of values are used with each. For that, it’s better to see some CSS tutorials / documentation (I provided links at the end of this post). Here, we’ll concentrate on what I find lacking in most tutorials – explaining the basics, which should allow you to follow and use other tutorials more easily. Let’s get back on topic:
Property
Property is an attribute that can be changed using CSS. Some examples:
- color: sets / changes the text colour of a HTML element.
- text-align: aligns the text of a HTML element to left, right margin, or the center.
- background-color: sets the background colour of a HTML element.
You’ve noticed that each property is assigned to a HTML element. Which one? That is explained in the next chapter: “CSS selectors“. Before that, let’s see some examples with the Values set, so that declarations are complete.
Value
Value, as the name says, defines the value of a property. Value examples:
- color: red;
- text-align: center;
- background-color: green;
All the declarations (with its Properties and Values) within one rule-set are grouped using curly brackets – ” { } “.
{
  color: red;
  text-align: center;
  background-color: green;
}Code language: CSS (css)
Which HTML element is defined using the above listed declarations? The one we choose (define) using a Selector, as is explained in the next chapter.
3.3. CSS Selector
In order to define which HTML element, or elements a rule-set defines, CSS uses Selectors. HTML elements can be define in the following ways:
- ID: this is like a full name of a HTML element, it is unique (or at least it should be in a well written code).
- Class: each HTML element can be assigned to one, or several classes – this is defined when writing the HTML code.
- Element (or tag): this is the type of HTML element, such as paragraph <p>, heading <h1> etc.
This is explained in chapter 2.4, feel free to re-read it. CSS selectors are used to “target” the desired HTML element(s) that we wish to alter (make look better).
Element Selector
CSS Selector of each rule-set determines which HTML elements are affected by the rule-set. So if I want to set all the paragraph text of a website to be green, I’ll use a “p” selector – for paragraphs. HTML code:
<h2>Heading</h2>
<p>Bla bla bla</p>Code language: HTML, XML (xml)
CSS for colouring the text in green and aligning it centrally:
p {
  color: red;
  text-align: center;
}Code language: CSS (css)
All the HTML elements that are of <p> (paragraph) type will be coloured (and centered).
Now, what if I want to make each starting paragraph of each website page be blue? Here we come to the other type of selectors:
Class selector
In order to use this, I’ll have to edit HTML code of the paragraphs I want to be affected by a class selector.
<p class="introduction">First paragraph</p>Code language: HTML, XML (xml)Now I can refer to this using a class selector, that is written using the class name, with a full stop at the beginning:
.introduction {
  color: blue;
}Code language: CSS (css)
ID Selector
Finally, if I want to change the look of one particular HTML element, I’ll refer to it using its unique ID. HTML code, followed by CSS code that refers to it:
<p id="anne">First paragraph</p>Code language: HTML, XML (xml)#anne {
color: blue;
}Code language: CSS (css)Pseudo Classes
It is used to select a certain state of a HTML element. For example, we want a hyperlink <a> to change the colour to yellow when we hover the mouse over it:
a:hover {
  color: yellow;
}Code language: CSS (css)
Pseudo Elements
If we want to alter the appearance of a certain part of a HTML element, we use Pseud Element Selector. For example, we wish to make the first line in a paragraph (as shown on screen) orange:
p::first-line {
  color: orange;
}Code language: CSS (css)
Universal selector
This selector encompasses all the HTML elements that aren’t defined using other selectors (more on this in chapter 3.7). It is marked with an asterisk ( ” * ” ) and can be thought of as a setting of default values. For example, this website uses black text on white background 99.9% of the time, so a good universal selector for it would be:
* {
  color: black;
  background-color: white;
}Code language: CSS (css)
Attribute selector
It is used to select HTML elements that have a certain attribute, or a certain attribute with a certain value. Say we want to select all the links <a> that have a set outgoing link attribute (rel), whatever the value of that attribute, to be green. Then we want those that have rel=”nofollow” to be red. This is what CSS code would look like:
a[rel] {
  color: green;
}

a[rel="nofollow"] {
  color: red;
}Code language: CSS (css)
Inline style
There is a way for CSS styling to be written directly inside HTML code. This is called inline styling. Example:
<p style="color: blue;">Paragraph text.</p>Code language: HTML, XML (xml)This is something to be generally avoided, we’ll explain later why.
!important
Exclamation mark is not a typo. !important is placed next to a value within a declaration. Remember this for now, the use will be explained later. Now a sample of syntax:
p {
  color: red !important;
  text-align: center;
}Code language: CSS (css)
3.4. CSS Selector grouping
If I want to use one rule-set for several classes, or elements, I can list them all, separated with a comma. The following example sets the text colour of all the <p> and <h2> HTML elements to green:
p, h2 {
  color: green;
}Code language: CSS (css)
Both classes and ID-s can be listed this way:
.introduction, #anne, p, h2 {
  color: green;
}Code language: CSS (css)
3.5. Chaining CSS Selectors
Let’s take a HTML code example where <p> and <h2> elements have the same class:
<h2 class="aragorn">Heading</h2>
<p class="aragorn">Bla bla bla</p>
<p>Other paragraph</p>Code language: HTML, XML (xml)
How can we paint just the paragraphs of “aragorn” class to green, but without painting the <h2> elements of the same class? Here’s how we tell that to CSS:
p.aragorn {
  color: green;
}Code language: CSS (css)
We have just “told” the CSS: “declaration applies only to <p> type elements that have a class aragorn”.
3.6. Nested elements Selector
Remember HTML element nesting? Let’s use a simple, short example as a reminder:
<p>Website building blocks:</p>
<ul class="main">
  <li>HTML</li>
  <li>CSS</li>
  <li>JavaScript</li>
</ul>Code language: HTML, XML (xml)
Here we have a list <ul> and a few list items <li>. List items are nested in the list. How do we tell CSS to colour only the list items of the list that has a class “main” into red, but we don’t want to change the colour of <li> in other lists, with other class, or without any class assigned?
.main li {
color: red;
}Code language: CSS (css)
Note the space (” “) between the selectors “.main” and “li” – this is used to define nesting.
3.7. Selector specificity
First we’ll introduce some confusion, in order to make it all clear by the end. Take a look at this CSS code:
h1 {
  color: yellow;
}
h1 {
  color: red;
}

p.aragorn {
  color: green;
}
p {
  color: blue;
}Code language: CSS (css)
The same selector “h1” was used to first set the color to yellow, then to red.
Also, for “p”, the colour was defined first using a p.aragorn (chained HTML element and class selector), then using p (HTML element) selector.
What will be the colour of h1 and p eventually? I’ll answer right away: h1 will be red, p.aragorn will be green and p will be blue. Is it now even more confusing? Let’s explain.
Remember chaining of selectors. p.aragorn relates to HTML elements that are of <p> type and have a class “aragorn”. Is this a more specific designation than just a p selector, without a class chained?
- In CSS, declaration who’s selector is more specific, always takes precedence – it has more “weight”.
- If two declarations have specificity of the same weight, the “winning” one is the one that was last defined (by its order in CSS code).
CSS Selector hierarchy is based on specificity and is the following, by order of importance:
- !important
- Inline style – <p style=”color: blue;”
- ID Selector – #
- Class Selector – .class-name, Pseudo Class a:hover, Attributes – a[rel]
- Elements – p, Pseudo Elements – p::first-line
- Universal Selector – *
When two selectors change the same property, the winning one is the selector that is more specific, that has more “weight”.
So, for example double element selector, like “div p”, has more weight than a single “p” selector. However, single class selector, like “.aragorn”, beats even a million element selectors, because of the hierarchy.
For me, this is the easiest to visualise as a number system, where hierarchy dictates digit position, while the number of selectors dictates the value of that digit. Only Universal Selector practically has no value (0) – everything else overrides it.
Calculating “weight” can be visualised like this:
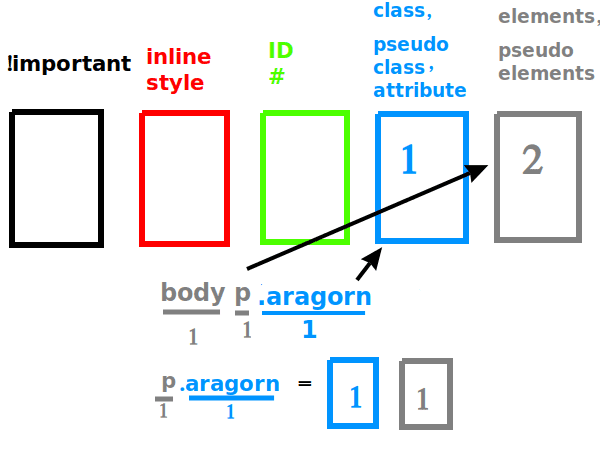
Picture 6
Note: when presented like this, many people fall into a trap to regard this as a numeric system (usually with a base 10, like the one we regularly use). Which is wrong. In picture 6, “body p.aragorn” wins over “p.aragorn”, because it has more elements, while they both have one class (each) – so then the first lower hierarchy value is compared. That is also why “p.aragorn” beats “p” from the code example.
At the same time, only one class, say “.aragorn” will beat even a thousand, or a million elements. While a selector with only one #ID will beat million classes with elements. And so on – based on hierarchy.
So inline style, even if it is defined for <p> paragraph, will beat even #ID.
For “!important” it can be said it always wins – and should be used carefully.
If all the weights are matched, then the selector that was last defined within CSS code wins.
Another good explanation of CSS Specificity:
css-tricks – Specifics on CSS Specificity
4. Combining HTML and CSS
In chapter 3.3. CSS Selector, inline style is explained, as a way to implement CSS styling directly from within the HTML code. In previous chapter, it was explained how inline style overrides .class and even #ID styling.
So, if a single paragraph is re-styled using inline styling, it will be difficult to remember that later if you wish to change the styling (unless you write down each page and paragraph on the website that you have altered using inline styling). It is a better practice to keep all the CSS styling saved in one .css file, like “style.css“.
This file must then be defined within the HTML code, in the following way:
<link href="style.css" type="text/css" rel="stylesheet">Code language: HTML, XML (xml)Correct, “full” HTML code would look like this:
<!DOCTYPE html>
<html>
<head>
  <title>Page title</title>
  <link href="style.css" type="text/css" rel="stylesheet">
</head>

<body>
  <!-- HTML elements -->
</body>Code language: HTML, XML (xml)
While .css file contains CSS rule-sets, like this:
* {
  box-sizing: border-box;
}

body {
  background-color: #FFF;
  margin: 0px;
  padding: 50px 60px;
}

h1 {
  color: #004E89;
  font-family: 'Yantramanav', sans-serif;
  font-size: 50px;
  font-weight: 400;
  margin: 0;
  text-align: center;
}

p {
  color: #333;
  font-family: 'Yantramanav', sans-serif;
  font-size: 16px;
  font-weight: 100;
  margin: 0;
  text-align: center;
}

.actions {
  text-align: center;
  margin-top: 30px;
}

.actions a {
  background-color: #9DD1F1;
  border-radius: 3px;
  color: #004E89;
  font-family: 'Yantramanav', sans-serif;
  font-size: 16px;
  font-weight: 300;
  display: inline-block;
  margin: 10px;
  padding: 12px;
  text-align: center;
  text-decoration: none;
  text-transform: uppercase;
}

#gameboard {
  position: relative;
  text-align: center;
  top: 30px;
}

.card {
  border: 2px solid #9DD1F1;
  display: inline-block;
  height: 200px;
  margin-top: 4px;
  padding: 30px auto;
  text-align: center;
  width: 215px;
}

.card:hover {
  background-color: #004E89;
  border-color: #004E89;
}Code language: CSS (css)
The next chapter explains the specifics of CSS use with WordPress.
5. WordPress and CSS
WordPress allows CSS styling in several ways:
- Using a theme and/or a Child theme.
- With a plugin.
- Additional CSS option from within WordPress options.
- Inline style – by editing pages / blocks using “Edit as HTML” option.
Small digression: WordPress has its own mechanisms for “connecting” CSS from themes, plugins and Custom CSS with the website – so there’s no need to add a declaration into HTML code, as was explained in chapter 4.
The theme you choose has its CSS for styling the menus, pages and general look of the WordPress website. If you wish to further customized this, it is best to create a Child theme. Then you can add your CSS to style.css file of the child theme. This is probably the best way to customize WordPress.
Plugins will also alter the design using their CSS.
Quick and easy way to edit design is using Additional CSS WordPress option (Appearance -> Customize -> Additional CSS), though I would recommend using a child theme for this and having all the customization placed within one file – the child theme’s style.css (you can see: how to create a WordPress child theme). It’s better in the long run.
Inline style is definitely best to avoid.
If the same property is defined in a theme and Custom CSS, or inline style etc, WordPress uses the following styling hierarchy, the higher placed one having priority (winning) over the lower placed:
- Inline styling – best avoided.
- Custom CSS.
- Plugin stylesheet.
- Child theme style.css.
- Theme style.css.
Thanks to this hierarchy, you can easily customize the design using a Child theme, because its style.css takes precedence over theme’s one – for all the properties defined within the child theme. With a note that !important always wins, wherever it’s placed – so use it cautiously.
This practically finishes this introduction to HTML and CSS. It is written in a way I would like if someone could have explained it all to me in the beginning. Another article is being written, that explains the basics in briefer way, but from another completely different angle. Also written as I would have liked to have been able to read / learn – and so it is practical to me as a reminder.
6. Useful links / sources
HTML:
CSS:
- w3schools – CSS Tutorial
- css-tricks – Specifics on CSS Specificity
- CSS Specificity Calculator
- CodeCademy CSS course
Advanced CSS:
Last updated:
Originally published: