Google is a powerful, smart search engine, while the native WordPress search leaves a lot to be desired. This article is a beginner-friendly, step-by-step tutorial on how to add Google’s search for your WordPress website, on your website. 🙂
The largest part of this article is valid even for websites that aren’t WordPress.
Table Of Contents (T.O.C.):
- WordPress native search
- Creating Google Programmable search for a website
- Configuring the search – on Google
3.1. Monetization
3.2. Look and feel - Adding Google Programmable search to a WordPress website
4.1. Placing the search on the website - Conclusion
1. WordPress native search
In a comment, on my cycling website version in my native, I had thoroughly explained the cassette wobble phenomena (in Serbocroatian). However, just one year later I had forgotten where I wrote about that. 🙂 In order to find it, I did a search on the website:
“tolerancije navoja freehub” (eng. “thread tolerances freehub”)
WordPress search said: “Nothing Found.”
So I went to Google and typed:
site:bicikl.bikegremlin.com tolerancije navoja freehub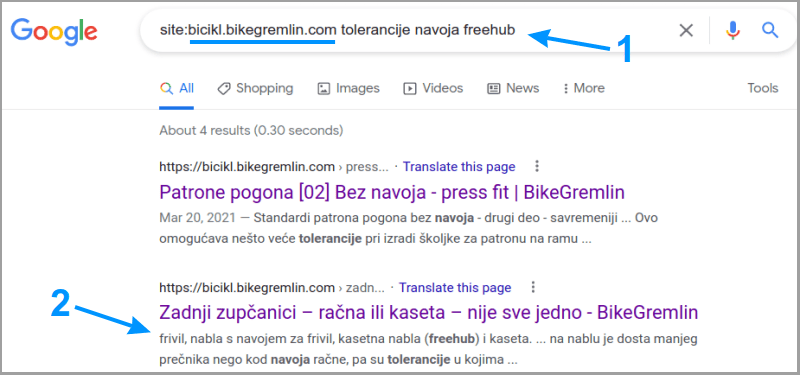
Picture 1
Cool, isn’t it? 🙂 I wanted that on my website, as a search option, at hand!
On the other hand, when I’m looking for a particular article, searching by its title, the limited WordPress search has an advantage – at the top of the search results, it lists pages containing the searched words in their title. Along with the article featured images – which is nice. 🙂
That is why during my website redesign, I decided to offer both:
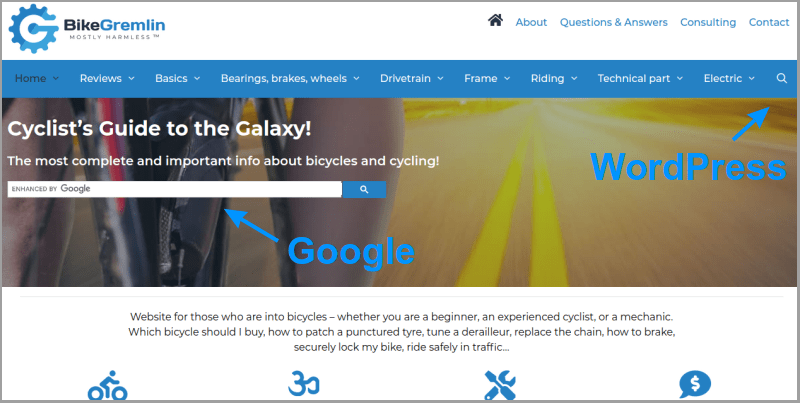
Picture 2
WordPress search is easily provided by enabling primary navigation search (or main menu search, depending on the theme used).
Google search? Read on. 🙂
2. Creating Google Programmable search for a website
It is understood you have a Gmail account. I still haven’t written a tutorial on how to do that, but it’s very simple. Just go to gmail.com and click on “Create an account.”
Log into your Gmail account, go to programmablesearchengine.google.com, and click on “Get started.”
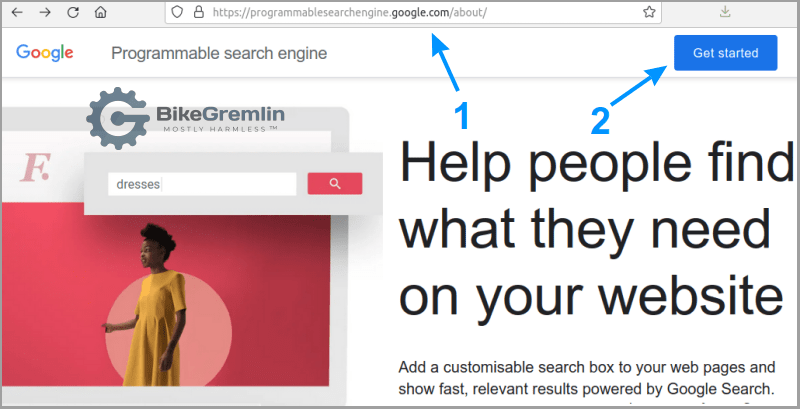
Picture 3
On the page that is now shown, click on the “New search engine” option and let’s start. 🙂
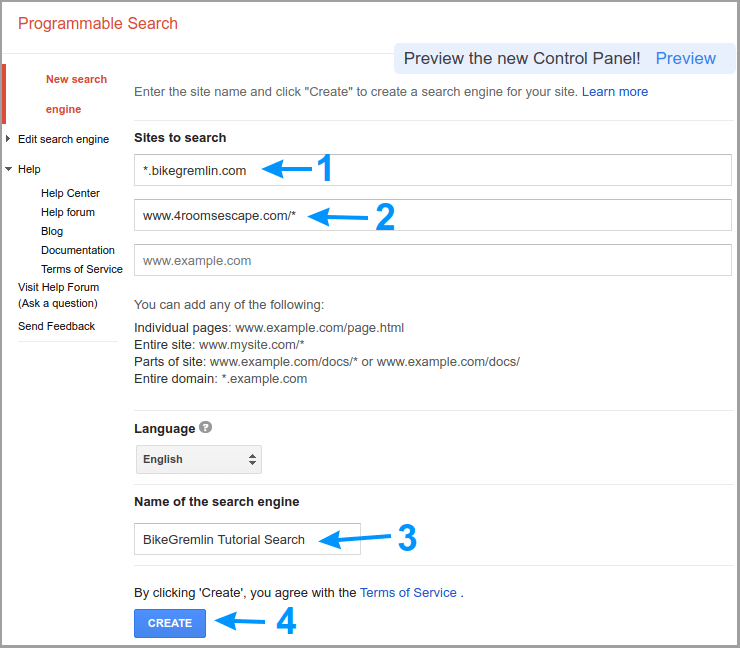
Picture 4
In this example, we’ve configured the search to encompass all the .bikegremlin.com subdomains (io.bikegremlin.com, bike.bikegremlin.com, www.bikegremlin.com etc.).
I also included the website www.4roomsescape.com – just for fun (it is cool 🙂 ).
Once you’ve configured what you want your search to include, name it and click on “Create.” You can always get back here and add, or remove websites or domains from the search.
3. Configuring the search – on Google
3.1. Monetization
If your Gmail account is connected with a Google AdSense account, you get to monetize your search (note that Google will insert ads whether you get the share, or not). To do that, click on “Edit search engine,” then “Setup” -> “Ads.”
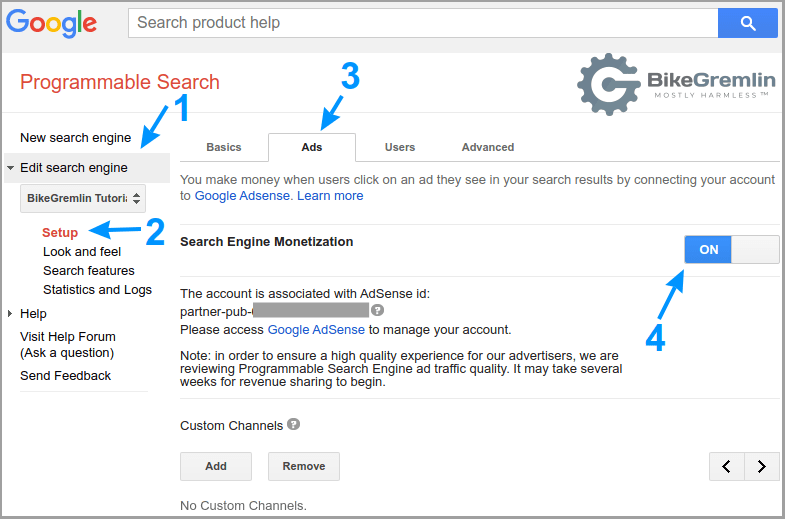
Picture 5
3.2. Look and feel
In the “Look and feel” menu, for this (WordPress) implementation of ours, we’ll choose the “Compact” option, click Save, then go to the “Customize” tab:
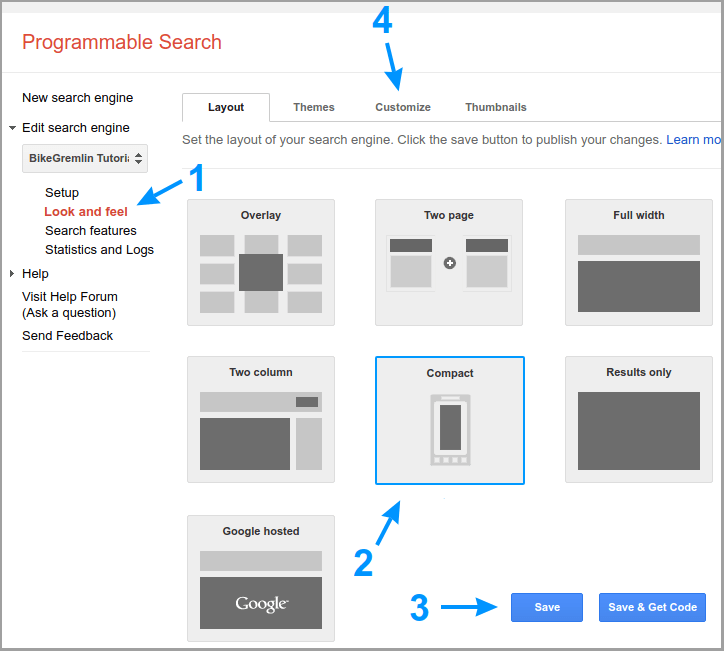
Picture 6
In the Customize menu, all the options are intuitive, nicely explained, with a preview window showing what it will look like once you implement them. I won’t be explaining each and every, let’s just set the search button as an example (the principle is the same for all the other options):
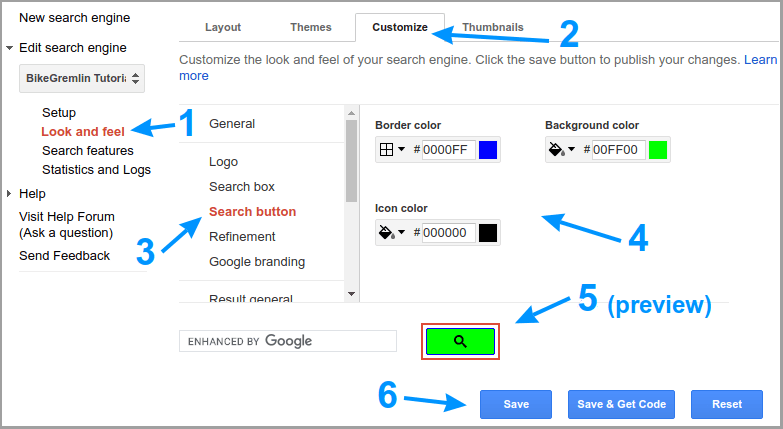
Picture 7
I used the “radioactive green” for a clear demonstration. What I finally used for style is the “BikeGremlin blue,” code “2581C4”.
The options “Search features” and “Statistics and Logs” can be left as they are – or you can look into them yourself and see if you’d like something altered there as well (it will work fine without touching them).
Just don’t forget to click on “Save” after making any changes.
Help BikeGremlin
stay online & independent
This website is educational, free, objective, and not commercial
(sponsors don’t enjoy paying if you mention all the product downsides that you notice 🙂 ).
If you find this site to be good and helpful,
and if $5 per month is what you can afford to set aside,
please consider supporting my work with a Patreon donation:
4. Adding Google Programmable search to a WordPress website
While we’re still in Google’s menu, we’ll go to the “Setup” option and write down (copy/paste) our Search engine ID:
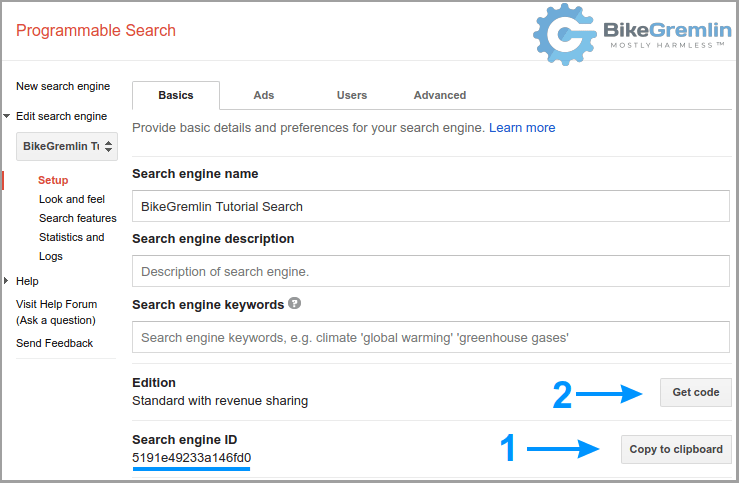
Picture 8
Now, to easily add our Google search to the website, we’ll use a plugin (in chapter 4.1, I’ll explain how to do it without a plugin).
Install the “WP Google Search” plugin (how to install a WordPress plugin).
Digression
If you go to its wordpress.org page, you’ll see a notice saying “This plugin hasn’t been tested with the latest 3 major releases of WordPress.”
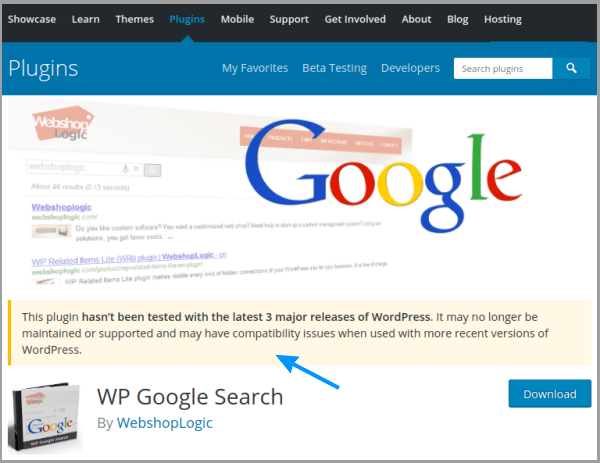
Picture 9
I wrote about this in my article on how to pick a good WordPress plugin. In spite of that, I can see that the plugin’s developers are very active on the WP Google Search support forum, solving all the issues (WebshopLogic company website, whose owners are the authors of this plugin). Also, the plugin works great for me, with the latest WordPress version (even with PHP 8.0).
Based on all that, my conclusion is that they made a good plugin that doesn’t need any “updates” or “upgrades” – it just works. 🙂
After we’ve installed the plugin, let’s configure it to use our Google search. This setup gave me the best results:
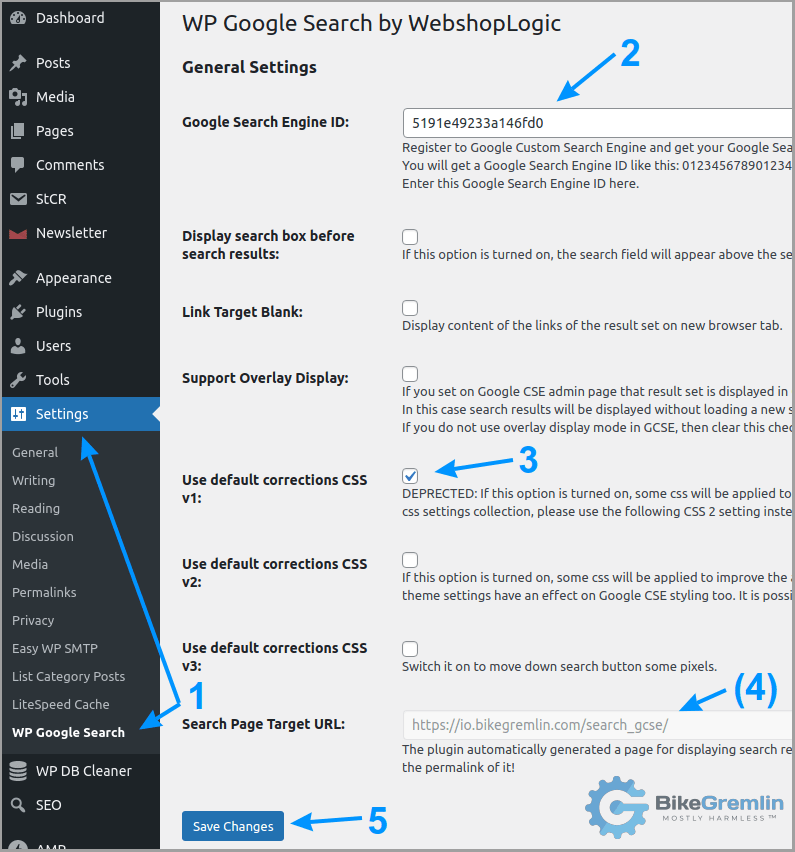
Picture 10
The plugin automatically creates the page io.bikegremlin.com/search_gcse/ – we mustn’t delete that page. But we should edit it. While you are logged in as a WordPress admin, go to yoursite.com/search_gcse/ and click on the “Edit Page” option (replace “yoursite.com” with your real website address, of course).
Configure everything as shown in the picture below, so Google doesn’t follow and try to follow and re-index your website search results – because those results are already from Google. 🙂
The picture shows the setup when using The SEO Framework SEO plugin. If you are using another plugin, I recommend you migrate to TSF.
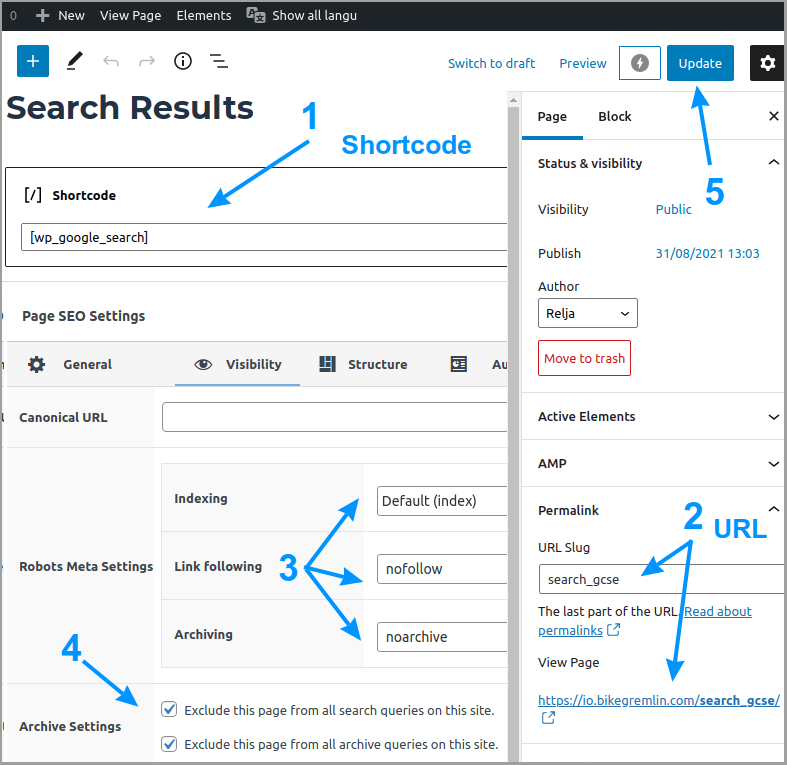
Picture 11
You can edit the title, add text or pictures, but it’s important for the page to contain the “[ wp_google_searchbox ]” Shortcode (without the spaces between the text and the brackets).
If you are using Cloudflare’s Rocket Loader optimization, search using this plugin. In order to make it work, create a Cloudflare Page rule like this:
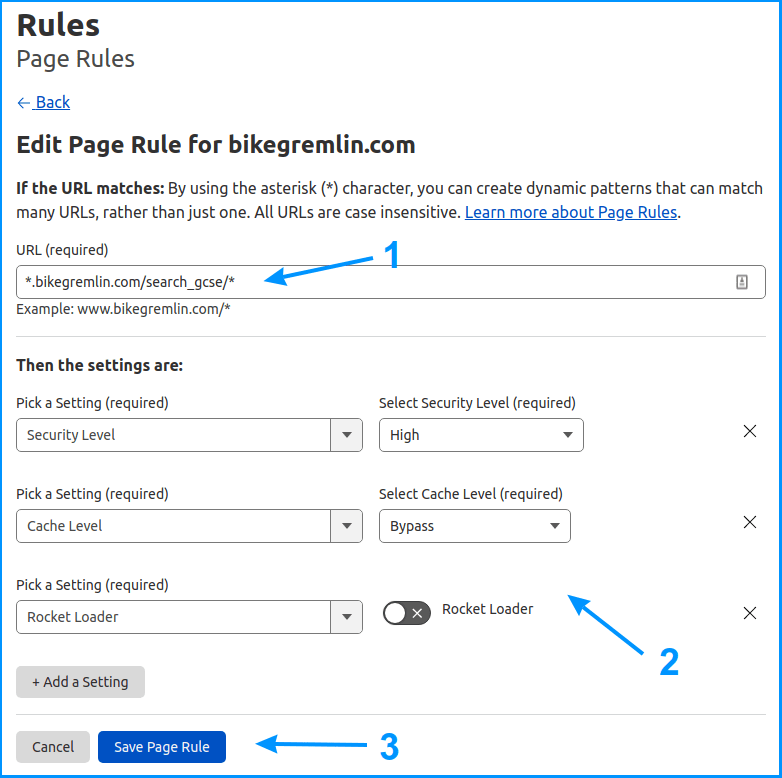
Picture 12
At least that’s how I got it to work. I’m not a programmer, and the plugin’s developers don’t want to bother with this (link to the plugin’s support forum).
4.1. Placing the search on the website
There are (at least) two ways to place the Google search on our website.
The first one is to place Google’s code (2 in picture 8) in a “Custom HTML” Gutenberg block. Here’s our code:
<script async src="https://cse.google.com/cse.js?cx=5191e49233a146fd0"></script>
<div class="gcse-search"></div>
And here is what it looks like when placed in a Custom HTML block on a page:
I couldn’t find an easy way to make it look nice. That’s why I installed the WP Google Search plugin (as explained in chapter 4).
That is the second way to add the Google search, by placing the plugin’s shortcode, which is: “[ wp_google_searchbox ]” (only without the spaces between the text and the brackets). Here’s what that looks like (with the search button styled to fit my design):
[wp_google_searchbox]
In the article about building this website, I’ve shown how the search button was added to the website’s header (top).
That article’s chapter about menu design, explains how you can add a picture to a menu, with a link pointing wherever you wish. So you can add a magnifying glass image and set it to link towards the page “yoursite.com/search_gcse/” like this:
Clicking on the icon leads you to the search page.
5. Conclusion
WordPress native search has its advantages – but so does Google’s search. That’s why I’ve decided to provide both on my websites.
Yes, there are plugins that improve WordPress’s native search. Relevanssi is among the better ones. But they come with some downsides:
- They put extra load on your server – solution provided here lets Google do all the heavy lifting.
- They aren’t as good as Google’s search – at least in my opinion and experience.
The main downside of my solution is that I’m using a plugin to make the search button look nice. I hope an experienced developer will provide some custom code that solves this without using a plugin (at least for the GeneratePress theme). 🙂


What a pain it was troubleshooting issues with this plugin and Cloudflare. Thanks for the Rocket Loader fix Relja!