In this article, I’ll answer the following questions: What is a Hetzner Storage Box? Is it a good choice for cloud FTP storage? How to configure and use it?
See here for configuring Rclone with Hetzner Storage box (it works wonderfully).
0. Note about Hetzner’s technical support
A fair disclaimer:
Hetzner’s service is very stable and it just works. However, technical support is slow to respond (talking a day or two, depending on the service) and not always very helpful.
- If you’re not sure how to use or set up something: you’re on your own.
- If something isn’t completely broken but just not working right: you’re on your own (I once had an FTP speed issue that “fixed itself” after nearly a year).
- If something actually breaks: I can’t say – the good thing is, nothing has broken for me yet over the years with Hetzner.
So, it’s not ideal, not for everyone.
1. What is a Hetzner Storage Box?
It’s a high-quality cloud storage, provided by the Hetzner company, enabling you to upload (save) and download files.
Hetzner is a German company known for providing reliable, yet affordable servers, VPS-s (see what a VPS is) and storage solutions.
In a separate article, I explained what cloud storage is, along with the pros and cons of various different cloud storage solutions. Here I’ll talk in detail about Hetzner’s Storage Box solution.
Is it any good?
For me, it’s been fast and reliable so far. No complaints. Backblaze B2 is a bit cheaper, but it doesn’t allow standard FTP (nor SFTP) access, and I sometimes need the FTP access.
2. Opening a Storage Box account
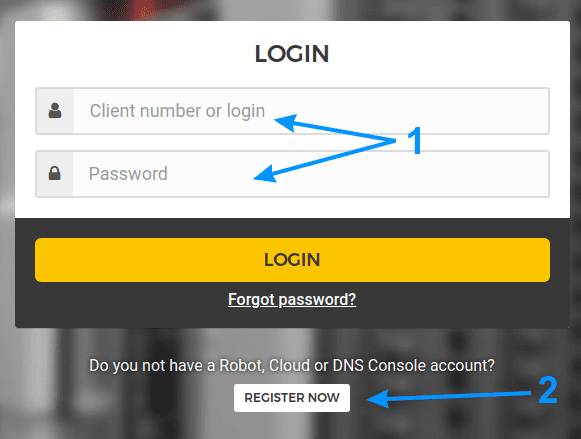
Go to Hetzner’s website, and follow the instructions shown in picture 1 below. If you use this Hetzner referral link, you might get some bonus credits (I’m not 100 % sure what services are granted with the extra credits).
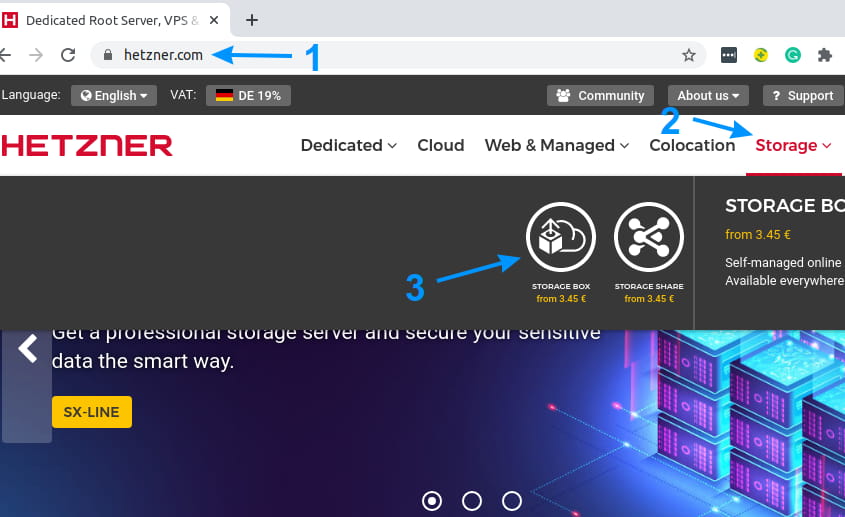
Picture 1
Then choose how much storage space you want:
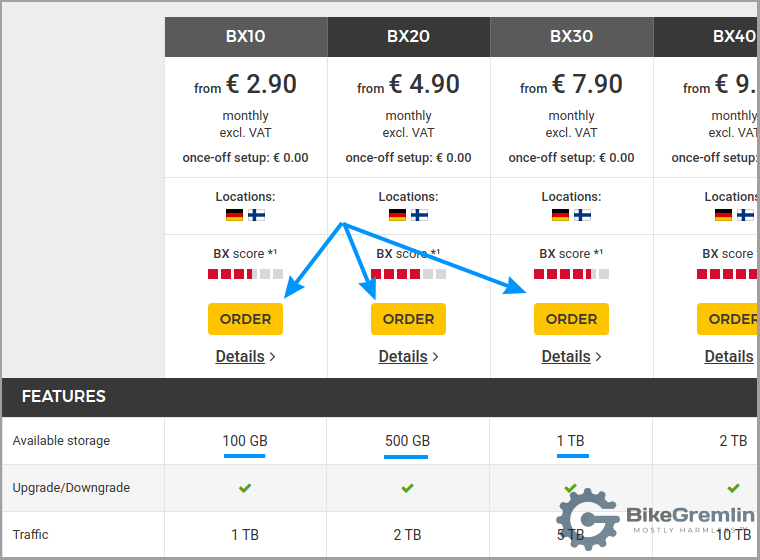
Picture 2
Next, choose the country where your storage server will be physically located:
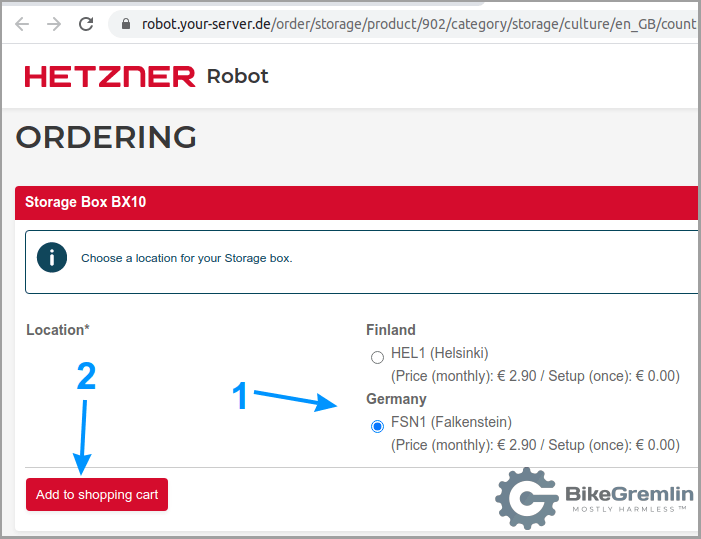
Picture 3
After that, you go to the “Checkout.” If you don’t already have a Hetzner account, you’ll need to register and open one. They might ask for your passport photo to confirm your identity and prevent abuse.
Picture 4
After you’ve sorted out your account and paid for the service, it will be deployed after a while (often, but not always, that’s done within hours).
I recommend you keep all the passwords in a KeePass file, that is backed up in several locations and protected with a strong password.
3. Configuring the account and FTP users
After a successful purchase, you’ll receive an email with a link for logging onto your service:
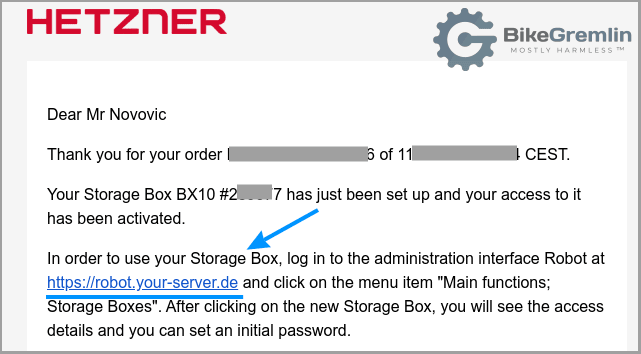
Picture 5
After logging in (with your username and password), you’ll see a list of your Hetzner services:
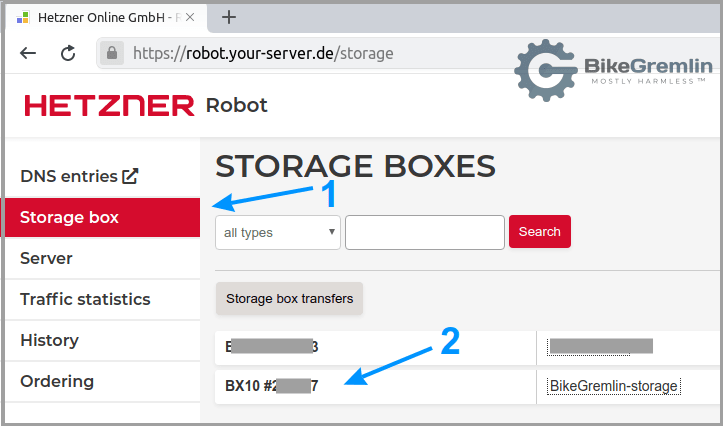
Picture 6
Now is the time to set an FTP login password by clicking on “Reset password” and copy/paste all the important data to a KeePass file:
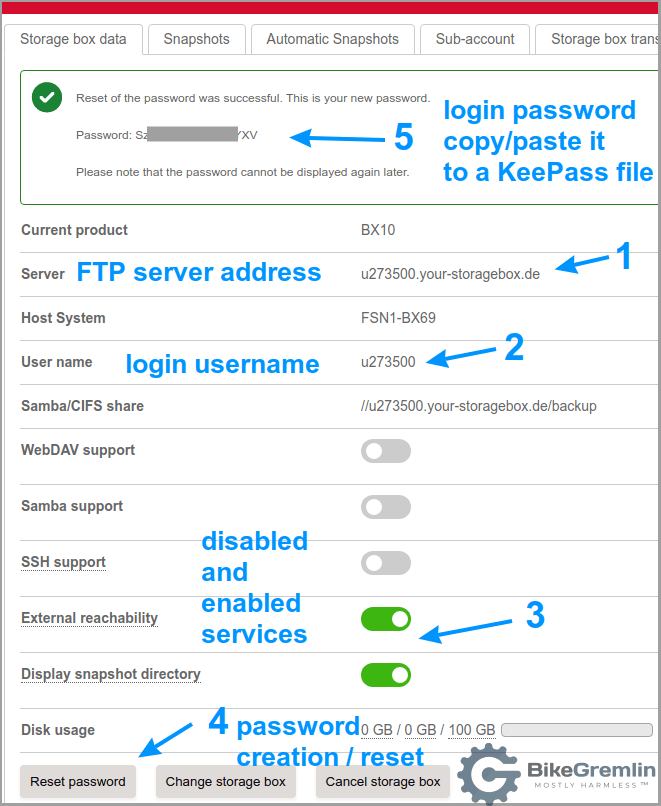
Picture 7
Note: username and FTP server address should be kept secret along with your password(s).
Here they are displayed for educational purposes and the server will be shut down after this article is finished.
4. FTP client configuration
One of the simplest ways to download and upload files to Hetzner Storage Box is using an FTP client.
The first thing to do is to download and install an FTP client. I won’t be covering that in this article, since I think it’s a relatively straightforward process (if you’ve ever installed any program on your computer, you’ll know what to do).
As an example, I’ll be using the free open-source FileZilla FTP client (link to their download page), but the principle is the same for whichever FTP client software you decide to use. Let us begin.
Start FileZilla, click on the “File” menu, then click on “Site Manager…” (or just press CTRL+S), and choose the “New site” button.
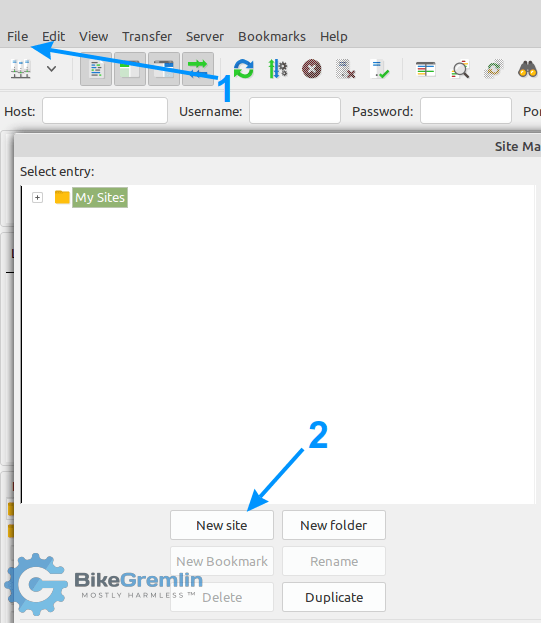
Picture 8
Now you’ll get to enter all the needed data – here’s what it looks like for our example:
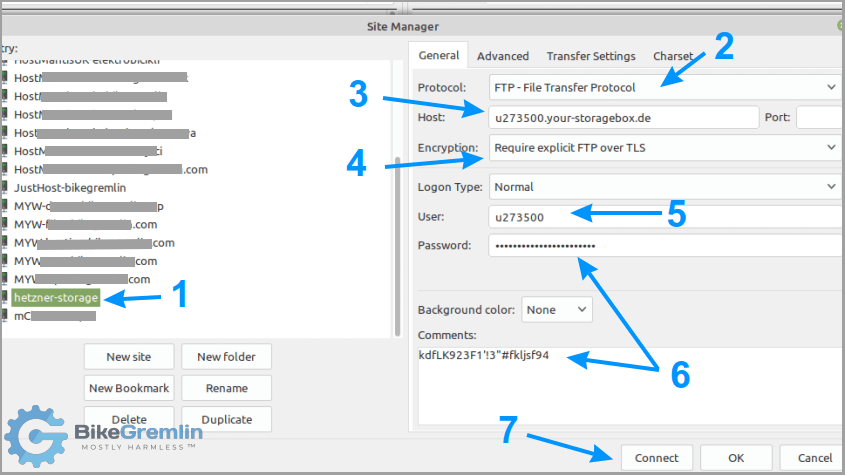
Password in the picture is not “real” – it’s only used to demonstrate what it looks like
Picture 9
To explain picture 9: you can name the storage as you like (1), choose the protocol (2 – Hetzner Box can also work with SSH, i.e. SFTP), enter your Box server address (3), choose the encryption type (4 – available options depend on the chosen protocol), enter your Storage Box user name (5), and password (6), then click the “Connect” button (7) to confirm it works.
When I copy-paste a password from a KeePass file, I first paste it into the “Comments” field, to be 100% certain that I hadn’t copied any line/page breaks (enter) at the end of the password. This can happen sometimes, so the connection won’t work (wrong password). So I first copy to the Comments, and only then copy-paste to the “Password” field. Making sure to delete the password from the Comments field after I’m done.
It is safest not to save passwords in the FTP client. It may be more convenient, but it’s safer to always copy them from the encrypted KeePass file. FileZilla is an exception to this, see the next chapter:
4.1. Saving encrypted passwords in FileZilla FTP client
Since version 3.26, FileZilla offers decent AES 256 password encryption. So you just need to memorize one strong password for FileZilla. 🙂
Here’s how that’s configured:
Click on “Edit” in the main menu, then choose the “Settings…” option.
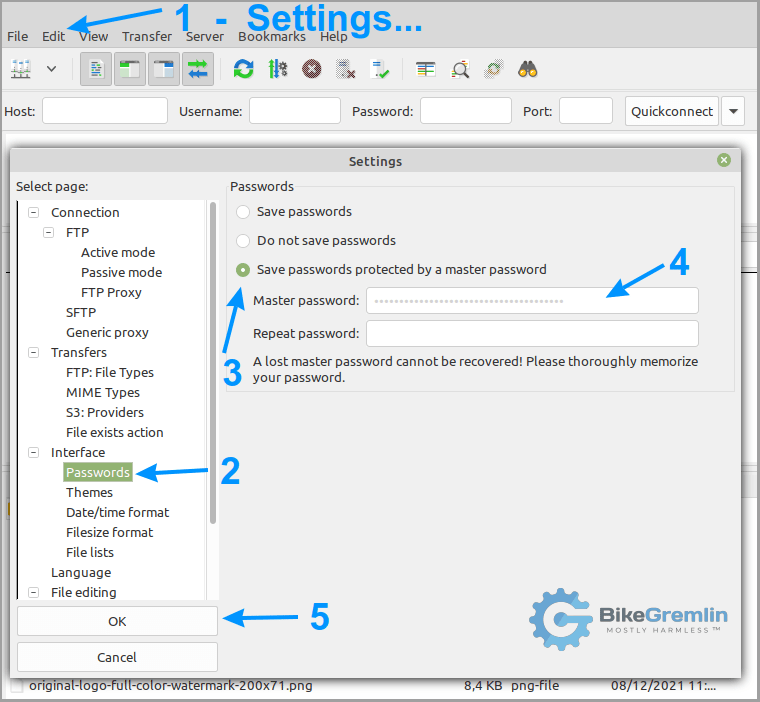
Picture 10
Now, when you try to connect to an FTP server, FileZilla will ask for the Master password you had defined. You can click on a checkbox to prevent it from bothering you again until you close FileZilla.
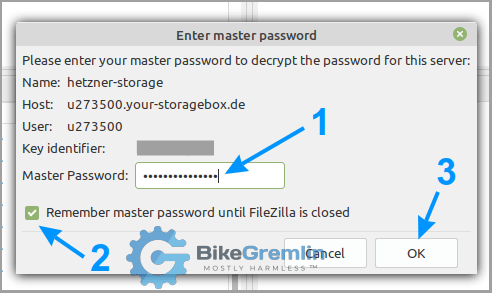
Picture 11
5. Working with Hetzner Storage Box using an FTP client
If you’ve configured it all properly as explained in the previous chapters, there should be no problems connecting to your Hetzner Storage Box using an FTP client.
You just click on the arrow in the top-left corner to get a drop-down list of all the connections you’ve created, then click on the connection you want.
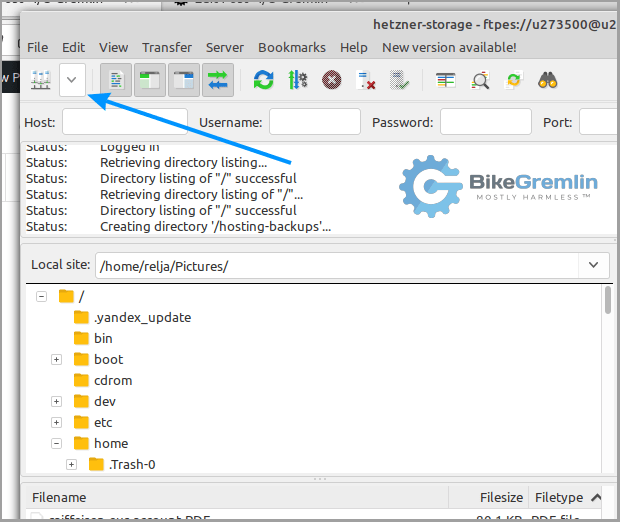
Picture 12
After you’ve connected, the user interface is very intuitive, easy to understand. On the left-hand side there’s a list of your local computer files, and on the right-hand side is the list of the remote storage files and directories.
The right mouse button opens a context menu so you can choose what to do – upload, download, rename, delete, etc.
To create a new directory on your Box, you just right-click in the empty space of the storage directory listing and choose the “Create directory” option.

Picture 13
The example in the picture shows a directory called “hosting-backups” that I had created previously, and a hidden directory “.zfs” that contains Storage Box “Snapshots” – more on that in chapter 7.
You can use the classic “drag & drop” to copy or move files and directories. You can drag an entire directory on the remote server to another location on that server, and FileZilla will smartly do the “move” command, finishing the job in a second, instead of downloading it all to your computer, then re-uploading it to a new location on the remote server.
6. Creating additional FTP user accounts
A classic scenario:
I want to make automated backups from my hosting server to my Hetzner Storage Box. But, in case my server gets hacked, I want all the files and previously uploaded backups on my Box to be secure. How do I do that?
- First I create a directory for storing the automated backups on my Box, like “hosting-backups.”
- Then I create a directory where I will move all the fresh backups to. Let’s name it “stored-backups.”
- Finally, I create a Storage Box user account that has access only to the “hosting-backups” directory (and all its sub-directories, of course). I will then use this account on my hosting server to “push” all the backups to my Storage Box.
To create a new FTP account, I’m logging into Hetzner’s robot console (see chapter 3). Then I select the storage I wish to “play” with, and do as shown in picture 14:
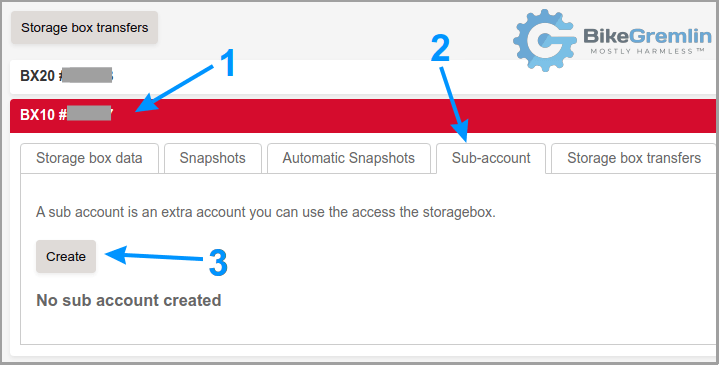
Picture 14
Now picture 15 says it all – I’ve defined to which directory I wish to limit the newly created account, along with the other relevant options:
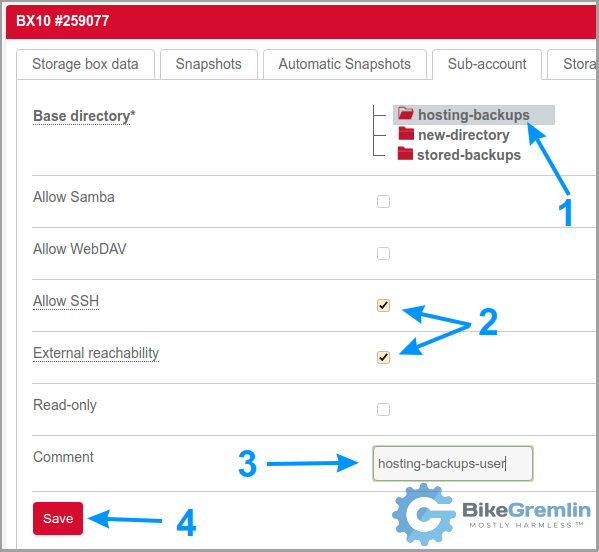
Picture 15
Now it’s important to copy/paste the username and password of the newly created user into the encrypted KeePass file.
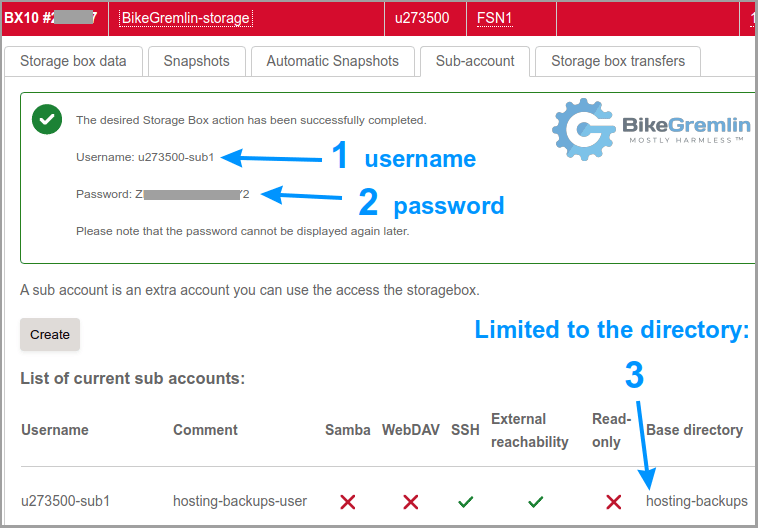
Picture 16
You can create several different sub-accounts using this method.
7. Snapshots
Hetzner Storage Box allows you to create “Snapshots.” Snapshots are basically copies of the entire contents of your Box. They can later be used to revert all the files and directories to the state they were in at the time a snapshot was created (in case you delete, or alter something by mistake).
You can create more than one snapshot. They can be created either manually, or automatically, at a time you schedule.
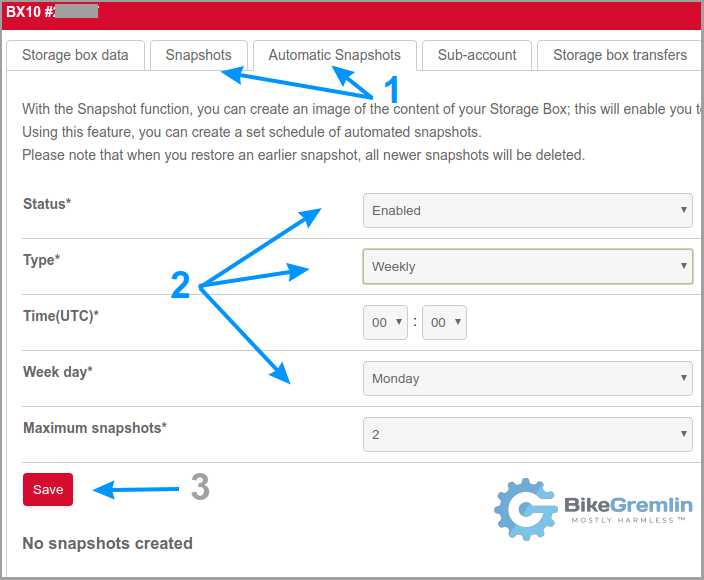
Picture 17
Important notes:
- Say you have three snapshots: A, B, and C, created in that order. If you choose to restore the snapshot B, then all the snapshots created after it (C in this case) will be deleted. Your Box will be resotred to the state it was in when snapshot B was created. Snapshot A will still be kept (because it was created before B).
- Snapshots take storage space of your Box, just like any other files.
- Snapshots are not backups – if your Box storage server goes completely bust, so will the snapshots.
8. Reliability and speed
Hetzner swears that their Storage Boxes use RAID storage, configured so that data can survive even several storage disks failures. I haven’t had any problems so far.
However, RAID is not backup. If you have any important data, make sure they are copied to at least two different locations. For more details: how to create and store backups.
I regularly get calls: “ooooh, all my data is gone!” It happens. Don’t think it won’t happen to you.
When it comes to speed, I haven’t used any precise measuring methods. Only subjective – it seems nice and fast. Don’t take my word for it, measure and let me (let us all) know the results in the comment section, it’s appreciated.
Update 2022: really high-speed Internet finally came to my house, so I was able to test properly. 🙂
- Downloading several large .zip files using FileZilla with a total speed of about 4 MB/s, i.e. 32 Mb/s.
- Upload speeds are limited by my ISP upload speed of about 8 MB/s, i.e. 64 Mb/s.
I’m happy for being able to quickly upload files to Hetzner Storage Box, especially when doing it directly from a hosting server (I couldn’t make any exact measurements, but the upload speed seems to be a lot faster than the above-mentioned 64 Mb/s).
However, I’d like to see a bit faster download speeds. At least three times faster.
9. Conclusion
Hetzner Storage Box has served me well for backups and file storage. Yes, Backblaze B2 is noticeably cheaper (and you pay only for the storage your files actually use). Still, there are use-cases when you need FTP or SFTP access. For that, Storage Box is the best option in my opinion.
If you decide to give it a try, you can use my Hetzner referral link and support this website.
10. Apendix – SFTP, SSH, SCP connections
You can ignore this if you are happy using FTP. If you want a bit more data security using SFTP, you need to create a pair of SSH keys.
In a separate article, I explained what is asymmetric encryption with public and private keys.
You can generate a pair of keys, using “ssh-keygen” Linux command, or Putty with Windows. Default filenames are “id_rsa” for the private, and “id_rsa.pub” for the public key. I recommend making a key with a password. I recommend you create the keys using a password (that you will copy/paste from a KeePass file).
Then convert the key to a format accepted by Hetzner, using the command: “ssh-keygen -e -f ~/.ssh/id_rsa.pub”. So that’s:
ssh-keygen
ssh-keygen -e -f ~/.ssh/id_rsa.pubCode language: JavaScript (javascript)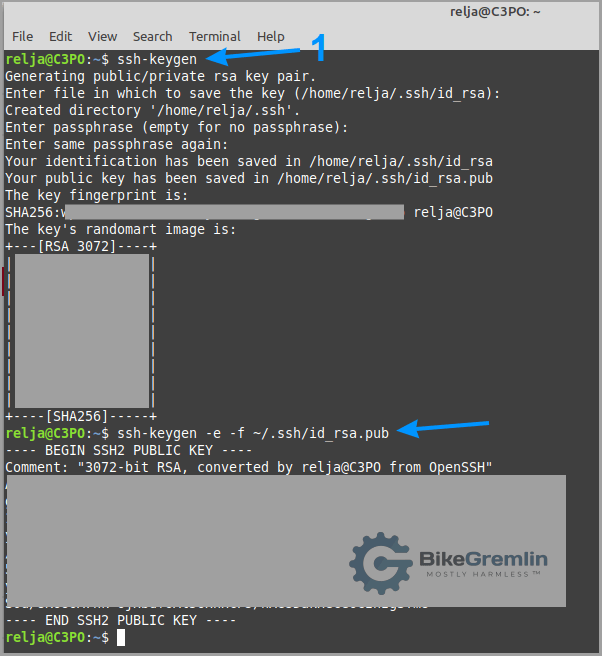
Picture 18
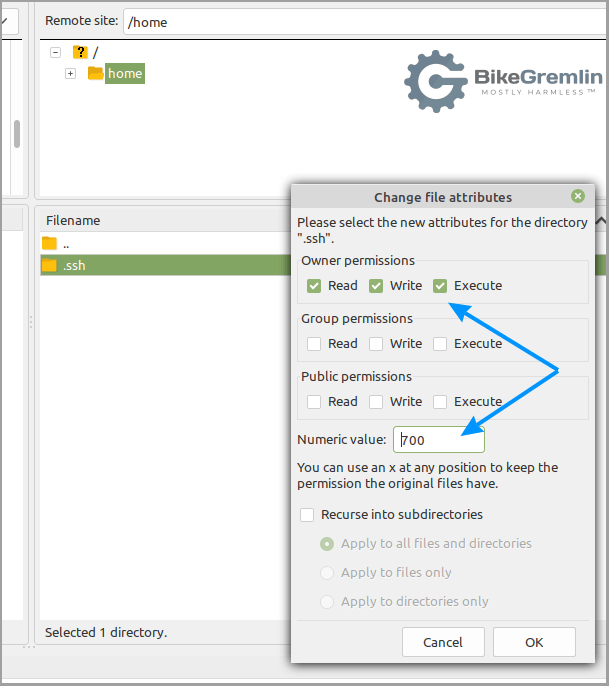
Now use your FTP client to connect to the Hetzner Storage Box and create a directory named “.ssh”. Set its access permissions to “rwx — —” or “700” if you prefer numerics.
Take the public key you had created (“id_rsa.pub”) and copy it to the .ssh directory, renaming it to “authorized_keys”. Set the key file’s permissions to “rw- — —” or “600”.
Picture 19
If you are using an FTP sub-account, the .ssh directory should be created in that account’s root directory.
To use the key with FileZilla, you must convert it to Putty format .ppk, using this command:
puttygen your_key_file -o output_filename.ppk

- in this case that is:

puttygen id_rsa -o id_rsa.ppkCode language: JavaScript (javascript)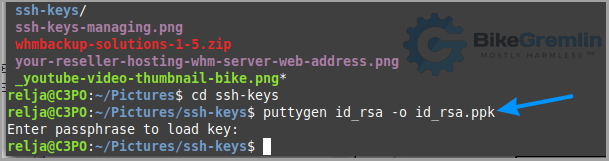
Picture 20
Now FileZilla can be used with a more secure SFTP connection to Hetzner’s Storage Box:
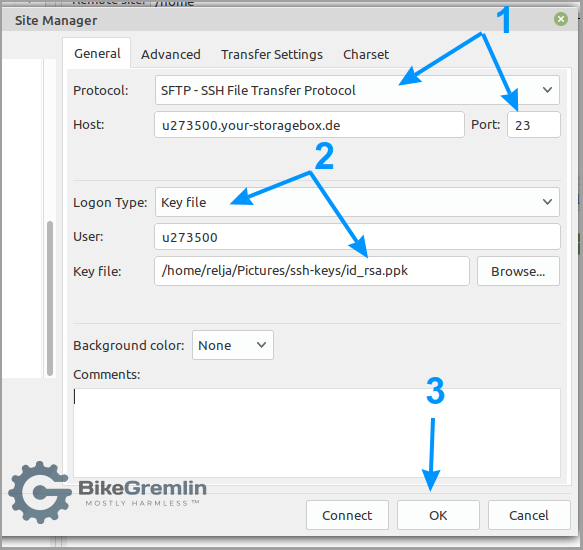
Picture 21
Make sure to enter the correct user name under “User:” if you are making a connection for a sub-account.
If you’ve created the keys as instructed in this tutorial, since you aren’t a recognized certificate authority, you will be asked whether you trust those certificates:
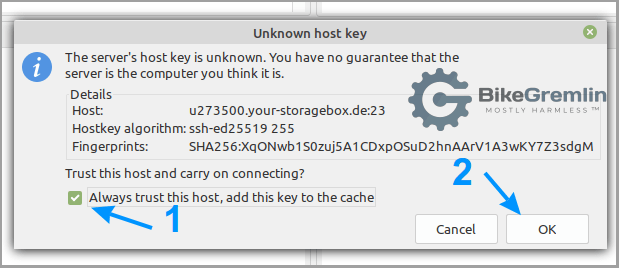
Picture 22
After that – you’re in! 🙂
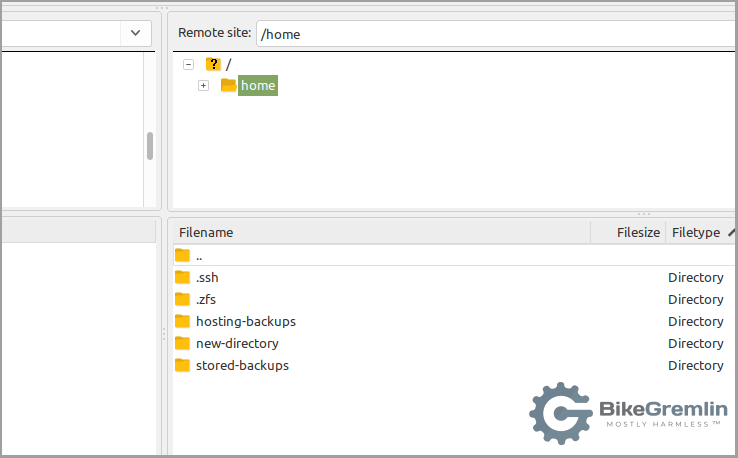
Picture 23
To summarize it:
- Create a pair of public and priate SSH keys, as well as a PPK version of the private key.
- Create a directory named “.ssh” (mind the starting dot), or in the main directory of a sub-account if you intend to use the key with a sub-account.
- Set its permissions to “700”.
- Upload your public key (“id_rsa.pub” in this example) to the “.ssh” directory.
- Rename it to “authorized_keys”.
- Set its permissions to “600”.
- Use the .ppk key (“id_rsa.ppk” in this example) with FileZilla, as shown in picture 21.
10.1. Using cPanel to create SSH keys
You can easily generate SSH keys using a web hosting cPanel account (if the provider allows SSH access, otherwise the option will be missing, even though you won’t be using it to access the provider’s server).
Start by finding the “SSH Access” option in cPanel, click on it and then click on “Manage SSH Keys.”
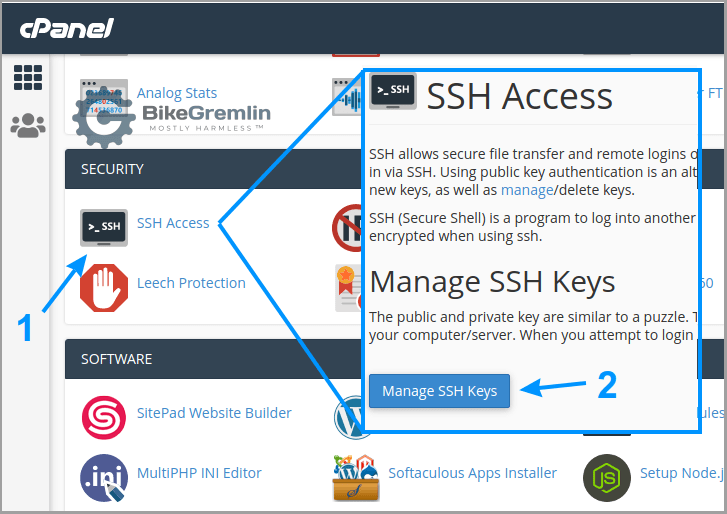
Picture 24
Now you can create your key, with a strong password.
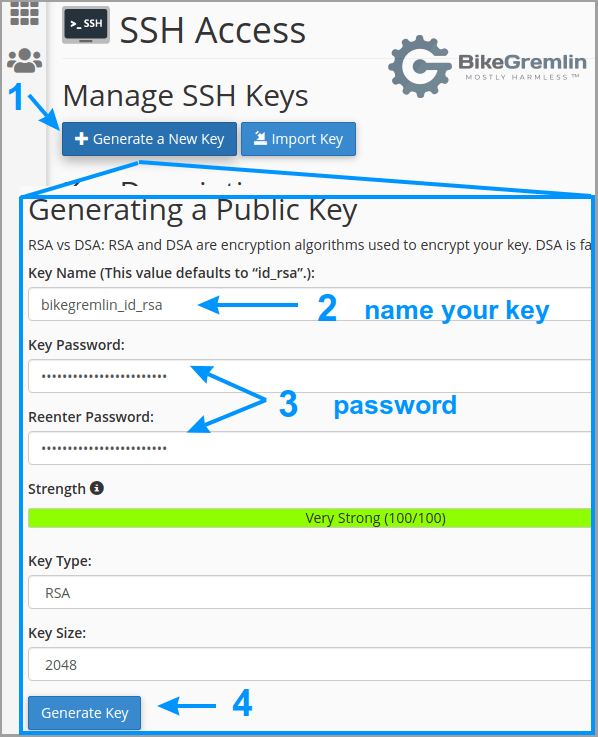
Picture 25
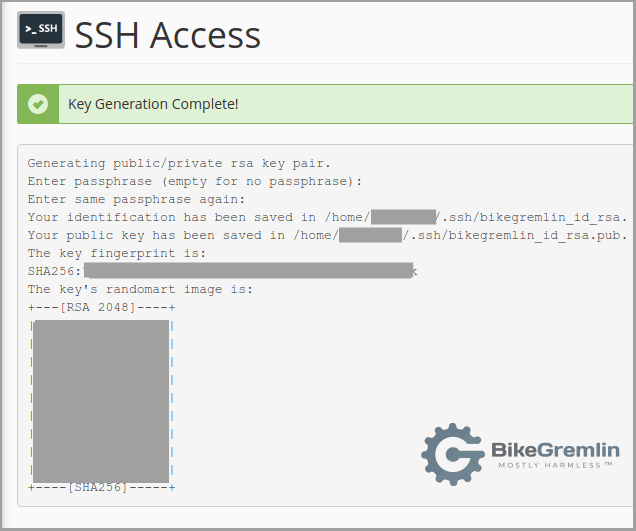
Picture 26
Now you can download the keys from the SSH menu.
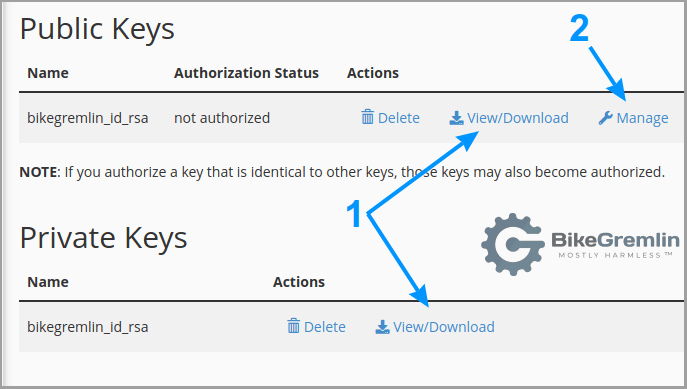
Picture 27
If you wish to use the SSH key to access your hosting server, choose the “Manage” option – (2) in picture 27 – then click on “authorize.”
When you click on the “View/Download” option for the private key, download it
Only then create its .ppk version as shown in picture 28 below. Download it after having converted it (2 in picture 28). You’ll need it for use with the FileZilla FTP client.
The text in picture 28 can be confusing – it doesn’t relate to the previous, bolded, paragraph.
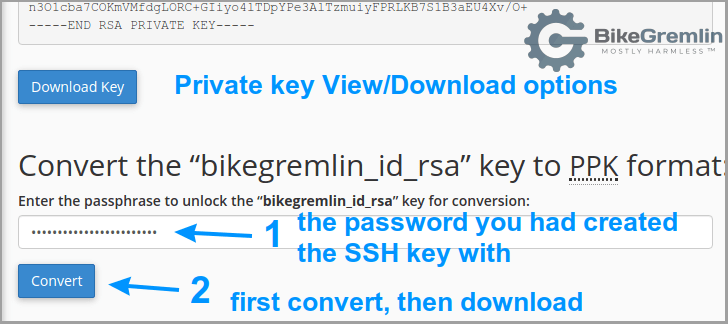
Picture 28
After this, the principle is the same as explained for the “manual” key creation (chapter 10):
- Create a directory named “.ssh” (mind the starting dot), or in the main directory of a sub-account if you intend to use the key with a sub-account.
- Set its permissions to “700”.
- Upload your public key (“bikegremlin_id_rsa.pub” in this example) to the “.ssh” directory.
- Rename it to “authorized_keys”.
- Set its permissions to “600”.
- Use the .ppk key (“bikegremlin_id_rsa.ppk” in this example) with FileZilla, as shown in picture 21.
Last updated:
Originally published: