From my experience, LiteSpeed gives the best results when it comes to caching (and speed in general) of WordPress websites. Separate articles explain website caching in general, and WordPress caching in particular. In this article, I’ll explain the installation and configuring of the LiteSpeed Cache plugin.
To be taken as – what’s worked for me so far, nothing more, nothing less.
If you don’t wish to bother configuring it all manually, you can just download and import my settings (chapter 3.8.2.).
Table Of Contents (T.O.C.):
- What is WordPress website caching?
- What is LiteSpeed Cache?
- Configuring LiteSpeed Cache plugin
3.1. General options
3.2. Cache options
3.3. CDN options
3.4. Image Optimization options
3.5. Page Optimization options
3.6. Database options
3.7. Crawler options
3.8. Toolbox options - Testing the configuration
- Conclusion
1. What is WordPress website caching?
This article you’re reading now does not exist on the server as such. All this text is kept in the database, while all the images are placed in a directory on the server ( “wp-content/uploads/2021/10/picture-123.jpg” ).
In order to show this article, the server needs to run PHP, which reads the MySQL database, and based on that info it creates the page just as I had designed it, placing text and images right where they should be.
Out of the box, WordPress does this for every visit of every page. This puts a lot of load on the server and hampers performance, especially if there are many visitors.
Caching is basically a way of pre-creating a page so that the pre-created version sits ready to be served to any visitors. I.e. in that case the server really creates a “litespeed-wordpress-cache-configuration.html” file (or something very similar to that) and serves you that when you come here and “open” this article.
This can go one step further, instructing visitors’ browsers to store local copies (on the visitors’ computers) of images and other “heavy” files that take long to download, which increases page-load speed for returning visitors.
What if I fix a “bed spilling” mistake, add a paragraph, or someone posts a comment at the bottom of the page? Then, the cached page version needs to be re-created to show the updated page version. This is called “cache invalidation” or “cache flush.” Simply put, that is the server telling all the returning visitors: “hey, you should load an updated version, the page has changed” (any new visitors will only get the latest version, they don’t have the old version previously cached in their browser).
A good WordPress caching plugin takes care of all this automatically. Create cached versions, flush cache when changes are made, only for pages that are changed (if you flush all the cache, it puts a load on the server to re-create it for all the pages).
If you’d like to learn more, see my article explaining caching, minimization and compression.
2. What is LiteSpeed Cache?
LiteSpeed Cache (wp.org link) is probably the best WordPress caching plugin.
In order to do its job, it requires your hosting server to be LiteSpeed. Many hosting providers offer this, but not all. If your server isn’t LiteSpeed, and you don’t want to change your hosting provider, alternative plugins are described in the article Caching a WordPress website.
3. Configuring LiteSpeed Cache plugin
LiteSpeed Cache works great out of the box, but its performance can be further improved by some tweaking. 🙂 First, you need to install it – and that procedure is the same as for any other plugin (how to install a WordPress plugin).
Those who aren’t interested in reading all this can just download the settings from chapter 3.8.2.
LiteSpeed Cache plugin has 8 options in its main menu:
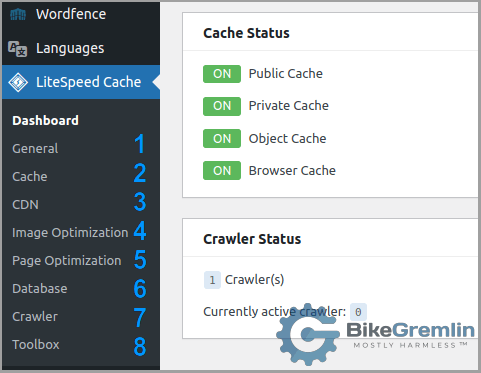
Picture 1
Every main menu option has two to nine sub-menus:
![Menu option "General" has two sub-menus - "[1] General Settings," and "[2] Tuning"](https://io.bikegremlin.com/wp-content/uploads/2021/10/litespeed-cache-submenu.png)
Picture 2
It’s all nicely, logically structured. I will now go through all the main menu options (from top to bottom), each its sub-menu (from left to right), and explain every option (from top to bottom).
I’ll note the option’s name, recommended setting, and a brief comment when needed.
Some options don’t do anything unless an option above them has been enabled. Still, to keep this tutorial simple, when I disable such a pre-requisite option, I’ll set its sub-options to OFF. I know that it doesn’t matter how they are configured without enabling their “parent” option.
Before we begin – these are the settings that have worked fine for me, on large WordPress with an AMP version added, and smaller WooCommerce websites. For larger WooCommerce websites, it’s worth diving into the ESI options, and figuring out which things need to be set as “private” cache.
Save changes (after configuring each settings page), and test thoroughly.
3.1. General options
[1] General Settings
- Automatically Upgrade – OFF (always test updates in a staging environment first.
An example of a LiteSpeed update that caused a problem, then fixed it with the next update. Took me hours to figure it out.Fortunatelythanks to my update policy, it was not on a production website. - Domain Key – not using this, I opzimize images before uploading them, and use Cloudflare as a CDN.
- Guest Mode – OFF
- Guest Optimization – OFF
- Server IP – Enter the IP address of your hosting server.
- Notifications – OFF
[2] Tuning
- Guest Mode User Agents:
Lighthouse
GTmetrix
Google
Pingdom
bot
PTST
HeadlessChrome- Guest Mode IPs – leave the default values.
3.2. Cache options
[1] Cache
- Enable Cache – ON
- Cache Logged-in Users – ON
- Cache Commenters – ON
- Cache REST API – ON
- Cache Login Page – ON
- Cache favicon.ico – ON
- Cache PHP Resources – ON
- Cache Mobile – OFF
The other options can be skipped (cleared), until Drop Query String, which should list:
fbclid
gclid
utm*
_ga
[2] TTL
- Default Public Cache TTL – 6048000 (10 weeks)
- Default Private Cache TTL – 3600
- Default Front Page TTL – 604800 (1 week)
- Default Feed TTL – 604800
- Default REST TTL – 604800
- Default HTTP Status Code Page TTL (the defaults are fine):
403 3600
404 3600
500 3600
[3] Purge
- Purge All On Upgrade – ON
- Auto Purge Rules For Publish/Update – don’t check anything, or updatding published pages will put a lot of load on the server. If there are any problems, it’s better to just clear all cache once updates are finished (though that’s rarely required in my experience), by going to the “Toolbox” menu and choosing the “Purge All” option. If you really insist, you can check “Front Page” and “Home Page.”
- Serve Stale – OFF
Skip the other options (leave the fields blank) and leave the Purge All Hooks with the default values:
switch_theme
wp_create_nav_menu
wp_update_nav_menu
wp_delete_nav_menu
create_term
edit_terms
delete_term
add_link
edit_link
delete_link
[4] Excludes
- Do Not Cache URIs – I added my website search pages here:
/search_gcse/
/?q
/?s- Do Not Cache Query Strings – here I entered my Google AdSense publisher ID number. The server shouldn’t even be attempting to cache the adverts – they are dynamically generated for each visitor.
All the other options are left blank / un-checked.
[5] ESI
- Enable ESI – OFF
This makes all the other options below effectively disabled, no matter how you configure them.
ESI (Edge Side Includes) basically enables you to not delete more cached content than is needed, but without the risk of serving one buyer’s account page, or cart page, to another buyer (simply put, if all is configured properly).
For large WooCommerce websites, this is worth turning the ESI on, then very carefully, with a lot of testing, configure the ESI Nonces options. For example, on my webshop that uses a PayPal plugin for processing payments, it is worth adding this line (among many others):
“woocommerce_ppec_payer_id_live_* private”
Here I’m using an asterisk as a joker, to set all that begins with the above-noted structure as “privately” cached – for each visitor separately.
LiteSpeed’s knowledge base is phenomenal, and ESI is nicely explained there.
[6] Object
- Object Cache – ON
- Method – Memcached, or Redis
- Host – localhost
- Port – 11211 (Memcached), or 6379 (Redis) – check with your provider if they use some other ports.
- Default Object Lifetime – 360
Confirm that Memcached or Redis object cache is working properly:
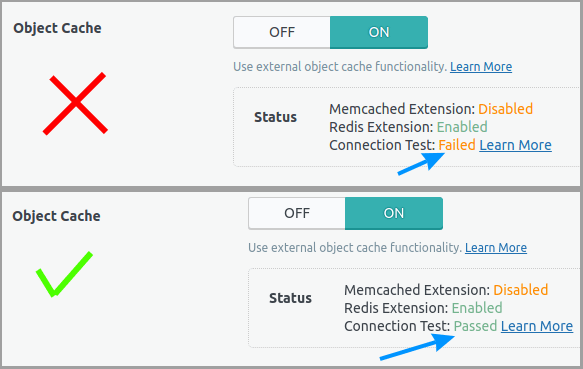
Picture 3
Note:
In shared and/or reseller hosting environments, Redis is not safe to use unless the hosting provider makes every user’s Redis instance be separate and isolated. Most providers don’t do this. For more details, see:
The following options can be left blank, while Global Groups and Do Not Cache Groups are properly automatically filled by LiteSpeed (at least in my experience). But we should enable the final 3 options:
- Persistent Connection – ON
- Cache WP-Admin – ON
- Store Transients – ON (this option makes no difference when Cache WP-Admin is enabled).
[7] Browser
- Browser Cache – ON
- Browser Cache TTL – 6048000
[8] Advanced
All blank, all OFF.
[9] WooCommerce
- Use ESI for Cart – if you’ve enabled and configured ESI, then it makes sense to turn this ON. Otherwise, it has no effect.
- Product Update Interval – Purge product on changes to the quantity or stock status. Purge categories only when stock status changes.
- Use Front Page TTL for the Shop Page – ON
- Privately Cache Cart – ON
3.3. CDN options
[1] CDN Settings
All set to OFF. I manually configure Cloudflare and don’t use the QUIC.cloud CDN – with all the pros and cons of that choice. When thousands of daily visits become hundreds of thousands, I’ll probably configure a CDN on a subdomain, or use a Cloudflare paid option, in order to reduce server load. For now, it would just be a needless complication – the free Cloudflare tier automatically serves most images from its edge cache servers.
Having said that, it’s still a good idea to configure the “Cloudflare API” – its settings at the bottom of the CDN Settings page. Here’s how to do it:
- Cloudflare API – ON
- Global API Key / API Token – when logged in your Cloudflare account, go to this address:
https://dash.cloudflare.com/profile/api-tokens
There, under “API Keys,” click on the “View” button next to “Global API Key,” and copy/paste it to LiteSpeed. - Email Address – the email used for logging into your Cloudflare account.
- Domain – the domain you are configuring this for (enter the main, root domain, even if you are configuring this for a website on its subdomain).
[2] Manage
As explained above, nothing to configure here.
3.4. Image Optimization options
[1] Image Optimization Summary
If you’ve connected your site with the QUIC.cloud service, here you get to “manually” start the image optimization process by clicking on the Gather Image Data button. At the bottom, there is a small button “Remove Original Image Backups” that deletes the unoptimized image versions, after they’ve been optimized, and saves the storage space. This will make more sense after we explain the following sub-menu options:
[2] Image Optimization Settings
I have all the options here set to OFF. But I will provide the setup that’s worked fine for me, for those who wish to let LiteSpeed auto-optimize their images. LiteSpeed does this wonderfully, replacing all the other image optimization plugins (Smush, EWWW Image Optimizer and similar).
- Auto Request Cron – ON
- Auto Pull Cron – ON
- Optimize Original Images – ON
- Remove Original Backups – ON (keep this OFF if you wish to first check if you’re happy with how the optimized images look – in my experience, LiteSpeed does a top-class job)
- Optimize Losslessly – OFF
- Preserve EXIF/XMP data – OFF
- Create WebP Versions – OFF. Keeping this off until most browsers are compatible with WebP format. The same goes for all the other WebP-related options below. If you decide to use WebP, set them all to ON.
- Image WebP Replacement – OFF
- WebP Attribute To Replace – LiteSpeed fills this in nicely, by default
- WebP For Extra srcset – OFF
- WordPress Image Quality Control – 85. That is a good compression, while keeping a decent image quality. If you want even lower image file/download sizes, with an OK quality, set it to 80. With that in mind: 75 is the minimum below which images look ugly, while it makes no sense going over 90, because you only get huge file sizes, without any noticeable image quality gains.
3.5. Page Optimization options
These options can provide speed boosts. But be careful – they can also hamper the website’s proper functioning, depending on the theme and plugins you are using.
The setup I’ll recommend below doesn’t offer the fastest possible performance (though it’s still quite good), but has worked well with every theme, page-builder and plugin combo that I’ve tested it with. So I think it’s a great starting point for most websites. Then you can try enabling some more options and see how it fares. Enable one option at a time, then test. Test very patiently and thoroughly.
[1] CSS Settings
- CSS Minify – ON
- CSS Combine – OFF. Explanation why CSS Combine is no longer a good idea (WebSpeedTools link).
- Generate UCSS – OFF. Enable this if you are using the QUIC.cloud.
- UCSS Inline – OFF
- CSS Combine External and Inline – OFF
CSS HTTP/2 Push – ON– option removed since LiteSpeed Cache 4.3.3 update.- Load CSS Asynchronously – OFF
- CCSS Per URL – OFF. Set this to ON if using a page builder and start having problems with page display/look.
- Inline CSS Async Lib – ON
- Font Display Optimization – Swap
[2] JS Settings
- JS Minify – ON
- JS Combine – OFF
- JS Combine External and Inline – OFF
JS HTTP/2 Push – ON– option removed since LiteSpeed Cache 4.3.3 update.- Load JS Deferred – OFF
[3] HTML Settings
- HTML Minify – ON
- DNS Prefetch – leaving this empty
- DNS Prefetch Control – OFF
- HTML Lazy Load Selectors – leaving it empty
- Remove Query Strings – OFF
- Load Google Fonts Asynchronously – OFF (to avoid CLS penalties on mobile)
- Remove Google Fonts – OFF
- Remove WordPress Emoji – OFF
- Remove Noscript Tags – OFF
[4] Media Settings
- Lazy Load Images – OFF. When a page is loaded, I want it to be loaded. I hate it when I quickly scroll to an article section, to see that the browser is only then “deciding” to start loading the images there. This set to OFF does give lower page-speed test results, but I think it is better for the website visitors.
- Basic Image Placeholder – leaving this empty.
- Responsive Placeholder – ON. If the Lazy Load Images is set to OFF, this option does nothing.
- Responsive Placeholder SVG – the same goes as for the option above. The default entry is OK.
- Responsive Placeholder Color – #cfd4db. Or pick a colour you like.
- LQIP Cloud Generator – OFF. Requires QUIC.cloud. If you’re saving the bandwidth, then save it. Let a blank placeholder be placed until the image is loaded.
- LQIP Quality – Does nothing if the LQIP Cloud Generator is set to OFF. Otherwise, the default value of 4 is fine.
- LQIP Minimum Dimensions – the same goes as for the option above.
- Generate LQIP In Background – OFF. Set it to ON, if LQIP Cloud Generator and Lazy Load Images are enabled.
- Lazy Load Iframes – OFF
- Add Missing Sizes – OFF
- Inline Lazy Load Images Library – ON
[5] Media Excludes
These options are set to empty or with the default settings (for those that have a default setting).
For those chasing 100% page-speed scores, or have millions of visitors:
When you enable most (or all) of the optimizations from the previous sections of the Page Optimizations options, your website will most likely not work properly. However, here you can “manually” disable the optimizations for particular things only. With enough patience and testing to figure out what needs to be excluded from the optimizations, your website will work fine, while being as fast as possible.
This is not a replacement for choosing a high-quality WordPress theme and plugins (and having as few plugins as possible – no, you don’t need a plugin to connect Google Analytics to a WordPress website).
An exception is the option: Lazy Load Image Class Name Excludes. There, I added my cover (“featured”) image CSS class, in order to get better LCP speed results:
wmu-preview-img
featured-image
[6] Localization
- Gravatar Cache – ON
- Gravatar Cache Cron – OFF
- Gravatar Cache TTL – 6048000 (10 weeks)
- Localize Resources – OFF
[7] Tuning
Generally, for these options, the same goes as for the Media Excludes options. However, there are a few things that I think should be configured, so I’ll note them:
- Optimize for Guests Only – ON
- Role Excludes – I’ve de-checked all here. That way, I can more easily notice if there are any problems with the website’s caching and optimization policies.
3.6. Database options
[1] Manage
After any major edits, it’s worth coming here and clicking on the Clean All button.
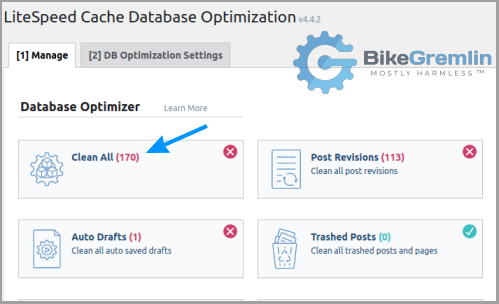
Picture 4
Database Table Engine Converter – if there are tables using MyISAM engine, click on the option “Convert to InnoDB.” Do this with all the tables.
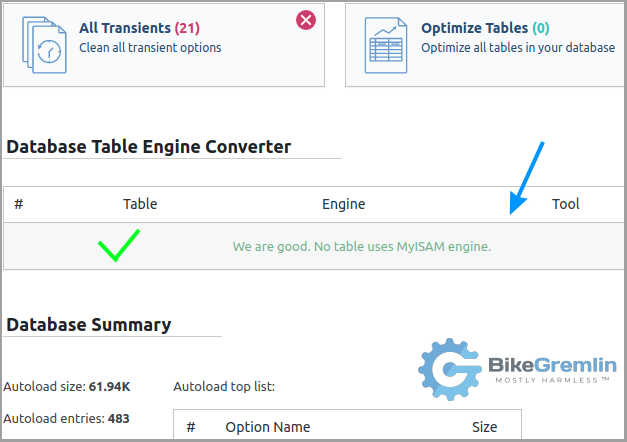
Picture 5
[2] DB Optimization Settings
- Revisions Max Number – 0
- Revisions Max Age – 0
I leave it like this because I “manually” optimize the database after making edits, as shown in picture 4.
3.7. Crawler options
I generally leave everything here to OFF or default settings. Letting cached page versions be created as needed, when a first visitor arrives. You could activate this if you are expecting a sudden huge influx of visitors (a campaign or similar) to many of your website’s pages (so you don’t have to manually visit each one, for the cached version to be created).
I don’t need that – it would only be putting a load on the server, making cached versions even for the very seldom visited pages (unless I manually list them all for exclusion, which also makes no sense). Hence, the options I confirm to be configured are the following:
[4] General Settings
- Crawler – OFF
[6] Sitemap Settings
- Drop Domain from Sitemap – ON. If you’ve neabled the Crawler, and your sitemap contains links from another domain, then set this to OFF.
3.8. Toolbox options
[1] Purge
The Purge All button is useful if you wish to “manually” invalidate (clear) all the cached page versions.
Below is the menu for deleting cache for particular pages (by URL for example), post categories etc.
[2] Import / Export
Here you can export all your LiteSpeed Cache settings to a file, by clicking on the Export button. You will then be asked to choose where you wish to save the .data file on your computer – and how to name it.
This allows you to easily “transport” the staging website configuration to a production website. That is done by clicking on the Choose File button, which will then ask you to choose an export saved on your computer. After you’ve chosen the file, click on the Import button – and it’s done, all your settings have been “transferred” to a new website. 🙂
This is very practical.
To make everyone’s life simpler, I’ve exported the settings as they’ve been shown in this article. I only left the Server IP field empty – you should enter your server’s IP address there (General options).
Here you can download the BikeGremlin LiteSpeed configuration. You can just unzip the downloaded .zip file and import it with your LiteSpeed Cache plugin.
Update 2022:
I’ve created a newer setup for websites that don’t use AMP: BikeGremlin LiteSpeed configuration – no AMP (note that Memcached Object Cache is disabled with this config, since it doesn’t work at this moment – hope LiteSpeed fixes this soon).
Important note: it is risky just downloading stuff like this from the Internet and importing them to your website. It would have been a lot safer if LiteSpeed made something similar on their official website (with several different typical configuration profiles). The safest option is to just follow this tutorial and configure it all manually, on a staging website. A second, a bit less safe option, is to import my settings to a staging website version. Whatever it is you are changing, test it first on staging, before importing it to your production website.
[3] Edit .htaccess
Cool – you can edit the contents of your .htaccess file from WordPress if you like, and if you know what you are doing. 🙂
[4] Heartbeat
I set all this to OFF. Letting the stuff get triggered by visitors, and leaving the server alone when there aren’t any.
[5] Report
Basic info that could be sent to an expert helping with troubleshooting.
[6] Debug Settings
All to OFF if the website is working. Enable debug logs only if you are having some problems (ideally, in a staging environment).
[7] Log View
Here, you’ll be able to see the logs, if you’ve enabled them in the Debug Settings.
[8] Beta Test
If you wish to help the LiteSpeed Cache plugin development by testing the beta versions and sending your feedback to the developers, use one of the available options here. It’s all nicely explained, I don’t think I should add anything here.
4. Testing the configuration
Every website change should first be implemented in a staging environment, thoroughly tested – only then implemented on the production site, with more testing just to confirm it’s all good.
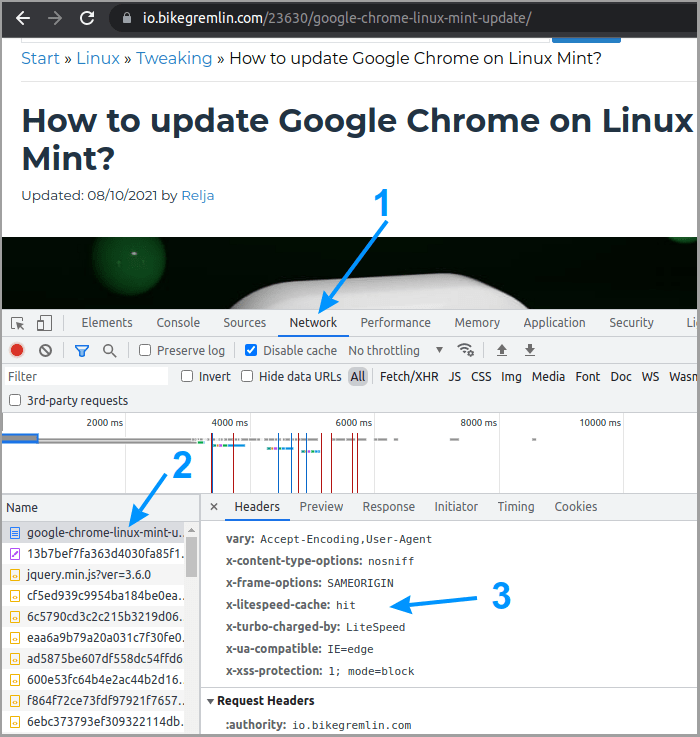
How to test it? A good start is by opening an anonymous Chrome browser window (CTRL+SHIFT+N), pressing the F12 key, and then opening (visiting) a website page.
In the Network options, when you click on your website’s page, it should read: “x-litespeed-cache: hit”. If that’s not visible upon the first page visit, it should show after refreshing the page (by pressing the F5 key).
Picture 6
If you wish to be really thorough, you could do the following (again, on a staging website version):
- Using FTP, replace one of the images of the page you are testing with another image, but use the same file name (save the original image backup copy, just in case).
- Refresh the page (F5).
If the new image is shown instead of the old one, it means your caching isn’t working properly. Test this using an anonymous browser window as explained at the start of this chapter, with the “Disable cache” checkbox enabled, as shown in picture 6 above.
Test if all the website pages and functions are working properly. If visitors sometimes log in to your site, test it as a logged-in visitor.
5. Conclusion
As I said at the start, LiteSpeed Cache works great with default settings. They are configured to provide a noticeable performance boost, without the risk of anything not working on a website. This article is intended if you wish to slightly further improve that.
Any additions, improvements, and especially corrections are more than welcome – use the comment section below.
If you have any questions, a good place to start is the LowEndSpirit forum’s WordPress section.
Last updated:
Originally published:


The best guide I have ever seen written! Followed it to set the plugin up myself.
Hello, I have a question about LiteSpeed Cache. Whether there are positive differences in website speed – you need to use these third-party cloud and redis services in this plugin. And why, after installing this plugin, the database is many times larger. I have a small website on the lite speed server https://totemat.pl/ and I do not know why it is that when I run this plugin, the website works a bit slower – according to google page speed. What could be the reason?
LiteSpeed server and plugin do rely on some other services, as does a lot of other software. Tech. stack is getting more and more complex as more functionalities and options are added (with all the pros and cons of that).
Currently, LiteSpeed won’t work with Memcached (this problem exists since April 2022), and it won’t allow for isolated Redis instances for each user (this problem has existed from the start). They did announce a solution for this (can’t find it now), that they will charge extra, per user/instance. Guess it’s about the money.
Despite the object cache not working, LiteSpeed does perform better than the other WordPress cache solutions I’ve tested (though, without the object cache possible to do safely on shared/reseller hosting, for large WooCommerce shops, I would expect WP Rocket to perform faster).
So, having seen your website, I think the problem could be with your LiteSpeed configuration (either how the server is installed & configured, and/or how the WordPress plugin is configured). Or, it could just be a slow (or overloaded) server (the biggest problem is the very slow initial server response time, the rest looks OK).
For the embedded YouTube videos, you could try the free plugin WP YouTube Lyte (WP.org link). That should help with every page that has a YouTube video embedded.
Hope this helps at least a bit. 🙂